.NET 6
Endless Lifecycle Support (ELS) for .NET 6 from TuxCare provides security fixes for .NET 6 that has reached its end of life. This allows you to continue running .NET 6 applications without vulnerability concerns, even after official support has ended.
Supported Windows Versions
| OS | Version | Architectures |
|---|---|---|
| Nano Server | 2019, 2022 | x64 |
| Windows | 11 (24H2 (IoT), 24H2 (E), 24H2, 23H2, 22H2 (E)), 10 (22H2 (E), 21H2 (E), 21H2 (IoT), 1809 (E), 1607 (E)) | x64, x86 |
| Windows Server | 23H2, 2022, 2019, 2016, 2012-R2, 2012 | x64, x86 |
| Windows Server Core | 2022, 2019, 2016, 2012-R2, 2012 | x64, x86 |
Supported .NET 6 Versions
SDK 6.0.x The .NET SDK (Software Development Kit) is the recommended option if you plan to develop, build, test, or publish .NET 6 applications. It includes:
- The .NET Runtime, which is required to run .NET apps.
- The ASP.NET Core Runtime, so you can develop and host ASP.NET Core web applications out of the box.
- The .NET CLI and build tools for compiling and managing your .NET 6 projects.
With the SDK, you won't need to install separate runtimes for ASP.NET Core or the Desktop environment - everything is bundled together to streamline development and deployment.
ASP.NET Core Runtime 6.0.x The ASP.NET Core Runtime contains the components needed to run ASP.NET Core web applications on .NET 6. It includes libraries and features for building dynamic web pages, RESTful APIs, and real-time communication with SignalR.
Note: If you install the full .NET SDK, you already get the ASP.NET Core Runtime.
.NET Desktop Runtime 6.0.x The .NET Desktop Runtime allows you to run Windows desktop applications built with Windows Forms or WPF (Windows Presentation Foundation). It focuses on providing a smooth experience for traditional graphical apps on Windows platforms.
.NET Runtime 6.0.x The .NET Runtime is the base runtime required to run console or server-based .NET applications. It's more lightweight than the SDK, since it does not include compilers, build tools, or additional libraries for web or desktop development.
TuxCare applies security patches to .NET 6 for the above OS versions, ensuring continued stability and security even beyond the official end-of-life date.
Vulnerability Coverage and Target Response Times
TuxCare employs the Common Vulnerability Scoring System (CVSS v3) to assess the severity of security vulnerabilities. Our severity rating system for patching vulnerabilities integrates both NVD scoring and vendor scoring (when available). When the vendor's score is lower than the NVD score, we prioritize the NVD score.
Aligning with many industry standards and regulatory requirements, TuxCare is committed to delivering timely security updates. For instance, the Payment Card Industry Data Security Standard (PCI DSS) mandates that all 'High' vulnerabilities (CVSS score of 7.0+) must be addressed within 30 days. Other regulations and standards, such as the Health Insurance Portability and Accountability Act (HIPAA) for healthcare or the Federal Information Security Management Act (FISMA) for government agencies, uphold similar requirements.
TuxCare will make commercially reasonable efforts to adhere to the following guidelines when addressing vulnerabilities:
- High and Critical CVEs (CVSS 7+): Patches provided within 14 days
- Medium-severity CVEs (CVSS 4.0 to 6.9): Patches provided within 60 days
- Low-severity CVEs: Patches may be provided upon custom request
- TuxCare may offer a mitigation strategy as an alternative to a direct code fix.
Incident Reporting and Response Timeframe
Customers can report vulnerabilities by submitting a ticket through the TuxCare Support Portal https://tuxcare.com/support-portal/. TuxCare commits to providing an initial response to any reported issue within 3 days.
Requests for customer-directed security patches for CVEs that are outside of the ELS for .NET scope will be reviewed within 3 working days. If the request is accepted, we will provide the patch within the next 60 days.
Handling Multiple Vulnerabilities: In cases where several CVEs are reported simultaneously for fixing, TuxCare will discuss and agree upon resolution timelines separately with the customer.
Technical Support
TuxCare provides technical support according to the support policy. It delivers 24/7/365 access to the TuxCare’s support team through the TuxCare Support Portal https://tuxcare.com/support-portal/ and to the TuxCare’s online knowledge base.
Enhanced Transparency & Visibility
TuxCare's commitment to transparency and visibility is foundational to our ELS for .NET offering. We aim to provide comprehensive details about how each package is built, verified, and distributed, ensuring complete trust in the software supply chain.
- SLSA Compliance: All packages are built and signed to ensure verifiable Supply-chain Levels for Software Artifacts (SLSA) compliance. They are securely constructed from vetted sources, include attestations for all dependencies, and undergo continuous testing to maintain integrity and security.
- Software Bill of Materials (SBOM): We provide complete visibility into the software supply chain with a comprehensive inventory of every package in the codebase, ensuring transparency and accountability in your software ecosystem.
Note: This feature is under consideration for future development and may be available at a later date. If you are interested, please contact sales@tuxcare.com
- Verifiable Integrity and Provenance: Our packages and metadata provide comprehensive end-to-end provenance, detailing how each package was constructed and tested, ensuring that all components in your software stack are trustworthy.
Note: This feature is under consideration for future development and may be available at a later date. If you are interested, please contact sales@tuxcare.com
- Secure Distribution: Signed versions of the packages and their metadata are distributed from a registry managed, secured, and protected by TuxCare, guaranteeing that your software updates are authentic and untampered.
Installation via the .NET Installer
Prerequisites & System Requirements
- Operating System compatibility - please, check the supported versions section above.
- For system requirements, please refer to the official .NET documentation.
- Administrator rights for installation
- Check if you have .NET already installed on your system:
Open Command Prompt (type
cmdin the search bar) or PowerShell (typepowershellin the search bar) and run the following command:dotnet --versionIf .NET is already installed, the command will return the version number. If it’s not installed, you’ll see an error message.
It’s recommended that you first install the latest version of .NET before uninstalling the old one. This ensures a smooth transition without breaking the dependencies.
Installation Steps
- Obtain the required license to get access to the service.
- Contact sales@tuxcare.com to receive the necessary steps for generating your unique access link (tokenized URL). Anonymous access is restricted.
- Follow the provided instructions to create your secure download link.
- Use this link to access and download .NET 6 files.
- Choose the appropriate runtime:
- .NET SDK - Includes everything needed for development, including the runtime and build tools.
- .NET Runtime - Runs .NET applications but does not include development tools.
- .NET Runtime Desktop - Required for running desktop applications built with .NET.
- ASP.NET Core Runtime - Needed for running web applications and services built with ASP.NET Core. For more information please refer to the official .NET documentation.
- Download the corresponding installer based on your system type (x64 or x86). Downloading the latest version is recommended.
- .NET SDK - Installed via an .exe installer.
- .NET Runtime, .NET Runtime Desktop, and ASP.NET Core Runtime – Installed via .msi files.
In certain versions of some browsers (for example, Edge), you might see a warning after downloading. In this case, manually allow the download.
Note: The following steps use the .NET SDK installation as an example. If you are installing a runtime instead, follow a similar process using the corresponding .msi file.
Once the installer is downloaded, double-click the file to run it. You’ll see a dialog window. Follow the on-screen instructions:
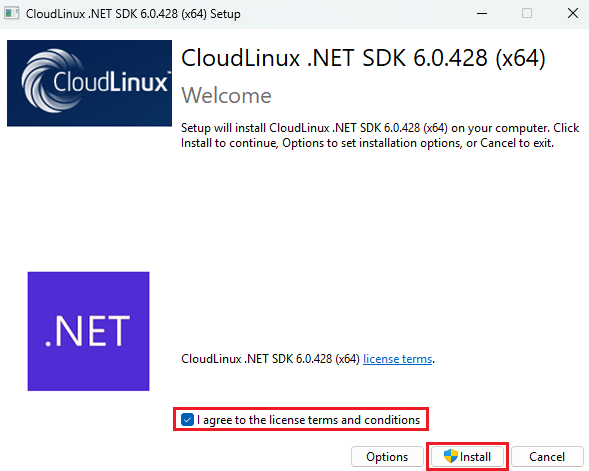
- Accept the license agreement.
- Click Install and wait for the process to complete. It should only take a few minutes.
- Once the installation is finished, click Close.
Verify the installation. Open Command Prompt (type
cmdin the search bar) or PowerShell (typepowershellin the search bar) to confirm that .NET was installed successfully:dotnet --versionExample output:
6.0.429
Start Using .NET
Now that .NET is installed, you are ready to start using it. You can create and run .NET applications using the command-line tools or Visual Studio/Visual Studio Code.
If you’re new to .NET, we recommend visiting the official .NET documentation for a deeper understanding of the platform.
Create and Run a Test Project
For a quick start, you can follow this example to create and run a simple console application:
Open Command Prompt (type
cmdin the search bar) or PowerShell (typepowershellin the search bar).Run the following command to create a new console application:
dotnet new console -o MyTestAppExample output:
Welcome to .NET 6.0!
---------------------
SDK Version: 6.0.429

----------------------------------------------------------------------------
The template "Console App" was created successfully.

Processing post-creation actions...
Running 'dotnet restore' on C:\Users\user\MyTestApp\MyTestApp.csproj...
  Determining projects to restore...
  Restored C:\Users\user\MyTestApp\MyTestApp.csproj (in 115 ms).
Restore succeeded.
Navigate to the newly created folder:
cd MyTestAppBuild and run the application:
dotnet runWhen executed, you should see the following output:
Hello, World!
Useful Commands
The following commands are useful for managing and troubleshooting .NET installation.
where.exedotnet locates the dotnet executable on the system. The output shows the exact path where the dotnet command is installed. By default, the .NET installation is placed in the Program Files\dotnet folder, unless a different destination is chosen during setup.where.exe dotnetExample output:
C:\Program Files\dotnet\dotnet.exedontet --infodisplays information about the installed .NET SDKs, runtimes and your OS. It also verifies the .NET is correctly set up.dotnet --infoExample output:
.NET SDK (reflecting any global.json):
 Version:   6.0.429
 Commit:    ef6f5ce48c

Runtime Environment:
 OS Name:     Windows
 OS Version:  10.0.22631
 OS Platform: Windows
 RID:         win10-x64
 Base Path:   C:\Program Files\dotnet\sdk\6.0.429\

global.json file:
  Not found

Host:
  Version:      6.0.36
  Architecture: x64
  Commit:       N/A

.NET SDKs installed:
  6.0.429 [C:\Program Files\dotnet\sdk]

.NET runtimes installed:
  Microsoft.AspNetCore.App 6.0.36 [C:\Program Files\dotnet\shared\Microsoft.AspNetCore.App]
  Microsoft.NETCore.App 6.0.36 [C:\Program Files\dotnet\shared\Microsoft.NETCore.App]
  Microsoft.WindowsDesktop.App 6.0.36 [C:\Program Files\dotnet\shared\Microsoft.WindowsDesktop.App]

Download .NET:
  https://aka.ms/dotnet-download

Learn about .NET Runtimes and SDKs:
  https://aka.ms/dotnet/runtimes-sdk-info
dotnet –list-sdkscommand lists all the .NET SDKs installed on your system. It’s recommended to uninstall the old .NET version after you install a new one.dotnet --list-sdksExample output:
6.0.429 [C:\Program Files\dotnet\sdk]
NuGet Repository (Optional)
Developers working on .NET projects may need a NuGet repository to manage and share packages across projects. TuxCare provides a shared NuGet repository, which you can add with a simple command:
dotnet nuget add source \
  https://nexus.repo.tuxcare.com/repository/els_dotnet/index.json \
  --name TuxCare \
  --username $USERNAME \
  --password $PASSWORD
Replace $USERNAME and $PASSWORD with the credentials provided by sales@tuxcare.com.
Uninstall ELS for .NET 6
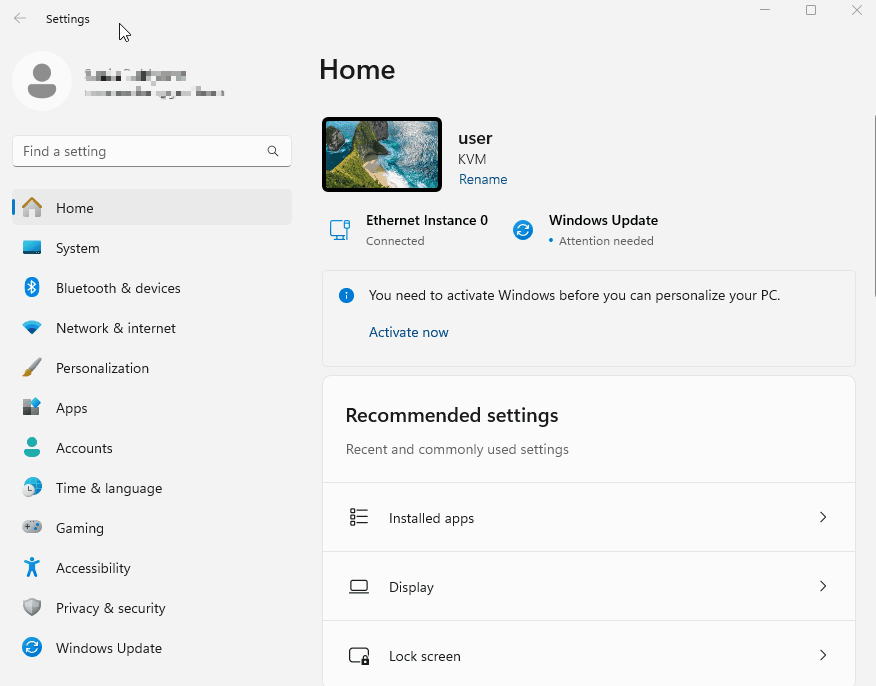
Uninstall via Windows Settings
- Open Settings → Apps → Installed Apps or (Apps&Features on older versions).
- Search for .NET SDK or .NET Runtime depending on what you’ve installed.
- Click on each entry and select Uninstall.
During the uninstall, a "Files in use" window can appear. Select "Do not close applications. A reboot will be required" option and click OK to proceed.
- A dialog window will appear. Click Uninstall. It should take a few minutes. When the process is finished, close the window.
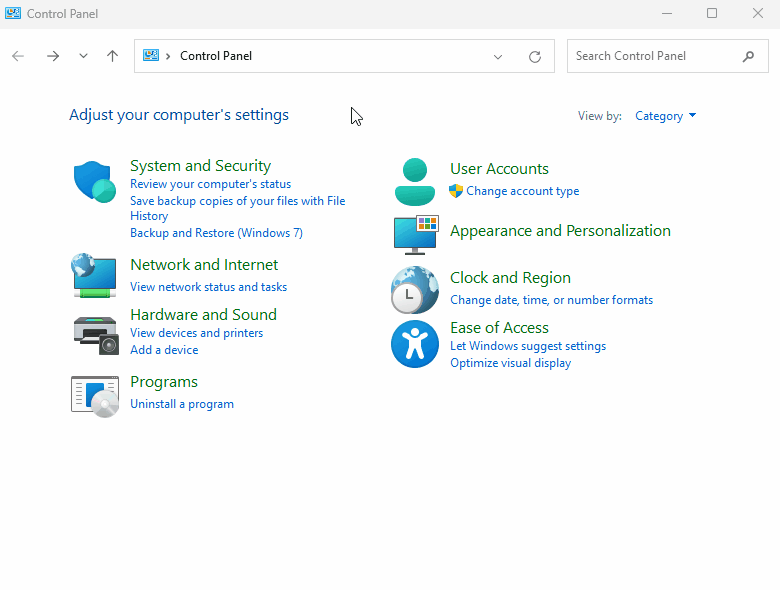
Uninstall via Control Panel
- Open Control Panel → Programs → Programs and Features.
- Search for .NET SDK or .NET Runtime depending on what you’ve installed.
- Right-click on each entry and select Uninstall.
During the uninstall, a "Files in use" window can appear. Select "Do not close applications. A reboot will be required" option and click OK to proceed.
- A dialog window will appear. Click Uninstall. It should take a few minutes. When the process is finished, close the window.
Remove Remaining Files
After uninstalling .NET some files may remain in the following locations:
C:\Program Files\dotnet\C:\Users\<user>\.dotnet\
Consider deleting the folders manually to fully remove .NET.
Frequent Issues
How do I update .NET if a new version is released?
Currently, to update .NET, you need to manually download the latest installer and follow the installation steps described above. After installing the new version, it’s recommended to remove the previous one. In the future, an automatic update mechanism for the components will be provided.
What should I do if there are conflicts during installation?
If you encounter conflicts, try uninstalling the previous version before installing the new one. In most cases, .NET versions can coexist without issues, but removing the older version may help resolve compatibility problems.