PHP
Endless Lifecycle Support (ELS) for PHP from TuxCare provides security fixes for PHP versions that have reached their end-of-life. This allows you to continue running your server vulnerability-free.
About ALT-PHP
alt-php (also known as "CloudLinux PHP Selector") is a component provided by CloudLinux designed for managing PHP versions on web servers and enabling users to choose PHP versions for their websites.
Here are the key features and characteristics of alt-php:
Multiple PHP Versions - alt-php allows the installation and usage of various PHP versions on a single web server. This enables users to select the PHP version that best suits their web applications.
User Segmentation - alt-php allows hosting providers and web server administrators to provide different PHP versions for different users. Each user can choose the PHP version that suits their website.
Enhanced Compatibility - alt-php is designed to ensure maximum compatibility with various web applications and frameworks. This includes optimizations and changes to make it compatible with a wide range of PHP applications.
Updates and Support - CloudLinux provides regular updates for alt-php, including bug fixes, performance improvements, and updates for new PHP versions. This helps ensure the security and currency of PHP usage.
Management Tools - alt-php usually comes with a set of management tools, such as PHP Selector, allowing users to manage PHP versions and enable/disable various PHP extensions.
alt-php provides a more flexible and convenient environment for working with different PHP versions on a single server, which is particularly useful in a web hosting environment where multiple users have varying requirements for PHP versions for their web applications.
Supported OS and PHP versions
Supported architecture: 64-bit.
| OS | Package Type | OS Version | PHP Version |
|---|---|---|---|
| CentOS, CloudLinux, OracleLinux, etc. | RPM | 7.x, 8.x, 9.x | 5.2, 5.3, 5.4, 5.5, 5.6, 7.0, 7.1, 7.2, 7.3, 7.4, 8.0, 8.1, 8.2, 8.3, 8.4 |
| AlmaLinux | RPM | 8.x, 9.x | 5.2, 5.3, 5.4, 5.5, 5.6, 7.0, 7.1, 7.2, 7.3, 7.4, 8.0, 8.1, 8.2, 8.3, 8.4 |
| Amazon Linux 2 | RPM | - | 5.2, 5.3, 5.4, 5.5, 5.6, 7.0, 7.1, 7.2, 7.3, 7.4, 8.0, 8.1, 8.2, 8.3, 8.4 |
| Ubuntu | DEB | 16.04, 18.04, 20.04, 22.04, 24.04 | 5.6, 7.0, 7.1, 7.2, 7.3, 7.4, 8.0, 8.1, 8.2, 8.3, 8.4 |
| Debian | DEB | 10, 11, 12 | 5.6, 7.0, 7.1, 7.2, 7.3, 7.4, 8.0, 8.1, 8.2, 8.3, 8.4 |
| Windows | - | Windows Server 2019, 2022, 2025 | 5.6, 7.2, 7.3, 7.4 , 8.0, 8.1 |
Other distros and architectures upon request.
Vulnerability Coverage and Target Response Times
TuxCare employs the Common Vulnerability Scoring System (CVSS v3) to assess the severity of security vulnerabilities. Our severity rating system for patching vulnerabilities integrates both NVD scoring and vendor scoring (when available). When the vendor's score is lower than the NVD score, we prioritize the NVD score.
Aligning with many industry standards and regulatory requirements, TuxCare is committed to delivering timely security updates. For instance, the Payment Card Industry Data Security Standard (PCI-DSS) mandates that all 'High' vulnerabilities (CVSS score of 7.0+) must be addressed within 30 days. Other regulations and standards, such as the Health Insurance Portability and Accountability Act (HIPAA) for healthcare or the Federal Information Security Management Act (FISMA) for government agencies, have similar requirements.
TuxCare will make commercially reasonable efforts to adhere to the following guidelines when addressing vulnerabilities:
- High and Critical CVEs (CVSS 7+): Patches provided within 14 days
- Medium-severity CVEs (CVSS 4.0 to 6.9): Patches provided within 60 days
- Low-severity CVEs: Patches provided within 90 days
- TuxCare may offer a mitigation strategy as an alternative to a direct code fix.
Incident Reporting and Response Timeframe
Customers can report vulnerabilities by submitting a ticket through the TuxCare Support Portal https://tuxcare.com/support-portal/. TuxCare commits to providing an initial response to any reported issue within 3 days.
Requests for customer-directed security patches for CVEs that are outside of the ELS for PHP scope will be reviewed within 3 working days. If the request is accepted, we will provide the patch within the next 60 days.
Handling Multiple Vulnerabilities: In cases where several CVEs are reported simultaneously for fixing, TuxCare will discuss and agree upon resolution timelines separately with the customer.
Enhanced Transparency & Visibility
TuxCare's commitment to transparency and visibility is foundational to our ELS for PHP offering. We provide comprehensive details about how each package is built, verified, and distributed, ensuring complete trust in the software supply chain.
- SLSA Compliance: All packages are built and signed to ensure verifiable Supply-chain Levels for Software Artifacts (SLSA) compliance. They are securely constructed from vetted sources, include attestations for all dependencies, and undergo continuous testing to maintain integrity and security.
- Software Bill of Materials (SBOM): We provide complete visibility into the software supply chain with a comprehensive inventory of every package in the codebase, ensuring transparency and accountability in your software ecosystem.
Note: This feature is under consideration for future development and may be available at a later date. If you are interested, please contact sales@tuxcare.com
- Enhanced Metadata in Standard Formats: Each SBOM is provided in universally recognized formats such as SPDX and VEX. These include enhanced metadata like artifact analysis, package health, and vulnerability impact data, ensuring that you have the most detailed and actionable information at your fingertips.
- Verifiable Integrity and Provenance: Our packages and metadata provide comprehensive end-to-end provenance, detailing how each package was constructed and tested, ensuring that all components in your software stack are trustworthy.
Note: This feature is under consideration for future development and may be available at a later date. If you are interested, please contact sales@tuxcare.com
- Secure Distribution: Signed versions of the packages and their metadata are distributed from a registry managed, secured, and protected by TuxCare, guaranteeing that your software updates are authentic and untampered.
Technical Support
TuxCare provides technical support according to the support policy . It delivers 24/7/365 access to the TuxCare’s support team through the TuxCare Support Portal https://tuxcare.com/support-portal/ and to the TuxCare’s online knowledge base.
Installation Instructions for Linux
Get user credentials
- Obtain the required license to get access to the service.
- Contact sales@tuxcare.com to receive instructions for generating your unique access link (tokenized URL). Anonymous access is restricted.
Install ALT-PHP
The following steps are provided for both RPM-based (CentOS, CloudLinux, Oracle Linux, AlmaLinux, Amazon Linux 2, etc) and DEB-based (Debian, Ubuntu) systems. Please select the appropriate tab for your distribution.
Amazon Linux 2-specific preprequisities. Before installing alt-php, make sure libvpx is installed. Amazon Linux 2 provides two version of libvpx: 1.9 (the default) and 1.3. alt-php requires 1.3 for compatibility with EL 7 systems like CentOS 7:
sudo yum install libvpx-1.3.0
Download the installer script:
wget https://repo.alt.tuxcare.com/alt-php-els/install-els-alt-php-rpm-repo.shRun the installer script with keys. The installation script registers the server in the CLN with the key, adds the yum repository, and adds a PGP key to the server.
sh install-els-alt-php-rpm-repo.sh --license-key XXX-XXXXXXXXXXXXVerify that the installation was successful.
To ensure the installation has been completed successfully, run the following command. It should return info about a package. If information about the package is available it means that installation was successful. After which, updates will be available for installation from the repository using the usual command:
yum upgradeInstall PHP package. Each version of PHP can be installed individually or all versions at once.
Standard commands to install each version separately, for example, installing alt-php73:
yum install alt-php73*To install all versions at the same time:
yum groupinstall alt-phpTo find out which groups/meta-package are available for installation, use the following command:
sudo yum group listFor example:
sudo yum group list
............

Available Environment Groups:
  Server with GUI
  Server
  Minimal Install
  CloudLinux OS Admin (minimal)
  CloudLinux OS Solo (minimal)
  Workstation
  Custom Operating System
  Virtualization Host
Available Groups:
  alt-nodejs
  alt-nodejs10
  alt-nodejs11
  alt-nodejs12
  alt-nodejs14
  alt-nodejs6
  alt-nodejs8
  alt-nodejs9
  alt-php
  alt-php44
  alt-php51
  alt-php52
..................
  alt-ruby30
  alt-ruby31
  alt-ruby32
To get a list of packages of a specific group or meta package, use the following command:
sudo yum groupinfo alt-phpXYReplace
XYwith a version of alt-php. For example:sudo yum groupinfo alt-php72 ............ Group: alt-php72 Description: PHP 7.2.x packages for CloudLinux OS PHP Selector Default Packages: alt-php72 alt-php72-bcmath alt-php72-brotli alt-php72-cli alt-php72-common alt-php72-dba alt-php72-devel ................ alt-php72-xml alt-php72-xmlrpc
Important!
When executing the
aptcommand, a warning may appear:WARNING: apt does not have a stable CLI interface. Use with caution in scripts.The
aptcommandline is designed as an end-user tool and it may change behavior between versions. While it tries not to break backward compatibility this is not guaranteed either if a change seems beneficial for interactive use. All features ofaptare available in dedicated APT tools likeapt-getandapt-cacheas well.aptjust changes the default value of some options. Therefore, we recommend using these commands (potentially with some additional options enabled) as they keep backward compatibility as much as possible.
Useful Commands and Usage of PHP ELS
When you deploy an updated version of PHP through PHP ELS, using your system's regular update tool (yum, dnf, apt) the new version will be installed under /opt/alt/php[version]/. This means that all modules, configurations and additional files pertaining to this version will be contained inside that path. Different versions of PHP will each have their own path and can coexist without issues on the same system. Below you will find the location of all the relevant files, should you want to make any changes.
To check whether the package is installed and see its current version, use the following command based on your OS:
sudo yum list installed | grep phpFor example, alt-php73:
sudo yum list installed | grep php
  ............
  alt-php-config.noarch                       1-54.el8                                               @cloudlinux-updates-testing
  alt-php-internal.x86_64                     7.4.33-6.el8                                           @cloudlinux-updates-testing
  alt-php-internal-cli.x86_64                 7.4.33-6.el8                                           @cloudlinux-updates-testing
  alt-php-internal-common.x86_64              7.4.33-6.el8                                           @cloudlinux-updates-testing
  alt-php-internal-intl.x86_64                7.4.33-6.el8                                           @cloudlinux-updates-testing
  alt-php-internal-mbstring.x86_64            7.4.33-6.el8                                           @cloudlinux-updates-testing
  alt-php-libc-client11.x86_64                2007f-3.el8                                            @cloudlinux-updates-testing
  alt-php-ssa.x86_64                          0.4-3.el8                                              @AppStream

  alt-php73.x86_64                            1:7.3.33-18.el8                                        @cloudlinux-updates-testing
  alt-php73-apm-agent.x86_64                  1.9.0-1.el8                                            @cloudlinux-updates-testing
  alt-php73-bcmath.x86_64                     1:7.3.33-18.el8                                        @cloudlinux-updates-testing
  alt-php73-bcmath-debuginfo.x86_64           1:7.3.31-2.el8                                         @cloudlinux-updates-testing
  alt-php73-brotli.x86_64                     0.5.0-2.el8                                            @cloudlinux-x86_64-server-8
  .....................
alt-php73-xmlrpc-debuginfo.x86_64 1:7.3.31-2.el8 @cloudlinux-updates-testingInstallation Instructions for Windows
Get user credentials
- Obtain the required license to get access to the service.
- Contact sales@tuxcare.com to receive instructions for generating your unique access link (tokenized URL). Anonymous access is restricted.
Download and Install TuxCare PHP Windows
TuxCare provides a Windows Installer that allows you to install and manage ELS PHP versions.
Follow the instructions provided by sales@tuxcare.com to create your secure download link.
Use this link to download the latest version of the installer.
Launch the installer. After the first run, it will appear under Settings > Apps.
Provide you access credentials:
- Register - if this is your first time using the installer or you're installing on a new system, choose the "Register" option. You’ll be asked to provide your license key or authentication token. You can also save your token for future use.
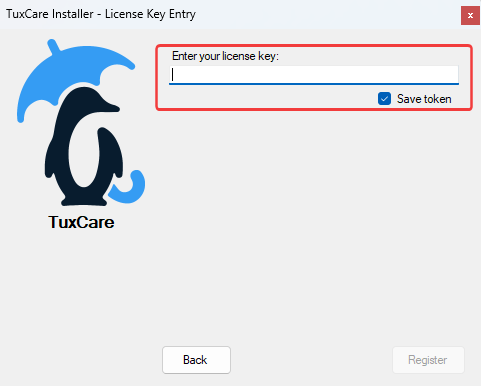
- Use previous token - if you’ve already registered on this machine and chose to save your credentials, the installer will detect and use the saved token automatically. You won’t need to enter your credentials again unless the token is missing or expired.
Select a PHP version and tick the checkbox next to it. Only 1 version can be installed per installation.

If you already have a version installed, it will appear highlighted in green. When another version is selected, the installer will ask whether to replace the existing one or install it alongside.

Choose Installation Path. By default, the installer will use
C:\Program Files. Click Change if you want to install to a different location.Click Load to fetch the required PHP archive. Once the archive is loaded, a list of available PHP modules will appear. Select the modules you need and click Continue to confirm.

During installation, the installer will create a folder with PHP configuration and selected modules, and add TuxCare PHP to the System PATH (advanced settings).
Click to see more
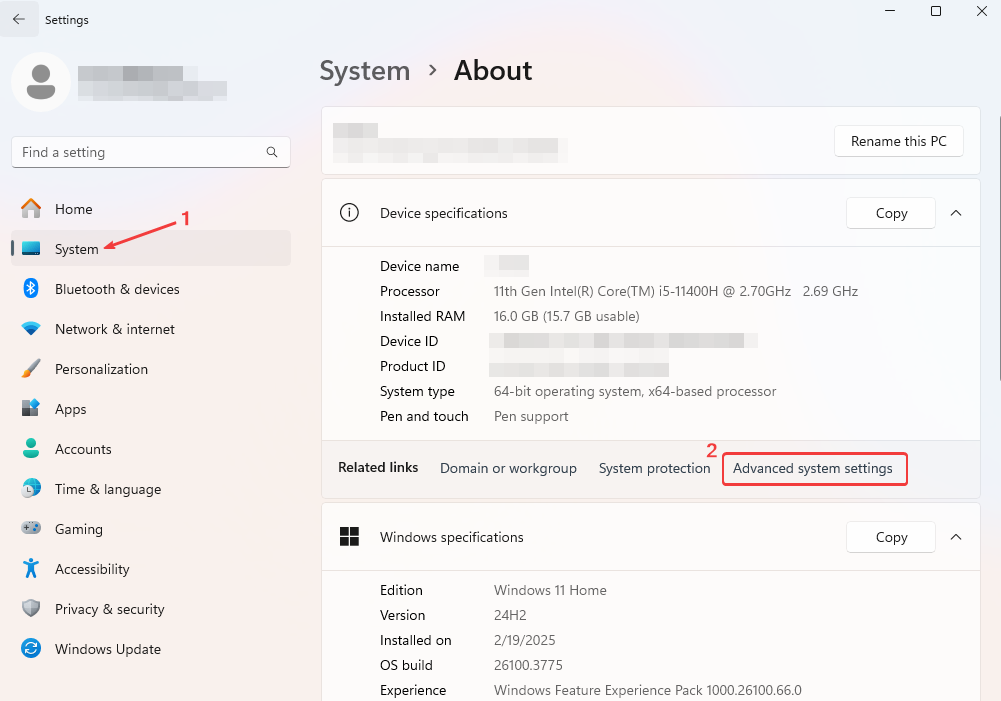
- Right-click This PC and select Properties, or search for Settings > System > About in the Start menu.
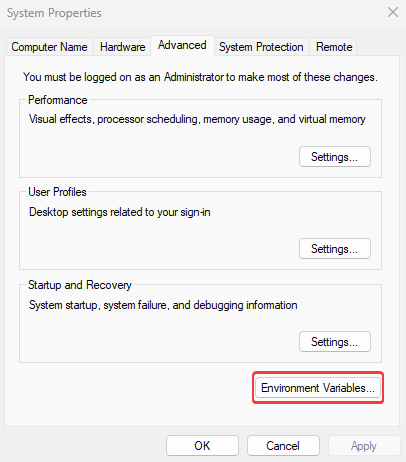
- Click Advanced system settings.
- Click on Environment Variables.
- Under System variables, find Path and click Edit.
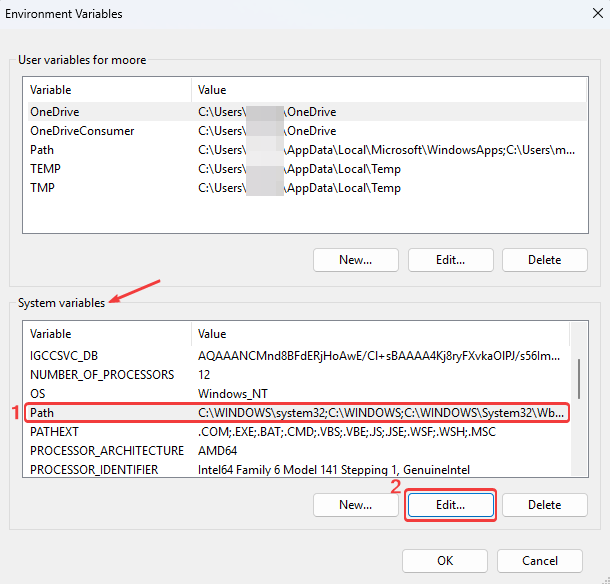
- You will see your PHP
C:\PHPdirectory added.
Wait for the installation process to complete.
Validate the Installation
To confirm PHP is working:
Open Command Prompt, PowerShell, or Terminal.
Run the following command:
php -vYou should see output like this:
PHP 5.6.40 (cli) (built: May 30 2025 15:43:43)
Copyright (c) 1997-2016 The PHP Group
Zend Engine v2.6.0, Copyright (c) 1998-2016 Zend Technologies
Additional configurations (optional)
Depending on your ELS PHP usage purpose, additional configurations may be required. Here are some commonly useful configurations.
Change Default PHP Version
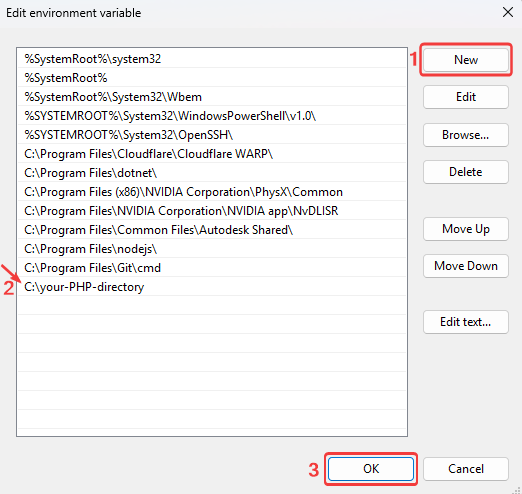
If you have multiple PHP versions installed and want to change the default, update your System Path environment variable:
Open Settings > System > About in the Start menu.
Click Advanced system settings.
Click on Environment Variables.
Under System variables, find Path and click Edit.
- Move the desired PHP version’s path to the top.
- Remove or move down other PHP paths.
Click OK and restart your terminal
Verify the active PHP version by running:
php -v
Extensions
To enable or disable extensions in your installed PHP version:
Navigate to your PHP installation directory, e.g.
C:\PHPdirectory.Open the
php.inifile in an editor of your choice (e.g. Notepad).Edit the list of extensions:
- To enable an extension, remove the semicolon
;at the beginning of the line. - To disable an extension, add a semicolon
;at the beginning of the line.
Example:
;extension=curl extension=gd2 ;extension=mbstring extension=mysqli extension=pdo_mysql- To enable an extension, remove the semicolon
Increase Upload/Memory Limits
If you're integrating PHP with applications like WordPress, you might need to increase memory and upload size limits:
Open the
php.inifile in an editor of your choice (e.g. Notepad).Set the limits as needed, e.g:
upload_max_filesize=40M
post_max_size=40M
memory_limit=256M
Example Use Cases
You can integrate PHP with other tools, for example, IIS or WordPress. For further details and documentation, refer to the official PHP documentation.
Uninstallation
Uninstall a PHP version,
To uninstall a PHP version:
Manually delete the PHP installation directory (e.g.,
C:\Program Files\TuxCare\php-version).Remove the PHP path from System Path.
Uninstall TuxCare Installer
To uninstall TuxCare Installer:
Open Settings > Apps.
Find TuxCare Installer and click Uninstall to remove it from the list of installed apps.
OVAL data
This section contains information about available ELS for PHP OVAL streams that can be used by vulnerability scanners.
TuxCare PHP ELS OVAL Streams
Currently, we provide OVAL data for the following OS versions:
- EL 7 (CentOS, CloudLinux, OracleLinux, Amazon Linux 2, etc.): oval.xml
- EL 8 (AlmaLinux, CentOS, CloudLinux, OracleLinux, etc.): oval.xml
- EL 9 (AlmaLinux, CentOS, CloudLinux, etc.): oval.xml
- Ubuntu 16.04: oval.xml
- Ubuntu 18.04: oval.xml
- Ubuntu 20.04: oval.xml
- Ubuntu 22.04: oval.xml
- Ubuntu 24.04: oval.xml
- Debian 10: oval.xml
- Debian 11: oval.xml
- Debian 12: oval.xml
How to use OVAL
OVAL can be used with the OpenSCAP tool.
Install OpenSCAP
yum install openscap openscap-utils scap-security-guide -yDownload an OVAL stream. For example, EL 8:
wget https://security.tuxcare.com/oval/els_alt_php/el8/oval.xmlRun a scan:
oscap oval eval --results result.xml --report report.xml oval.xml
Common Security Advisory Framework
Common Security Advisory Framework (CSAF) is a machine-readable format, standardized by OASIS. It's designed to enable consistent and automated sharing of security advisory information.
TuxCare publishes the following CSAF files at security.tuxcare.com:
- CSAF Vulnerability Exploitability eXchange (VEX) files – indexed by CVE VEX documents are available in CSAF 2.0 format, including past CVEs.
- CSAF Security Advisory files – advisories are published in CSAF 2.0 format and indexed by Security Advisory.
provider-matadata.json contains information for tools and users about where and how to retrieve CSAF advisories published by TuxCare. By OASIS requirements, it is available at two URLs (both serving the same file):
TuxCare CSAF data
Currently, we provide CSAF data for the following OS versions:
- EL 7 (CentOS, CloudLinux, OracleLinux, Amazon Linux 2, etc.): security.tuxcare.com/csaf/v2/els_alt_php/el7/
- EL 8 (AlmaLinux, CentOS, CloudLinux, OracleLinux, etc.): security.tuxcare.com/csaf/v2/els_alt_php/el8/
- EL 9 (AlmaLinux, CentOS, CloudLinux, etc.): security.tuxcare.com/csaf/v2/els_alt_php/el9/
- Ubuntu 16.04: security.tuxcare.com/csaf/v2/els_alt_php/ubuntu16.04/
- Ubuntu 18.04: security.tuxcare.com/csaf/v2/els_alt_php/ubuntu18.04/
- Ubuntu 20.04: security.tuxcare.com/csaf/v2/els_alt_php/ubuntu20.04/
- Ubuntu 22.04: security.tuxcare.com/csaf/v2/els_alt_php/ubuntu22.04/
- Ubuntu 24.04 security.tuxcare.com/csaf/v2/els_alt_php/ubuntu24.04/
- Debian 10: security.tuxcare.com/csaf/v2/els_alt_php/debian10/
- Debian 11: security.tuxcare.com/csaf/v2/els_alt_php/debian11/
- Debian 12: security.tuxcare.com/csaf/v2/els_alt_php/debian12/
How to Use CSAF
The CSAF files are published in JSON format which is easy to parse and integrate with other tools - OASIS provides a list of reference tools that support CSAF.
Errata
Currently, we provide errata for the following OS versions:
- EL 7 (CentOS, CloudLinux, OracleLinux, Amazon Linux 2, etc.): security.tuxcare.com/errata/els_alt_php/el7/
- EL 8 (AlmaLinux, CentOS, CloudLinux, OracleLinux, etc.): security.tuxcare.com/errata/els_alt_php/el8/
- EL 9 (AlmaLinux, CentOS, CloudLinux, etc.): security.tuxcare.com/errata/els_alt_php/el9/
- Ubuntu 16.04: security.tuxcare.com/errata/els_alt_php/ubuntu16.04/
- Ubuntu 18.04: security.tuxcare.com/errata/els_alt_php/ubuntu18.04/
- Ubuntu 20.04: security.tuxcare.com/errata/els_alt_php/ubuntu20.04/
- Ubuntu 22.04: security.tuxcare.com/errata/els_alt_php/ubuntu22.04/
- Ubuntu 24.04 security.tuxcare.com/errata/els_alt_php/ubuntu24.04/
- Debian 10: security.tuxcare.com/errata/els_alt_php/debian10/
- Debian 11: security.tuxcare.com/errata/els_alt_php/debian11/
- Debian 12: security.tuxcare.com/errata/els_alt_php/debian12/
PHP extensions list
PHP extensions are modules that extend the functionality of the PHP programming language. These extensions provide additional capabilities for working with various types of data, performing specific tasks, interacting with external resources and supporting various protocols.
The PHP core includes many built-in extensions that provide basic functionality, such as working with databases, string processing, working with images, and others. However, to support more specific tasks and third-party libraries, you can use additional PHP extensions.
| Reflection SPL SimpleXML apc apm ares bcmath bcompiler big_int bitset bloomy bz2 bz2_filter calendar coin_acceptor crack ctype curl date dba dbase dbx dom doublemetaphone eaccelerator enchant exif ffmpeg* | fileinfo filter ftp gd gender geoip geos gettext gmagick gmp gnupg haru hash hidef htscanner http huffman iconv idn igbinary imagick imap inclued inotify interbase intl ioncube_loader | json ldap libxml lzf mailparse mbstring mcrypt memcache memcached mhash mongo msgpack mssql mysql mysqli ncurses oauth odbc opcache openssl pcntl pcre pdo pdo_dblib pdo_firebird | pdo_mysql pdo_oci* pdo_odbc pdo_pgsql pdo_sqlite pgsql phar posix pspell quickhash radius rar readline recode redis rsync session shmop snmp soap sockets sourceguardian spl_types sqlite ssh2 standard stats stem | stomp suhosin sybase_ct sysvmsg sysvsem sysvshm tidy timezonedb tokenizer translit uploadprogress uuid wddx xcache xcache_3 xdebug xhprof xml xmlreader xmlrpc xmlwriter xrange xsl yaf yaz zend_optimizer zip zlib |
* CentOS 7, CloudLinux 7, etc.
Conclusion
As you can see, each version is entirely self-contained, and changing configurations in one will not impact the others, a desired feature in hosting environments.