
PHP
Endless Lifecycle Support (ELS) for PHP from TuxCare provides security fixes for PHP versions that have reached their end-of-life. This allows you to continue running your server vulnerability-free.
About ALT-PHP
alt-php is a component provided by TuxCare designed for managing PHP versions on web servers and enabling users to choose PHP versions for their websites.
Here are the key features and characteristics of alt-php:
Multiple PHP Versions - alt-php allows the installation and usage of various PHP versions on a single web server. This enables users to select the PHP version that best suits their web applications.
User Segmentation - alt-php allows hosting providers and web server administrators to provide different PHP versions for different users. Each user can choose the PHP version that suits their website.
Enhanced Compatibility - alt-php works with a wide range of web applications and frameworks. It includes optimizations and changes that make it compatible with many PHP applications.
Updates and Support - TuxCare provides regular updates for alt-php, including bug fixes, performance improvements, and updates for new PHP versions. This helps ensure the security and currency of PHP usage.
Management Tools - alt-php usually comes with a set of management tools, such as PHP Selector, allowing users to manage PHP versions and enable/disable various PHP extensions.
alt-php provides a more flexible and convenient environment for working with different PHP versions on a single server, which is particularly useful in a web hosting environment where multiple users have varying requirements for PHP versions for their web applications.
Supported OS and PHP Versions
| OS | Package Type | OS Version | PHP versions |
|---|---|---|---|
| EL 6 (CentOS, CloudLinux, Oracle Linux, etc.) | RPM | 6.x | 5.2, 5.3, 5.4, 5.5, 5.6, 7.0, 7.1, 7.2, 7.3, 7.4, 8.0, 8.1, 8.2, 8.3 |
| EL 7 (Amazon Linux 2, CentOS, CloudLinux, Oracle Linux, etc.) | RPM | 7.x | 5.2, 5.3, 5.4, 5.5, 5.6, 7.0, 7.1, 7.2, 7.3, 7.4, 8.0, 8.1, 8.2, 8.3, 8.4, 8.5 |
| EL 8 (AlmaLinux, CentOS, CentOS Stream, CloudLinux, Oracle Linux, etc.) | RPM | 8.x | 5.2, 5.3, 5.4, 5.5, 5.6, 7.0, 7.1, 7.2, 7.3, 7.4, 8.0, 8.1, 8.2, 8.3, 8.4, 8.5 |
| EL 9 (AlmaLinux, CentOS, CloudLinux, Oracle Linux, etc.) | RPM | 9.x | 5.2, 5.3, 5.4, 5.5, 5.6, 7.0, 7.1, 7.2, 7.3, 7.4, 8.0, 8.1, 8.2, 8.3, 8.4, 8.5 |
| EL 10 (AlmaLinux, CloudLinux, Oracle Linux, etc.) | RPM | 10.x | 5.3, 5.4, 5.5, 5.6, 7.0, 7.1, 7.2, 7.3, 7.4, 8.0, 8.1, 8.2, 8.3, 8.4, 8.5 |
| Ubuntu | DEB | 16.04 | 5.5, 5.6, 7.0, 7.1, 7.2, 7.3, 7.4, 8.0, 8.1, 8.2, 8.3 |
| Ubuntu | DEB | 18.04, 20.04 | 5.2, 5.6, 7.0, 7.1, 7.2, 7.3, 7.4, 8.0, 8.1, 8.2, 8.3, 8.4, 8.5 |
| Ubuntu | DEB | 22.04, 24.04 | 5.2, 5.6, 7.0, 7.1, 7.2, 7.3, 7.4, 8.0, 8.1, 8.2, 8.3, 8.4, 8.5 |
| Ubuntu | DEB | 26.04 | 5.6, 7.0, 7.1, 7.2, 7.3, 7.4, 8.0, 8.1, 8.2, 8.3, 8.4, 8.5 |
| Debian | DEB | 10 | 5.6, 7.0, 7.1, 7.2, 7.3, 7.4, 8.0, 8.1, 8.2, 8.3, 8.4, 8.5 |
| Debian | DEB | 11, 12 | 5.6, 7.0, 7.1, 7.2, 7.3, 7.4, 8.0, 8.1, 8.2, 8.3, 8.4, 8.5 |
| Debian | DEB | 13 | 5.2, 5.3, 5.4, 5.5, 5.6, 7.0, 7.1, 7.2, 7.3, 7.4, 8.0, 8.1, 8.2, 8.3, 8.4, 8.5 |
| Alpine Linux | APK | 3.23, 3.24 | 7.3, 7.4, 8.0, 8.1 |
| Windows | - | Windows Server 2019, 2022, 2025 | 5.2, 5.4, 5.6, 7.2, 7.3, 7.4, 8.0, 8.1, 8.2 |
Supported architectures:
- x86_64 — all supported Linux OSes
- aarch64/arm64 — Debian 12 and 13, Alpine Linux 3.23 and later
- Windows — x64 (64-bit) and x86 (32-bit) builds
Other versions and architectures available upon request. Contact [email protected] for more information.
Installation on Linux
Prerequisites
A valid TuxCare ELS license key — contact [email protected] to obtain one
Root or
sudoaccess to the serverAmazon Linux 2-specific. Before installing
alt-php, make surelibvpxis installed. Amazon Linux 2 provides two versions of libvpx: 1.9 (the default) and 1.3.alt-phprequires 1.3 for compatibility with EL 7 systems like CentOS 7:sudo yum install libvpx-1.3.0
Download the installer script
wget https://repo.alt.tuxcare.com/alt-php-els/install-els-alt-php-rpm-repo.shRun the installer script with your license key (see Prerequisites above)
The script registers the server with CLN, adds the PGP key and repository.
sh install-els-alt-php-rpm-repo.sh --license-key XXX-XXXXXXXXXXXXImunify customers
If Imunify360 is installed on the server and has a valid license, you can install alt-php (HardenedPHP) without a separate ELS license key. Run the installer with the
-i(--imunify) option instead of--license-key— your Imunify access credentials are used automatically for repository access:sh install-els-alt-php-rpm-repo.sh --imunifyInstall a PHP version
Each version can be installed individually or all versions at once.
yum groupinstall alt-php73To install all versions at the same time:
yum groupinstall alt-phpVerify the installation
Check that the desired PHP version is installed:
rpm -qa | grep alt-php
Useful Commands and Usage
When you deploy an updated version of PHP through PHP ELS with your system's regular update tool (yum, dnf, apt), the tool installs the new version under /opt/alt/php[version]/. This path contains all modules, configurations and additional files of this version. Each PHP version has its own path, so different versions can coexist without issues on the same system. Below you will find the location of all the relevant files, should you want to make any changes.
To check whether your system has the package and see its current version, use the following command based on your OS:
sudo yum list installed | grep phpPHP Extensions List
The following lists cover the Linux (alt-php) builds of ELS PHP. For ELS PHP for Windows, see PHP Extensions List in the Windows section.
PHP extensions are modules that extend the functionality of the PHP programming language. These extensions provide additional capabilities for working with various types of data, performing specific tasks, interacting with external resources and supporting various protocols.
The PHP core includes many built-in extensions that provide basic functionality, such as working with databases, string processing, working with images, and others. However, to support more specific tasks and third-party libraries, you can use additional PHP extensions.
- Reflection
- SPL
- SimpleXML
- apc
- apm
- ares
- bcmath
- bcompiler
- big_int
- bitset
- bloomy
- bz2
- bz2_filter
- calendar
- coin_acceptor
- crack
- ctype
- curl
- date
- dba
- dbase
- dbx
- dom
- doublemetaphone
- eaccelerator
- enchant
- exif
- ffmpeg*
- fileinfo
- filter
- ftp
- gd
- gender
- geoip
- geos
- gettext
- gmagick
- gmp
- gnupg
- haru
- hash
- hidef
- htscanner
- http
- huffman
- iconv
- idn
- igbinary
- imagick
- imap
- inclued
- inotify
- interbase
- intl
- ioncube_loader
- json
- ldap
- libxml
- lzf
- mailparse
- mbstring
- mcrypt
- memcache
- memcached
- mhash
- mongo
- msgpack
- mssql
- mysql
- mysqli
- ncurses
- oauth
- odbc
- opcache
- openssl
- pcntl
- pcre
- pdo
- pdo_dblib
- pdo_firebird
- pdo_mysql
- pdo_oci*
- pdo_odbc
- pdo_pgsql
- pdo_sqlite
- pgsql
- phar
- posix
- pspell
- quickhash
- radius
- rar
- readline
- recode
- redis
- rsync
- session
- shmop
- snmp
- soap
- sockets
- sourceguardian
- spl_types
- sqlite
- ssh2
- standard
- stats
- stem
- stomp
- suhosin
- sybase_ct
- sysvmsg
- sysvsem
- sysvshm
- tidy
- timezonedb
- tokenizer
- translit
- uploadprogress
- uuid
- wddx
- xcache
- xcache_3
- xdebug
- xhprof
- xml
- xmlreader
- xmlrpc
- xmlwriter
- xrange
- xsl
- yaf
- yaz
- zend_optimizer
- zip
- zlib
* CentOS 7, CloudLinux 7, etc.
Installation on Windows
TuxCare provides three ways to install ELS PHP on Windows: the TuxCare Installer (recommended) — a graphical tool that automates the process, the PowerShell script that does the same from the command line, or manually by downloading and configuring PHP from the repository.
Prerequisites
- A valid TuxCare ELS license key — contact [email protected] to obtain one
- Administrator access to the Windows system
Customers who previously received an authentication token can continue to use it: select Use previous token in the TuxCare Installer, or use the tokenized URL for manual installation.
TuxCare Installer installs and manages ELS PHP versions through a graphical interface on Windows Server 2019, 2022, and 2025.
Download the installer and launch it
Download the installer from the following link:
https://windows.tuxcare.com/TuxCare.Installer.exeRun the downloaded file. After the first run, the installer appears under Settings > Apps.
Register with your license key
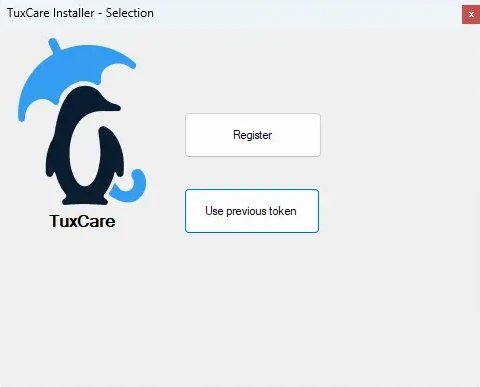
If you registered on this machine before, the installer first shows Register and Use previous token. Click Use previous token to keep the current registration and go straight to the product list (step 3), or Register to register again with a license key, which releases the current registration. New customers do not see this screen and start from the next one.
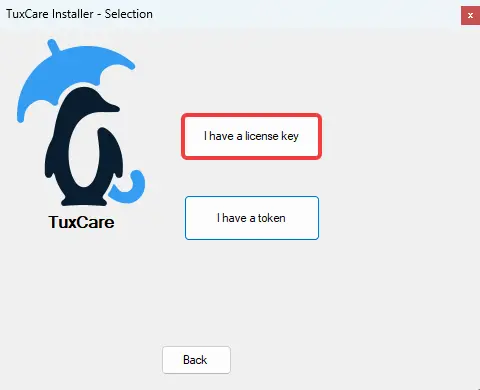
Click I have a license key.
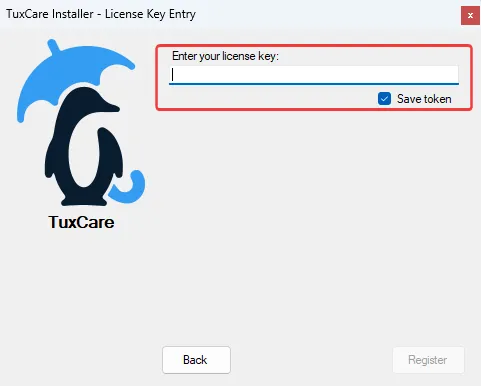
Enter your license key and click Register. Keep Save token ticked to reuse the registration next time.
If you have an authentication token instead of a license key, click I have a token.
Select a PHP version
Under PHP, expand a version (for example, 8.2.29) and a build (for example, tuxcare.els1), and tick the archive you want. Only 1 version can be installed per installation.
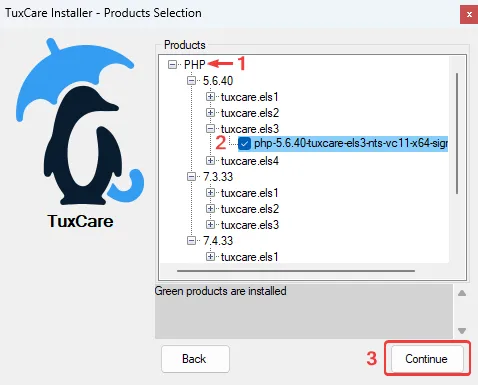
The installer highlights already installed versions in green. To uninstall one, untick it and click Continue.
When you select a version while another PHP is already installed (by TuxCare Installer or found on the Path), the installer asks how to proceed:
- Replace — removes the previous installations, then installs the new version.
- Alongside — keeps them and installs the new version next to them.
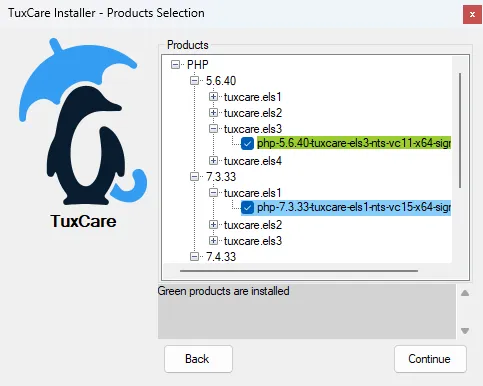
If your license does not cover a product, the installer shows it as PHP (Not Authenticated) with nothing to select.
Choose installation path and load modules
- By default, the installer uses
C:\Program Filesand extracts the version to its own folder there. - Click Change to install to a different location.
- Click Load to fetch the PHP archive and list its modules.
- Select the modules you need and click Continue.
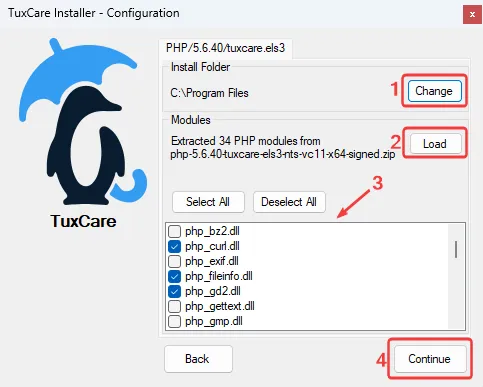
The installer creates
php.inifrom the archive'sphp.ini-productionwith the selected modules enabled, and adds the PHP folder to the system Path. It also removes other PHP folders from the Path, so this version becomes the default.When the installation finishes, the message Updating completed successfully confirms it.
- By default, the installer uses
Verify the installation
Open a new Command Prompt, PowerShell, or Terminal window, so that it picks up the updated Path, and run:
php -vYou should see output like:
PHP 5.6.40 (cli) (built: May 30 2025 15:43:43)
Copyright (c) 1997-2016 The PHP Group
Zend Engine v2.6.0, Copyright (c) 1998-2016 Zend Technologies
How to find System PATH
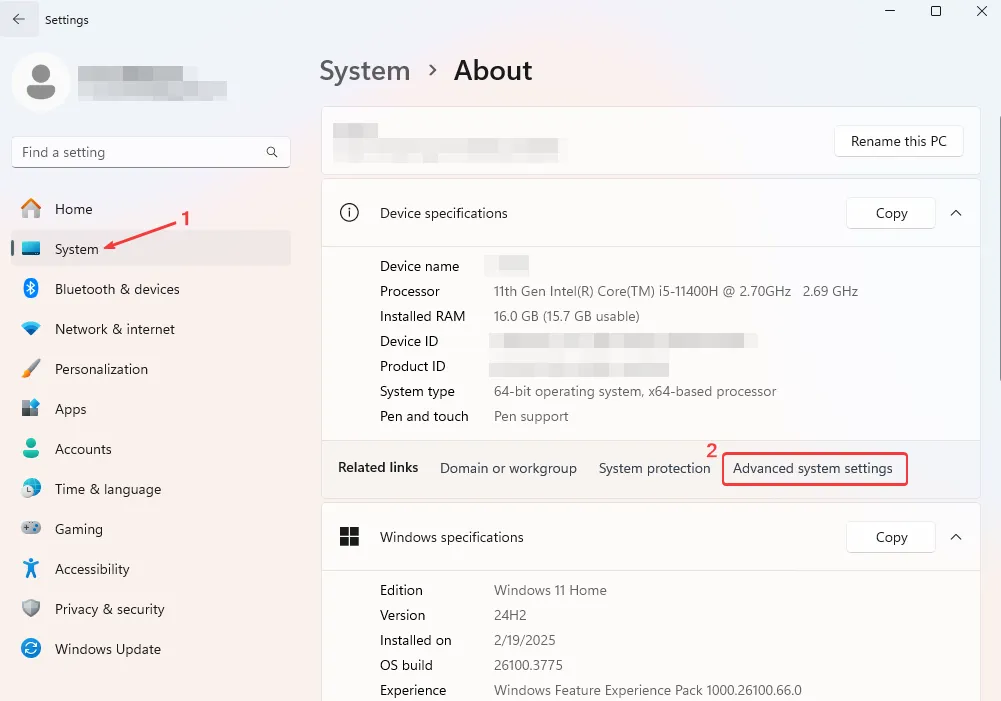
Right-click This PC and select Properties, or search for Settings > System > About in the Start menu.
Click Advanced system settings.
Click on Environment Variables.
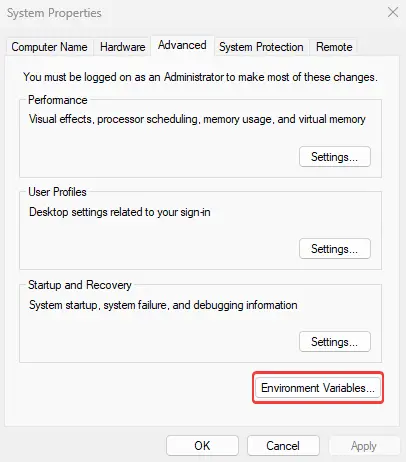
Under System variables, find Path and click Edit.
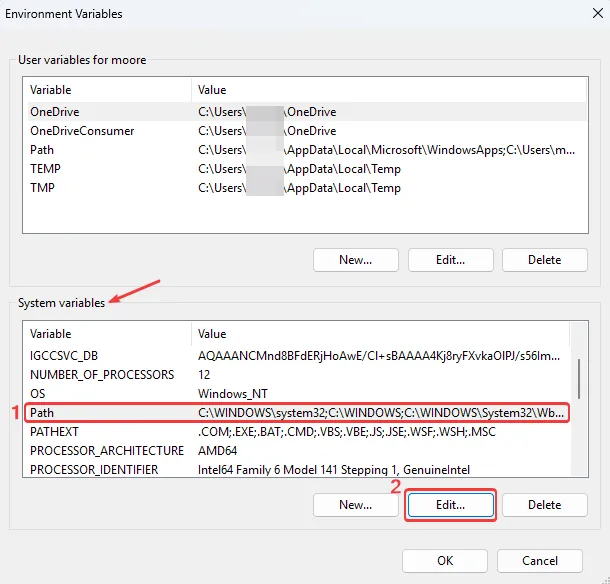
You will see your PHP
C:\PHPdirectory added.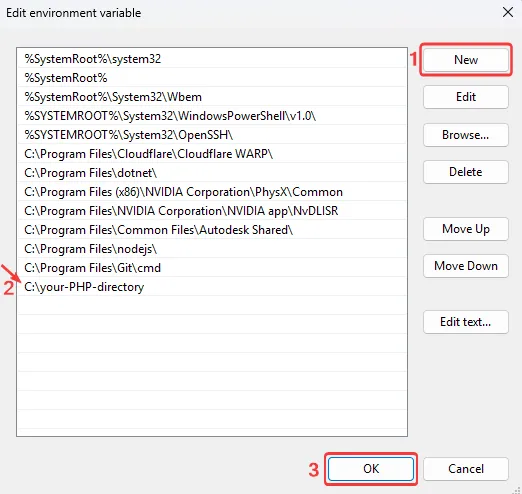
Additional Configurations
Depending on how you use ELS PHP, you may need additional configuration. You can integrate PHP with other tools, for example, IIS or WordPress. For further details, refer to the official PHP documentation.
Change Default PHP Version
If you have multiple PHP versions installed and want to change the default, update your System Path environment variable:
- Open Settings > System > About → Advanced system settings → Environment Variables.
- Under System variables, find Path and click Edit.
- Move the desired PHP version's folder to the top, and remove or move down the other PHP folders.
- Click OK, open a new terminal, and verify with
php -v.
Installing a version with TuxCare Installer, or with the PowerShell script without -NoPath, makes it the default automatically.
PHP Extensions List
ELS PHP for Windows comes with two kinds of extensions. Built-in extensions are part of the PHP build and always available. Loadable extensions are DLLs in the ext folder that you enable in one of two ways:
- TuxCare Installer — select the modules you need at the Choose installation path and load modules step.
- Manually — open
php.iniin your PHP installation directory (for example,C:\PHP) and remove the semicolon;at the start of theextension=line. Add;to disable an extension.
Extensions marked TS only or NTS only are available only in the Thread Safe or Non-Thread Safe build.
- bcmath
- calendar
- com_dotnet
- ctype
- date
- dom
- filter
- ftp
- hash
- iconv
- json
- libxml
- odbc
- pcre
- Reflection
- session
- SimpleXML
- SPL
- standard
- tokenizer
- wddx
- xml
- xmlreader
- xmlwriter
- zlib
Increase Upload/Memory Limits
If you're integrating PHP with applications like WordPress, you might need to increase memory and upload size limits. Open the php.ini file and set the values as needed:
upload_max_filesize=40M
post_max_size=40M
memory_limit=256M
Uninstallation
To uninstall a PHP version via TuxCare Installer, run the installer, untick the installed (green) version, and click Continue. The installer moves the PHP folder to %APPDATA%\TuxCareInstaller\Backups\<folder>_<date>_<time> instead of deleting it, so you can recover your php.ini and files, and removes the folder from the Path.
To remove everything installed by TuxCare Installer, open Settings > Apps, find TuxCare Installer, and click Uninstall. Then choose Uninstall products to remove all products installed by TuxCare Installer, or Keep products to remove only the installer.
A silent removal of TuxCare Installer, as deployment tools run it, cannot ask this question and keeps the products:
TuxCare.Installer.exe /uninstall /quiet
To uninstall the products too and release the registration, add UninstallProducts=1:
TuxCare.Installer.exe /uninstall /quiet UninstallProducts=1
To uninstall a PHP version with the PowerShell script, run it with the archive name shown by -List:
.\tuxcare-installer.ps1 -Uninstall 'php-8.2.29-*.zip'
To remove everything installed with the script or TuxCare Installer and release the registration, run:
.\tuxcare-installer.ps1 -Delete
The script asks whether to uninstall or keep the installed products. Add -UninstallProducts to uninstall them or -KeepProducts to keep them, and the script does not ask.
To uninstall a PHP version manually, delete the PHP installation directory (for example, C:\PHP) and remove the corresponding path from System Path.
Frequent Issues
PHP shows "(Not Authenticated)" in TuxCare Installer.
Your license or token does not cover PHP. Contact [email protected].
php -vstill shows the old version, or "php is not recognized".Open a new terminal: a terminal that was already open keeps the old Path. If the problem persists, check the order of PHP folders in the System Path (see Change Default PHP Version).
An extension does not load.
Check that its line in
php.inihas no leading;and thatphp.inicontainsextension_dir="ext". TuxCare Installer writesextension_dirwhen at least one module is available.I uninstalled a version by mistake.
TuxCare Installer keeps its folder in
%APPDATA%\TuxCareInstaller\Backups. Move the folder back to its original place and add it to the Path again, or install the version again.
SaxonC Use Case
You can extend alt-php with additional modules. Below is an example of installing the SaxonC PHP extension.
Although this guide uses alt-php82 in its examples, the same installation steps apply to alt-php83 and newer versions. Replace php82 with your target version in all commands and file paths.
This guide also uses SaxonC-HE as an example. Be sure to adjust file names and paths to match the version you downloaded.
Prerequisites
- Saxon 12+ (required for PHP 8.2+ compatibility) — download from saxonica.com
httpd(orapache2),gcc-c++(org++) with minimum C++14 supportalt-php82-devel(or matching version)
| Edition | License | Key Features |
|---|---|---|
| SaxonC-HE | Open Source | XSLT 3.0, XPath 3.1, XQuery 3.1 (Basic) |
| SaxonC-PE | Commercial | HE + ICU localization, JSON support |
| SaxonC-EE | Commercial | PE + Schema validation, Optimization |
Set Up SaxonC
Download SaxonC
Download from the official Saxonica download page. Create a working directory and move the downloaded zip file into it:
mkdir saxon && cd saxon
mv ../SaxonCHE-linux-x86_64-12-9-0.zip .
Extract the archive
Unzip the downloaded file and verify:
unzip SaxonCHE-linux-x86_64-12-9-0.zip
ls
Example output:
SaxonCHE-linux-x86_64-12-9-0 SaxonCHE-linux-x86_64-12-9-0.zipInstall the libraries
Starting with version 12.6,
/opt/saxonica/is the recommended installation path. Navigate into the extracted directory and copy all Saxon files:cd SaxonCHE-linux-x86_64-12-9-0 sudo mkdir -p /opt/saxonica/ sudo cp -r SaxonCHE/* /opt/saxonica/The installed structure should contain
bin,include, andlibdirectories.Configure environment variables
Add the following lines to your
.bashrcor/etc/profile.d/saxon.sh.The
LD_LIBRARY_PATHvariable must point to the Saxon libraries:export LD_LIBRARY_PATH="/opt/saxonica/lib:$LD_LIBRARY_PATH"To run the Transform, Query, and Validate (EE only) binaries, set the
PATHvariable:export PATH="/opt/saxonica/bin:$PATH"If the PHP web server can't find the Saxon libraries, you may also need to add
/opt/saxonica/libto a new file in/etc/ld.so.conf.d/and runldconfig.
Build the PHP Extension
Install alt-php82-devel
Install the development package required for compiling PHP extensions:
dnf install alt-php82-develVerify that
phpizeis available:ls /opt/alt/php82/usr/bin/phpizePrepare the build environment
Navigate to the PHP extension source directory within the extracted Saxon archive and run
phpizeto prepare the build:cd php/src/ /opt/alt/php82/usr/bin/phpizeExample output:
Configuring for:
PHP Api Version:         20220829
Zend Module Api No:      20220829
Zend Extension Api No:   420220829
Configure and compile
Configure the extension build with Saxon support and link to the Saxon libraries:
./configure --with-saxon --with-php-config=/opt/alt/php82/usr/bin/php-config LDFLAGS="-L/opt/saxonica/lib"Compile and install:
make
sudo make install
Example output:
Installing shared extensions: /opt/alt/php82/usr/lib64/php/modules/Enable the extension
Create a configuration file that tells PHP to load the extension:
tee -a /opt/alt/php82/etc/php.d/20-saxon.ini <<EOF
; configuration for php Saxon HE/PE/EE module
extension=saxon.so
EOF
Verify that the Saxon extension appears in the list of loaded modules:
/opt/alt/php82/usr/bin/php -m | grep saxonExample output:
saxoncVerify with a test script
Run a quick test to confirm the extension works:
/opt/alt/php82/usr/bin/php -ddisplay_errors=E_ALL  << 'EOF'
<?php
  $saxonProc = new Saxon\SaxonProcessor();
  $transformer = $saxonProc->newXslt30Processor();
  $executable = $transformer->compileFromString("
    <xsl:stylesheet version='2.0' xmlns:xsl='http://www.w3.org/1999/XSL/Transform'>
        <xsl:template name='go'><a/></xsl:template>
    </xsl:stylesheet>
");
  $root = $executable->callTemplateReturningValue("go");
  $node = $root->getHead()->getNodeValue();
  echo "$node \n";
EOF
Example output:
<a/>If you are using php-fpm or Apache, restart the services.
What's Next?
 CVE Tracker — Track vulnerability fixes and updates
 Available fixes — Patched versions and changelogs
 Supported components — Full list of product parts covered by ELS
- Machine-readable security data — Open Vulnerability and Assessment Language (OVAL), Common Security Advisory Framework (CSAF), Errata, and RSS feeds for PHP ELS
- PHP Changelog — latest updates, fixes, and enhancements for ALT-PHP
