


KernelCare
KernelCare
Note
KernelCare Plus was the former name for this product. It reached end-of-life in March 2023 and was replaced by KernelCare, which was the previous supported offering. KernelCare includes everything KernelCare Plus provided, plus additional capabilities such as controlled patch rollout via ePortal, air-gapped environment support, and access to add-ons such as LibCare. If you see references to "KernelCare Plus" on invoices or in the CLN portal, these refer to the same product now marketed as KernelCare.
KernelCare live patching enhances customers' vulnerability patching programs by providing live patches to the Linux kernel and, optionally (with an add-on), to critical userspace components. The systems are patched according to your patch deployment policy, allowing you to customize your patch management to align with the needs of your unique environment, whether online or air-gapped.
KernelCare can be extended with the LibCare add-on for live patching of critical userspace components.
The sections below describe KernelCare and LibCare live patching in more detail.
KernelCare (kernel live patching)
Introduction
KernelCare is a live kernel patching product that provides security patches for a range of popular Linux kernels that can be installed without rebooting the system. It supports kernels of Enterprise Linux operating systems, i.e., RHEL, Oracle, Rocky, AlmaLinux, and CentOS, as well as Ubuntu and Debian. Each individual kernel receives new live patches for as long as the kernel vendor releases security updates for the series.
The KernelCare offering consists of the client application, the live patching service hosted by TuxCare, and an optional on-prem management server. The client application runs on machines, periodically checks for available patches, downloads, verifies, and installs them.
At the same time, complex enterprise environments often follow policies that require a gradual roll-out of updates to reduce risk or have high-security isolated environments that need to be updated. ePortal is an on-prem management server allowing organizations to define their rollout policy and remain in full control of which machines will get updated and when.
The live patching process
When a new vulnerability is detected in the Linux kernel, TuxCare creates a live patch addressing the vulnerability. After the live patch is made available, it is tested in TuxCare’s internal server farm and then promoted gradually to a series of testing tiers, ensuring that any released live patch has been tested sufficient time on live systems. Once the patch is released, systems that enable the KernelCare client will receive the patch over an authenticated channel and apply it.
ePortal
Many organizations have a gradual patch roll-out policy or maintain a strict policy on which systems get upgraded and when. With ePortal, an on-prem management server, you can use the patch roll-out policy of your choice while automatically deploying patches in your air-gapped environment - all with a simple user interface.
Live patching testing tiers
KernelCare delivers live patches to “tiers”. A tier is a target audience for the delivery of a patch. Your tier depends on whether your systems receive updates directly from the TuxCare Portal repository or use ePortal as a proxy to gradually roll out patches according to your patching policy. The differences are outlined below.
| TIER | DESCRIPTION |
|---|---|
| Internal | For internal TuxCare use. Updates are first tested and then applied across TuxCare infrastructure to decrease the odds of a faulty patch making it to customer machines. |
| TuxCare Portal | Patches are delivered to these machines next. |
| ePortal Customers | Patches become available in the ePortal last. However, ePortal customers can customize the updates to receive them as soon as they become available in the test feed. |
Our kernel team closely monitors the patch health internally before promoting it to the TuxCare Portal and further monitoring is done before promoting the patch to ePortal servers.
Kernel patching lifetime
KernelCare offers live patches for each individual kernel for as long as the kernel vendor releases security updates for the series. This allows you to enjoy continuous protection for your existing kernels without being bound by the kernel vendor’s release schedule when planning your maintenance windows.
Vulnerability coverage
During the lifecycle of an operating system, TuxCare makes commercially reasonable efforts to provide live patches for all vulnerability fixes provided by the vendor, irrespective of their vulnerability rating. We may also address vulnerabilities that haven't been addressed by the OS vendor if they gained significant attention and were being actively discussed, exploited (according to the CISA list), or researched by the cybersecurity community.
Target response rates
TuxCare is committed to delivering timely security updates. We aim to deliver live patches for all CVEs patched by the vendor within 10 days from when the vulnerability is publicly disclosed. This rapid response time significantly reduces the opportunity window for a potential attack and meets most security regulation requirements. However, a live patch for a vulnerability can be significantly more complex than an ordinary kernel patch, and due to the additional complexity, can take more time to develop and test.
Supported architectures
KernelCare is available for both x86-64 (Intel and AMD) and ARM64 architectures.
Supported Linux distros and kernels
Customers can find detailed information about supported kernels, Linux distributions, specific vulnerabilities, and live patches provided by KernelCare and LibCare for each of the supported Linux distributions at https://patches.kernelcare.com/.
End-of-life (EOL) policy
TuxCare will stop supporting live patching for specific distros if there are no security advisories provided by the distro's vendor for the last 365 days. In this case, all customers running the affected distributions are notified about the upcoming EOL. Existing live patches for EOL distributions are available for the next 6 years after the EOL date.
Technical Support
All TuxCare live patching products include technical support provided according to the TuxCare support policy. It delivers 24/7/365 access to our engineers through the TuxCare Support Portal and to our online knowledge base.
Getting a trial license
You will need a trial activation key to be able to use the KernelCare. The trial license subscription will work for 30 days. You can request your free trial here https://tuxcare.com/free-trial/.
If you have any questions regarding using your trial subscription, contact sales@tuxcare.com and we will help.
Installation
KernelCare is compatible with 64-bit versions of CloudLinuxOS/CentOS 6, 7 and 8, AlmaLinux/RHEL 6, 7, 8 and 9, Oracle Linux 6 and 7, Amazon Linux 1 and 2, Virtuozzo/PCS/OpenVZ 2.6.32, Debian 8, 9 and 10, Proxmox VE 5 and 6, Virt-SIG/Xen4CentOS 6 and 7, Ubuntu 14.04, 15.04, 16.04, 18.04 and 20.04 kernels. The list of compatible kernels can be found at the following link: https://patches.kernelcare.com/
To install KernelCare, run the following as root:
# curl -s -L https://kernelcare.com/installer | bash
or:
# wget -qq -O - https://kernelcare.com/installer | bash
If you are using an IP-based license, nothing else is required to be done.
If you are using a key-based license, run:
# kcarectl --register <KEY>
Where KEY is the registration key code string provided when you sign up for purchase or trial of the product.
If you are experiencing a Key limit reached error after the end of the trial period, you should first unregister the server by running:
# kcarectl --unregister
To check if patches applied, run:
# kcarectl --info
The software will automatically check for new patches every 4 hours.
If you would like to run update manually:
# kcarectl --update
To check current kernel compatibility with KernelCare, use the following script by running:
$ curl -s -L https://kernelcare.com/checker | python
or:
$ wget -qq -O - https://kernelcare.com/checker | python
Update
To update the agent package to the latest version use:
- For rpm-based distributions (CentOS, RedHat, etc):
# yum install -y kernelcare
or:
# dnf install -y kernelcare
- For apt-based distributions (Debian, Ubuntu, etc):
# apt-get install kernelcare
or:
# apt install kernelcare
Uninstalling
To uninstall KernelCare, run the following as root:
- For CloudLinux, CentOS, RHEL, Virtuozzo, OpenVZ:
# yum remove kernelcare
or:
# dnf remove kernelcare
- For Ubuntu, Debian, Proxmox VE:
# apt-get remove kernelcare
or:
# apt purge kernelcare
This will also unlink the system from its activation key (provided there is network connectivity to the CLN Portal). However, you'll need to remove the license from the CLN Portal manually if you don't plan to use the service anymore.
Switching from Ksplice
To switch from Ksplice to KernelCare, use the following script that uninstalls Ksplice and installs KernelCare instead.
It will automatically detect and abort if the system is not 64-bit (as KernelCare doesn't support it).
It will also detect when the Ksplice module cannot be uninstalled and retries multiple times.
Download the script here: https://patches.kernelcare.com/ksplice2kcare
Run the command:
# bash ksplice2kcare <KERNELCARE_KEY>
The key can be created/retrieved in KernelCare Keys section of CLN.
If you want to use IP based licenses, run:
# bash ksplice2kcare IP
You have to add an IP license for that server, and it is just the two letters IP, not your actual IP address.
By default the script will attempt 3 times to uninstall Ksplice, waiting 60 seconds in between. You can run it using nohup if you don't want to wait.
You can change that by editing the script and changing RETRY and SLEEP values.
The script will exit with exit code 0 and message Done on success. Otherwise, it will produce exit code -1
The complete log file can be found at /var/log/ksplice2kcare.log
Canonical Livepatch
KernelCare is not compatible with Canonical Livepatch and should not be used on the same system.
Basic management
To disable automatic updates, edit the file /etc/sysconfig/kcare/kcare.conf
AUTO_UPDATE=False
To check the updated 'effective' version, run:
# kcarectl --uname
We provide a convenience script /usr/bin/kcare-uname that has same syntax as uname
To see applied patches, run:
# kcarectl --patch-info
Command line tools
/usr/bin/kcarectl - Manage KernelCare patches for your kernel.
/usr/bin/kcare-uname - Print certain system information.
kcarectl
-i, --info | Display information about patches installed by KernelCare. |
-u, --update | Download latest patches, and apply them to current kernel. |
--smart-update [since 1.6] | The same as --update, but uses UPDATE_POLICY to decide where to get patches. |
--unload | Unload patches. |
--auto-update | Check if update is needed and update. |
--patch-info | Lists applied patches. |
--status | Return a status of an update. Refer to the exit code: 0 - host is updated to latest patch level, 1 - there are no applied patches, 2 - there are new not applied patches, 3 - kernel is unsupported |
--force [since 2.3] | When used with update, forces applying the patch even if unable to freeze some threads. |
--uname | Prints safe kernel version. |
--license-info | Output current license info. |
--register KEY | Register using KernelCare Key. |
--register-autoretry [since 2.5] | If registration fails retries registration indefinitely. |
--unregister | Unregister from KernelCare for Key based servers. |
--userspace-update [PATCHES] | Download latest patches and apply them to the corresponding userspace processes. Сan be set so that only certain types of patches are applied. |
--test | Try test builds instead of production builds (deprecated, use --prefix=test instead). |
--prefix | Patch source prefix, used to test different builds, by downloading builds from a different location, based on prefix (v2.2+) |
--version | Print KernelCare version. |
--import-key PATH | Import gpg key. |
--set-monitoring-key | Set monitoring key for IP based licenses. 16 to 32 characters, alphanumeric only [version 2.1+] |
--freezer [since 2.3] | none: don't freeze any threads; full: freeze all threads; smart: freezes only threads that need to be frozen for patching. If option is not selected, best freezer method is chosen automatically. |
--check [since 2.4-1] | Check if new patchset is available, without updating. Exit code 0 means there is a new kernel. 1 when there is no new kernel. |
--doctor [since 2.6] | Send a report to the TuxCare support staff for diagnostics. |
--set-patch-type extra | To enable extra patches. |
--set-patch-type free | To enable free patches. |
--set-sticky-patch SET_STICKY_PATCH | Set patch to stick to date in format DDMMYY or retrieve it from KEY if set to KEY (no support for ePortal). Empty to unstick. More info at Sticky Patches. |
--tag COMMAND | Adds an extra Tag field for a server. COMMAND is a user-defined parameter. |
Note
Currently available userspace patch type is libs. To apply patches only for shared libraries, use --userspace-update libs.
kcare-uname
Print certain system information. Default is -s
-a, --all | print all information in the following order, except omit -p and -i if unknown |
-s, --kernel-name | print the kernel name |
-n, --nodename | print the network node hostname |
-r, --kernel-release | print the kernel release |
-v, --kernel-version | print the kernel version |
-m, --machine | print the machine hardware name |
-p, --processor | print the processor type or unknown |
-i, --hardware-platform | print the hardware platform or unknown |
-o, --operating-system | print the operating system |
--help | display this help and exit |
--version | output version information and exit |
kernelcare doctor
This tool collects essential information about the KernelCare environment and sends it to the support team.
# kcarectl --doctor

Generating report...
Uploading...
Key: FRWf74Zw11111111.83991334-1111-1111-1111-681ddd653e5f
Please, provide above mentioned key to KernelCare Support Team
The command generates a report and prints out the ID which could be linked to a support ticket.
Note
If there was a connection problem during uploading the report, the report will be stored locally as /root/cl-report. This file should be sent to the support team manually.
Config options
kcarectl behavior can be configured using /etc/sysconfig/kcare/kcare.conf
AUTO_UPDATE=YES|NO | YES - enable auto-update; NO - disable auto-update. |
PATCH_METHOD=normal|nofreeze|smart | Normal - (default) use freezer;Nofreeze - don't use freezer to freeze processes;Smart - smart freezer freezes only threads that need to be frozen for patching [kernelcare 2.3+]. |
PATCH_SERVER | Server to use to download patches. |
REGISTRATION_URL | Licensing server. |
PREFIX=prefix | Patch source prefix, used to test different builds, by downloading builds from a different location, based on prefix [kernelcare 2.2+] |
UPDATE_POLICY=REMOTE|LOCAL|LOCAL_FIRST | Depending on the policy, on server startup, use:REMOTE - (default) patches from patch server.LOCAL - only locally cached patches, if none cached (caching is done automatically) - do nothing.LOCAL_FIRST - see if locally cached patches exist, and load them. If not, try getting them from remote server. |
IGNORE_UNKNOWN_KERNEL=True|False | Don't provide notification if unknown kernel on auto-update. [kernelcare 2.5+] |
LOAD_KCARE_SYSCTL | Controls if /etc/sysconfig/kcare/sysctl.conf will be loaded on patchset load. True by default. [kernelcare 2.7+] |
STICKY_PATCH=KEY | Retrieve sticky patch from KEY (see CLN, Key Edit); not supported for IP based servers or ePortal. |
STICKY_PATCH=DDMMYY | Stick patch to a particular date. More info at Sticky Patches. |
[AUTO_]UPDATE_DELAY=<num>h|<num>d | Use patchsets not newer than specified time. For example 24h or 2d. AUTO_UPDATE_DELAY works for auto and smart modes. UPDATE_DELAY works for all modes. [kernelcare 2.82+] |
[AUTO_]STICKY_PATCHSET=<patchset> | Use patchsets not newer than specified value. For example K20230908_02. AUTO_STICKY_PATCHSET works for auto and smart modes. STICKY_PATCHSET works for all modes. [kernelcare 2.82+] |
REPORT_FQDN=True|False | Force using Fully Qualified Domain as a hostname. False by default. |
FORCE_GID=N | Use this group ID for symlink protection patch. By default, it's 48 (default Apache user GID) or 99 (nobody user) |
USERSPACE_PATCHES=libs | Define which userspace patches will be applyed by default |
Disabling some patches
Some patches might affect the functioning of the system, and we created a way to disable them.
This is done via the sysctl command.
When new patchsets load, KernelCare sysctl options get reset. To prevent that we added a file:
/etc/sysconfig/kcare/sysctl.conf
Options in this file will be loaded automatically on new patchset load.
To disable loading these options, specify LOAD_KCARE_SYSCTL=0 in /etc/sysconfig/kcare/kcare.conf
To disable the patch, set the corresponding kcare option to 1
Patches that can be disabled:
| Patch | sysctl option |
| CVE-2015-5157 | kcare_modify_ldt |
Extra patchset
Note
KernelCare 2.12-5 or higher
KernelCare Extra patchset includes all the security fixes from KernelCare for AlmaLinux, CentOS 6, CentOS 7, and CentOS 8 as well as symlink protection and the IPSet bugfix for CentOS 6.
To enable extra patches and apply updates, run:
# kcarectl --set-patch-type extra --update
To enable extra patches without an update, run:
# kcarectl --set-patch-type extra
The 'extra' patch will be applied on the next automatic update.
To see details, run:
# kcarectl --patch-info
You should see something similar to:
OS: centos6
kernel: kernel-2.6.32-696.6.3.el6
time: 2017-07-31 22:46:22
uname: 2.6.32-696.6.3.el6

kpatch-name: 2.6.32/symlink-protection.patch
kpatch-description: symlink protection // If you see this patch, it mean that you can enable symlink protection.
kpatch-kernel: kernel-2.6.32-279.2.1.el6
kpatch-cve: N/A
kpatch-cvss: N/A
kpatch-cve-url: N/A
kpatch-patch-url: https://gerrit.cloudlinux.com/#/c/16508/

kpatch-name: 2.6.32/symlink-protection.kpatch-1.patch
kpatch-description: symlink protection (kpatch adaptation)
kpatch-kernel: kernel-2.6.32-279.2.1.el6
kpatch-cve: N/A
kpatch-cvss: N/A
kpatch-cve-url: N/A
kpatch-patch-url: https://gerrit.cloudlinux.com/#/c/16508/

kpatch-name: 2.6.32/ipset-fix-list-shrinking.patch
kpatch-description: fix ipset list shrinking for no reason
kpatch-kernel: N/A
kpatch-cve: N/A
kpatch-cvss: N/A
kpatch-cve-url: N/A
kpatch-patch-url: https://bugs.centos.org/view.php?id=13499
To enable Symlink Owner Match Protection, add fs.enforce_symlinksifowner=1 to /etc/sysconfig/kcare/sysctl.conf and run:
# sysctl -p /etc/sysconfig/kcare/sysctl.conf
Sticky patches
Note
This functionality is not available for ePortal customers. If you are using ePortal, please use Feeds instead.
Note
Since v2.82 there is a more convenient way to specify the latest available release via the [AUTO_]STICKY_PATCHSET and [AUTO_]UPDATE_DELAY configuration options. It also works with recent ePortal versions (v2.3+).
Sometimes you don't want to use the latest patches, and you'd like to control which patches are get installed instead. For example, you have tested the patch released on 25th of May 2018 and want to use that patch across all servers.
You can do it by setting STICKY_PATCH=25052018 (DDMMYYYY format, DDMMYY and YYYY-mm-dd are also valid) in /etc/sysconfig/kcare/kcare.conf, this guarantees that when kcarectl --update or kcarectl --auto-update is called, you will get patches from that date and not the newest patches.
Alternatively, you can set STICKY_PATCH=KEY, this way you can control the date from which patches will be applied using KernelCare keys in CLN. On update, the actual date will be retrieved from CLN (from Key settings) for the key used to register a particular server (not supported for IP based servers).
This is very useful if you want to test patches in QA first and later roll them out to production without doing any changes on the systems.
Here is how you can do that:
- Set
STICKY_PATCH=KEYon all your servers. - Register QA servers with one KEY, and Production servers with ANOTHER key.
- Then, stop new updates for Production servers. In CLN set
Sticky Tagtoyesterday. You can do it by editing KEY in CLN in DDMMYY format. - Now, for example, let's use patches as of 03052018 (DDMMYYYY format). Set them for your QA server key. On the next auto-update, your QA servers will get those patches (auto-updates are typically every 4 hours).
Once you are happy with these patches, set the same Sticky Tag for Production servers key. In 4 hours your production servers should be updated to the same patches that QA servers were.
How to find a proper sticky patch name
Let's assume that you have a kernel patch that you want to "stick" with. All you need is to find a proper label for that patch.
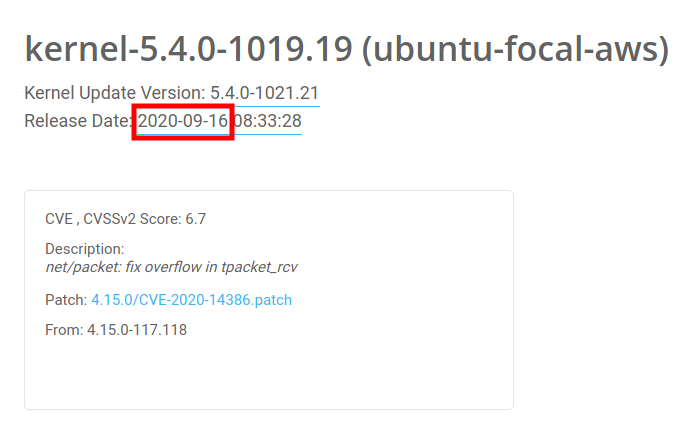
As you can see, the patch was released at 2020-09-16 (16th September 2020). And if you apply a supported date format, it becomes 16092020, that will be the sticky patch value.
Scanning for vulnerabilities
Identifying the vulnerabilities that apply to your systems is an important task for IT and InfoSec teams, and at TuxCare we make it easy. KernelCare live patching is integrated natively with vulnerability scanners including Tenable Nessus, Qualys, Rapid7 and many others.
How to use a vulnerability scanner with KernelCare
It's rather simple. New scan results after installing a package and applying a patchset should not show any kernel CVEs that are handled by KernelCare.
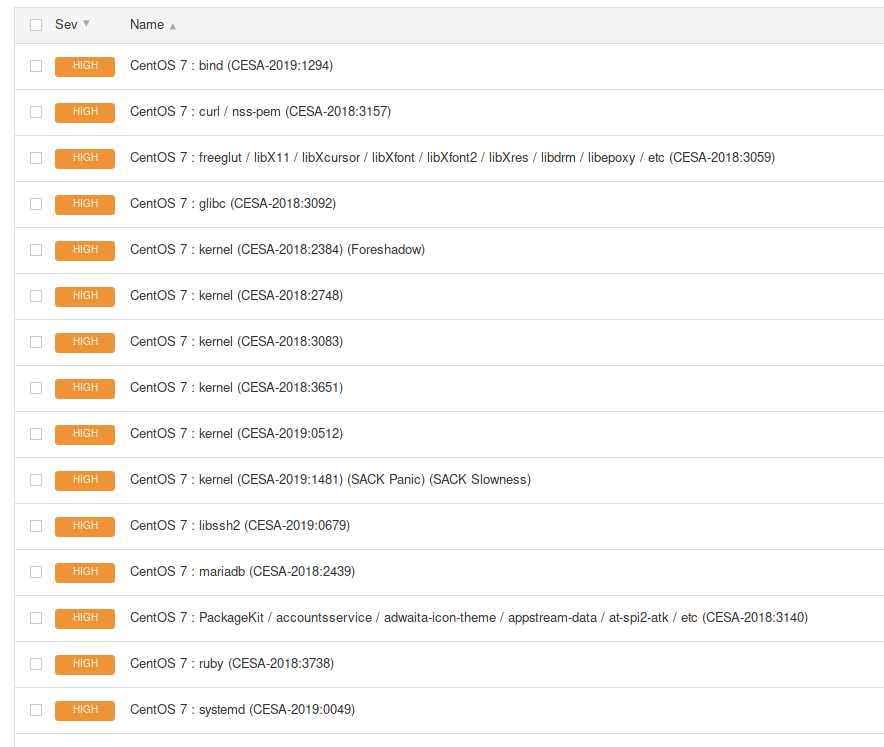
For example, Nessus for an old kernel shows a lot of detected CVEs before apply live patches:
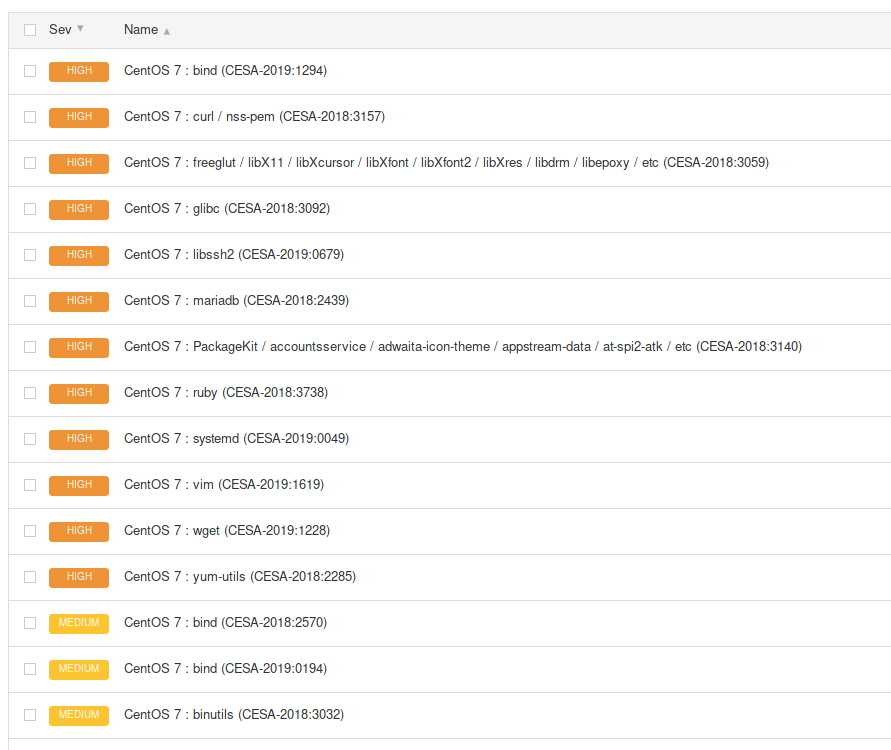
After the live patches were applied, there are no kernel-related CVEs:
What if my scanner is producing false positives?
If your scanner produces incorrect results due to not being KernelCare aware, we have a solution that works at the OS level to report the correct information to the rpm/dpkg/uname commands; namely kcare-scanner-interface
If you are using a scanner agent the defaults usually work and you can configure the scanner interface like so:
# kcare-scanner-interface init

Resetting.
Setting up scanner agents
Done.
If you are using SSH credentials-based scanning, then you can configure the scanner interface like so - where user1 and user2 are the usernames your vulnerability scanner will ssh/sudo as:
# kcare-scanner-interface init user1 user2

Resetting.
Setting up a scanner-interface for user1
Setting up a scanner-interface for user2
Setting up scanner agents
Done.
To disable the scanner interface run:
# kcare-scanner-interface disable
We don't recommend enabling the scanner interface as root, as the root user's command output should not be changed in this way. If your scanner elevates privileges after logging in via SSH, only sudo can be used and not su
Note
sudo is not installed by default on some distributions like CentOS 6 but is the default privilege escalation method for all Ubuntu versions. If you do install sudo, be sure to review the configuration in /etc/sudoers and any @include files.
How to use OpenSCAP with KernelCare
OpenSCAP is an open source vulnerability scanner and compliance tool and it can be used to scan a system protected by KernelCare. The following commands show how to use OpenSCAP to produce a vulnerability report for a system.
$ source /etc/os-release
$ wget https://patches.kernelcare.com/oval/com.kernelcare.${ID}.${VERSION_ID}.xml
$ oscap oval eval --report report.htm com.kernelcare.${ID}.${VERSION_ID}.xml
UEFI Secure Boot Support
KernelCare supports systems with Secure Boot enabled in UEFI firmware. The KernelCare Agent uses a certificate that must be added to the Secure Boot trust chain to sign kernel modules. You can use the automated setup method (recommended), which uses a certificate embedded in a Microsoft-signed helper binary, or manually add a public certificate to the MOK database.
Automated Setup (Recommended)
The automated setup method uses a Microsoft-signed helper binary that automatically injects the KernelCare certificate into the Secure Boot trust chain at boot time. This eliminates the need for manual MOK enrollment. The KernelCare Agent package (version 3.0-2 or later) includes this helper binary and a setup script that configures it.
Supported Distributions:
The automated setup method is supported on RPM-based distributions (RHEL, CentOS, AlmaLinux, Rocky Linux, Oracle Linux, CloudLinux, Amazon Linux) with EFI boot, shim installed, and Secure Boot enabled. Not available for Debian/Ubuntu.
Setup steps:
Update the KernelCare Agent to version 3.0-2 or later.
Run the setup script as root:
$ /usr/share/kcare/secure_boot/setup_kcare_certs.sh
The script verifies the EFI system partition and shim bootloader are present, then places the helper binary in the appropriate location.
- Reboot the system. The helper binary will automatically inject the certificate during the boot process.
Manual Setup
Supported Distributions:
This method of adding a certificate with mokutil is supported on systems that use UEFI Secure Boot with the standard shim and MOK stack.
If you need to set up the certificate manually or are using an older KernelCare Agent version:
- The latest KernelCare Agent package contains a public certificate at
/usr/libexec/kcare/kernelcare_pub.der. For older versions, download it to that location:
curl -o /usr/libexec/kcare/kernelcare_pub.der https://patches.kernelcare.com/kernelcare_pub.der
- Use
mokutilas root to add this MOK to the UEFI firmware:
$ mokutil --import /usr/libexec/kcare/kernelcare_pub.der
 input password:
 input password again:
If you don't have a MOK password, mokutil will ask you to create one. The password is temporary and will be used on the next boot.
Reboot your machine to enter the MOK manager EFI utility.
First, go down to the 'Enroll Mok':

Then the firmware gives you the option of viewing the new MOK or continuing. Let's continue.

It then asks you to confirm the enrollment.

Then you will need to enter the password you used when running mokutil --import.

Finally, the firmware will ask you to reboot.

Verification
After completing either setup method and rebooting, verify the certificate was enrolled successfully:
$ mokutil --list-enrolled | egrep -i 'SHA1|Issuer'
In some cases, the enrolled key may not appear in the mokutil output but can be verified with:
$ dmesg | grep -i 'cloud linux'
[   0.722149] EFI: Loaded cert 'Cloud Linux Software, Inc: Kernel Module Signing Key: 12ff0613c0f80cfba3b2f8eba71ebc27c5a76170' linked to '.system_keyring'
After successful verification, KernelCare should be able to apply patches as usual on systems with Secure Boot enabled.
Live patching and FIPS compliance
The FIPS-140 certification of a Linux kernel validates that the cryptography contained within a Linux kernel complies with the US government FIPS-140 data protection standard. Meaning that algorithms like AES, the random generator and other cryptographic aspects of the kernel are implemented as the standard defines.
At the same time the certification is a lengthy process --a typical validation can take almost a year-- and for that reason only some of each vendor's kernels are validated. That is because vendors release new kernels with security and feature updates on a regular cadence some as often as weekly, irrespective of their FIPS validation status. This means users of FIPS validated kernels need to choose between: (a) strict compliance by staying on the same kernel without updating until the next validated kernel is available and (b) reducing their security risk by installing new kernels with security updates even if they are not validated. The same story applies to the vendor's live patching solutions.
With KernelCare it is possible to live patch FIPS-140 validated Linux kernels, for example at the Red Hat Enterprise Linux operating system. The live patches applied to these kernels, in this example, consist of the same RHEL kernel patches but are limited to the ones addressing security vulnerabilities. That way, a live patched kernel contains the same security fixes as a vendor update without any feature or bug-fix updates, e.g. updates that may change the cryptographic subsystem for performance or other non-security related reasons.
In this way, security-conscious users of FIPS-validated Linux kernels that today apply their vendor's security patches can rely on KernelCare live patching the same way they do with their vendor's security updates. Furthermore, KernelCare live patching applies the minimum possible updates to the validated kernel by explicitly excluding any non-security updates.
Firewall and Proxy Settings
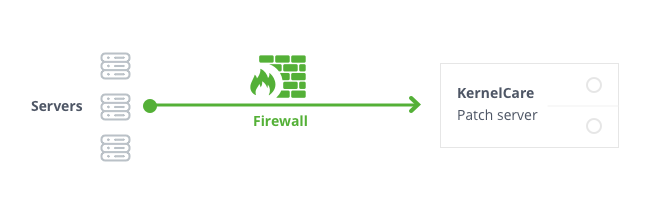
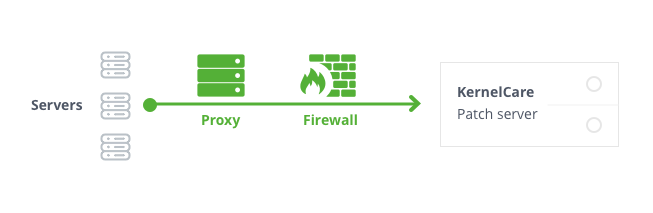
Patching servers through firewall
As long as your servers have access to the Internet, even behind NAT - you will be able to use KernelCare patch server without any problems.
Generally, KernelCare requires connection to only two servers to work:
cln.cloudlinux.com
patches.kernelcare.com
An additional address is used for KernelCare agent installation/update:
repo.cloudlinux.com
Patching servers through proxy
If your servers don't have direct Internet access but can gain access to the Internet using proxy, the configuration is not that different. KernelCare can pick up standard environment variables for a proxy.
Make sure you have environment settings for proxy setup, and everything else will be the same as if servers were directly connected to the Internet:
# export http_proxy=http://proxy.domain.com:port
# export https_proxy=http://proxy.domain.com:port
Note
Settings defined by export are case-insensitive, so the example above could be as follows for certain software:
# export HTTP_PROXY=http://proxy.domain.com:port
# export HTTPS_PROXY=http://proxy.domain.com:port
You can define these settings in the KernelCare config /etc/sysconfig/kcare/kcare.conf, for example:
$ cat /etc/sysconfig/kcare/kcare.conf

AUTO_UPDATE=True
HTTPS_PROXY=http://myproxy.com:59794
If you define these settings in the config, you don't need to export them each kcarectl launch and don't need to edit cron jobs.
All kcarectl launches will be aware of proxy settings from the config. In this case, you need to set proxy settings only once.
KernelCare on AWS - Deployment User Guide
Introductory Material
The Linux kernel is the most important piece of software on your server, as a security flaw in it can expose all of your services and customer data. KernelCare is a technology that allows you to keep the Linux kernel safe at all times, automatically, without ever having to stop the server and rebooting it causing downtime and inconvenient scheduling of maintenance windows. This improves availability, security, stability, operational costs, and customer satisfaction. It works with almost all mainstream distributions of Linux. It is simple, fast, and very easy to deploy while being able to handle very complex patches and customized kernels if you need them.
Prerequisites and Requirements
KernelCare can be installed on any x86_64 compatible server or VM running one of the following distributions:
- Amazon Linux 1, 2
- CentOS 6, 7, Xen4CentOS, CentOS-Plus, ElRepo
- CloudLinux 6, 7
- Debian 7, 8, 9, 8-backports
- Oracle Linux 6, 7
- ProxmoxVE 3,4,5
- RedHat EL 6, 7
- Ubuntu 14.04, 16.04, 18.04
- Virtuozzo 6
The exact list of compatible kernels can be found at the following link: https://patches.kernelcare.com/
Standard OS kernels are required in most cases unless the custom kernel is supported.
The software can be installed on a running server and doesn't require a reboot.
Basic Linux skills are sufficient to deploy KernelCare on AWS. Simple deployments involve just an EC2 instance. KernelCare is available using the BYOL model. You need to register in our customer portal to get a trial license. Once you get the trial license, you need to register your running EC2 instance with the activation key.
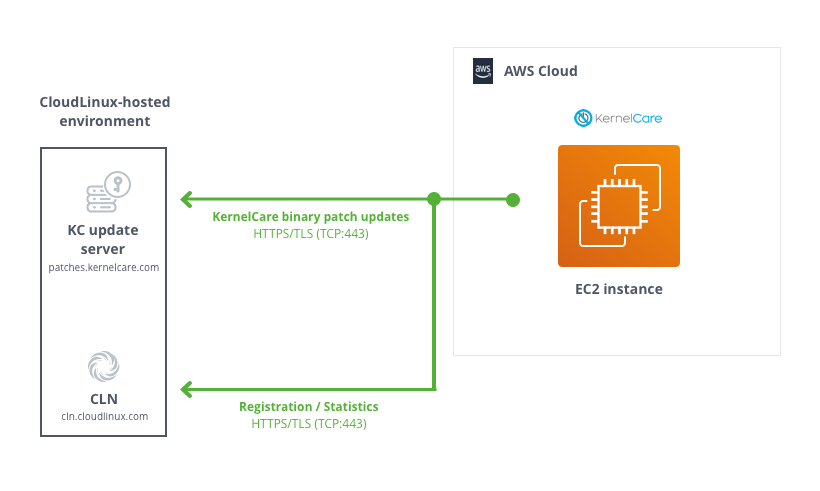
Architectural Design
As long as your servers have access to the Internet, even behind NAT - you will be able to use KernelCare without any problems.
Generally, KernelCare requires connection to only two servers to work:
cln.cloudlinux.com
patches.kernelcare.com
If your servers don't have direct Internet access but can gain access to the Internet using a proxy, the configuration is not that different. KernelCare can pick up standard environment variables for proxies.
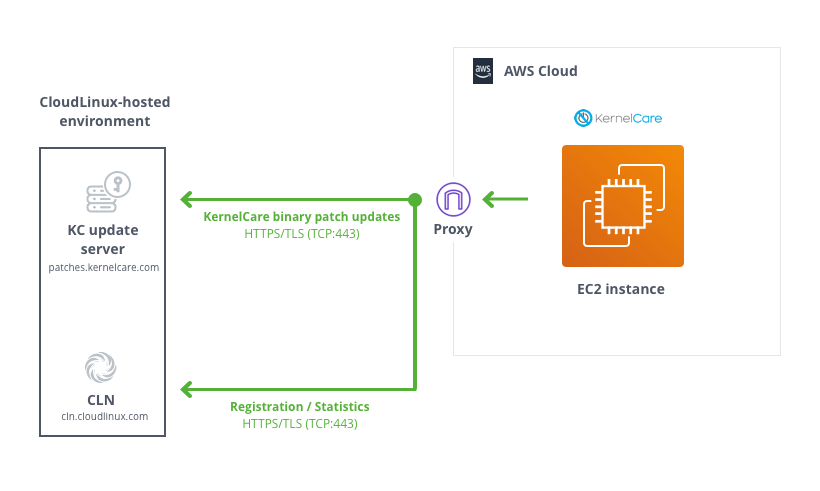
Make sure you have environment settings for your proxy setup, and everything else will be the same as if the servers were directly connected to the Internet:
# export http_proxy=http://proxy.domain.com:port
# export https_proxy=http://proxy.domain.com:port
Security
The only thing you need to be able to install/control your KernelCare deployment is SSH access (root credentials, key-based authentication/sudo or similar mechanisms are preferred).
Costs
KernelCare is billed as a subscription service, for volume pricing please contact sales@cloudlinux.com
Sizing
KernelCare agent has a tiny RAM footprint - binary patches usually require less than 1 MB.
Deployment Guidance
To install KernelCare, run:
# curl -s -L https://kernelcare.com/installer | bash
or:
# wget -qq -O - https://kernelcare.com/installer | bash
If you are using IP-based license, nothing else required to be done. If you are using key-based license, run:
# kcarectl --register <KEY>
Where KEY is the registration key code string provided when you signed up for a trial or pruchased the product.
You can easily automate KernelCare deployment with Ansible, Puppet, Chef or other orchestration tools. Here are the steps that may be automated:
- Distribute KernelCare agent package (optional - required only for servers with no access to the Internet) and a KernelCare agent configuration file (
/etc/sysconfig/kcare/kcare.conf); - Set required environmental variables (optional);
- Install KernelCare agent from either locally available package or central KernelCare download location;
- Register KernelCare with either license key or IP-based license.
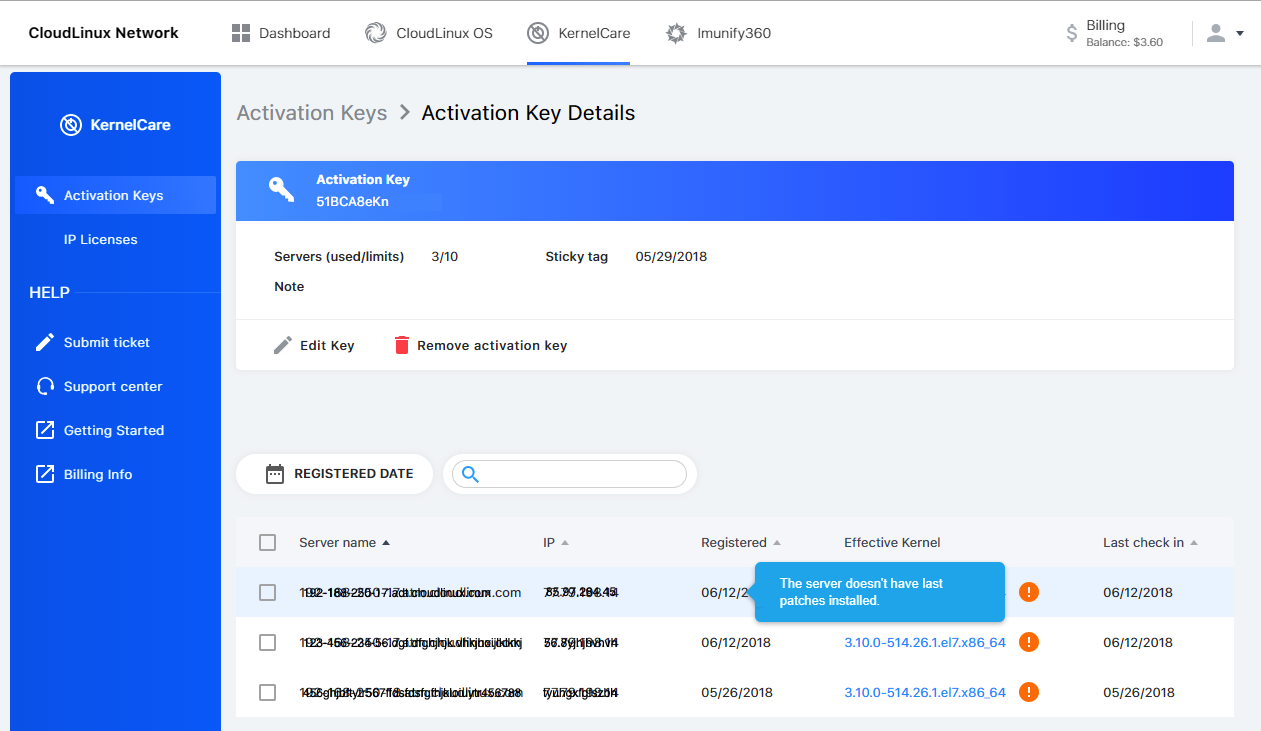
Health Check
Systems protected by KernelCare can be monitored by means of CloudLinux Network (CLN) portal available at https://cln.cloudlinux.com. Registered KernelCare installations are grouped by license keys. Kernels that are marked with the exclamation sign in amber do not have the latest patches installed.
In either case, you can check whether the latest available patch has been applied by running the following command on a system protected by KernelCare:
# kcarectl --check
Backup and Recovery
There is no reason to backup KernelCare. KernelCare doesn't store any data. You can always re-install and re-register KernelCare. To backup the configuration file of KernelCare if you have modified it, backup the /etc/sysconfig/kcare/ folder.
Routine Maintenance
KernelCare is packaged in RPM/DEB packages (depending on Linux distribution) and will update any time system packages are updated. No additional maintenance is needed.
Emergency Maintenance
If one of your instances degraded, once you start another instance based on EBS or snapshot - KernelCare will continue working as before, no additional work is needed. If you set up a new server instead, re-register KernelCare on the new server. If you decide to uninstall patches, run the command:
# kcarectl --unload
Or to completely remove the kernelcare package run one of the following commands:
- on RPM-based systems:
# yum remove kernelcare
- or on DEB-based systems:
# apt-get remove kernelcare
Patch Feed Advanced Options
Test and Delayed Feeds
The KernelCare Patch Server has several patch feeds available in addition to the standard (production) feed:
- Test feed - the newest patches (test builds) that have not undergone the complete testing process. Test feed makes it possible to start testing new patches earlier.
- Delayed feeds - instructs KernelCare to skip loading patches that were released within the last 12/24/48 hours.
The alternate feed option is enabled by setting PREFIX variable in /etc/sysconfig/kcare/kcare.conf to one of test/12h/24h/48h.
Feed Management With Sticky Patch Feature
The best way to handle QA and Production environments is to use Sticky tag feature of KernelCare license keys issued from CloudLinux Network (CLN) portal. To use this tag, go to CLN portal -> KernelCare tab -> click on the target key -> Edit Key Info window.
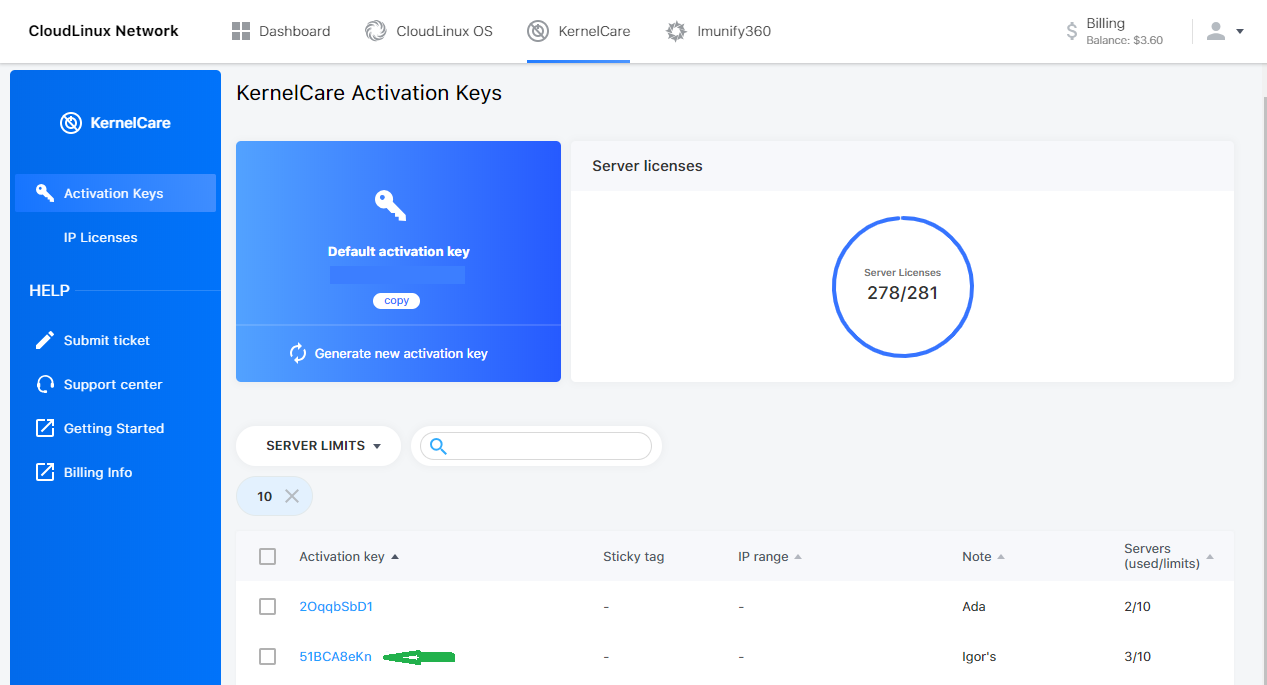
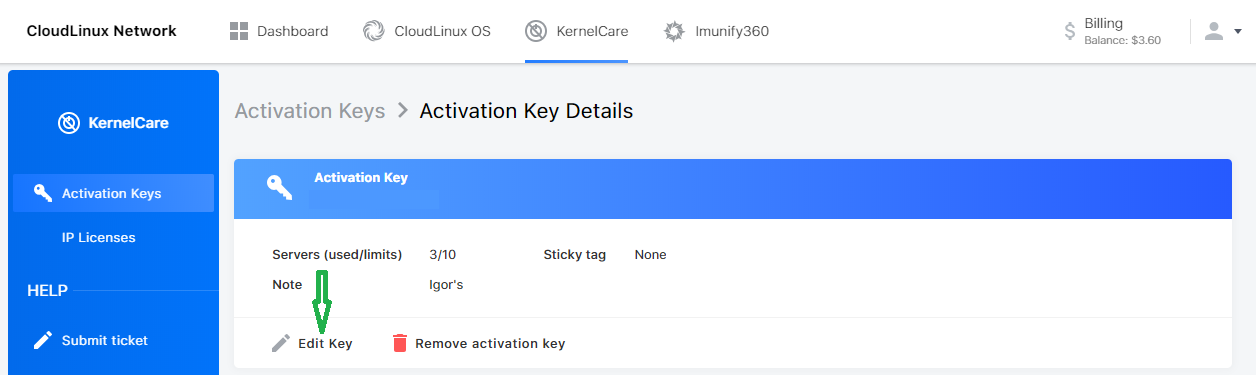
You should provide a separate key for each environment and set them to a particular sticky tag which is actually the date to which all the servers in an environment have to be patched.

The date in the Sticky tag field can be any date from May 28, 2018 up to one day before today. To use the Sticky tag feature on the servers to be patched, run:
$ kcarectl --set-sticky-patch=KEY
Alternatively, you can do the same by adding STICKY_PATCH=KEY to the /etc/sysconfig/kcare/kcare.conf file.
Warning
Do Not replace the KEY word with the actual KernelCare license key used to register the server, you should just use the word KEY
When the Sticky tag feature is enabled for particular servers, all such servers will get patches only released before the date specified in the Sticky tag field. This way, you can add new patches to all the servers in an environment (i.e. registered with the same KernelCare license key) by updating only a single field in the CLN portal.
Support
We offer unlimited, 24x7x365 support. Submit a direct support request using this form.
- We answer all support questions within one business day and most within a couple of hours. To expedite the support, run the following command on your server (as root):
# kcarectl --doctor
Then paste the generated key into the support request.
Support Costs
Your KernelCare subscription includes free 24/7 support.
Reference Materials
- KernelCare website: https://tuxcare.com/enterprise-live-patching-services/kernelcare-enterprise/
- KernelCare Patch Server: https://patches.kernelcare.com
- CloudLinux Network - CLN (Billing Portal): https://cln.cloudlinux.com
- CloudLinux 24/7 online support system: https://tuxcare.zendesk.com
Localization
KernelCare is available in the English language only.
Reseller Partner UI
Once you have got the reseller partner access, in the IP Reseller Partner UI you can view and manage IP licenses, billing options and profile details. Here you can track your balance, license count and license prices as well as using an IP address search to find customers. You can find more information about KernelCare licensing here.
Server Section
As soon as you have added funds (See Billing Info/Add Funds below) to your account you can immediately add new licenses for clients. To add an IP KernelCare license:
- Enter IP address in the Add IP License field, choose a license type in the pull-down menu (KernelCare) and click Add license.
To delete a license click Delete in front of the needed IP address.
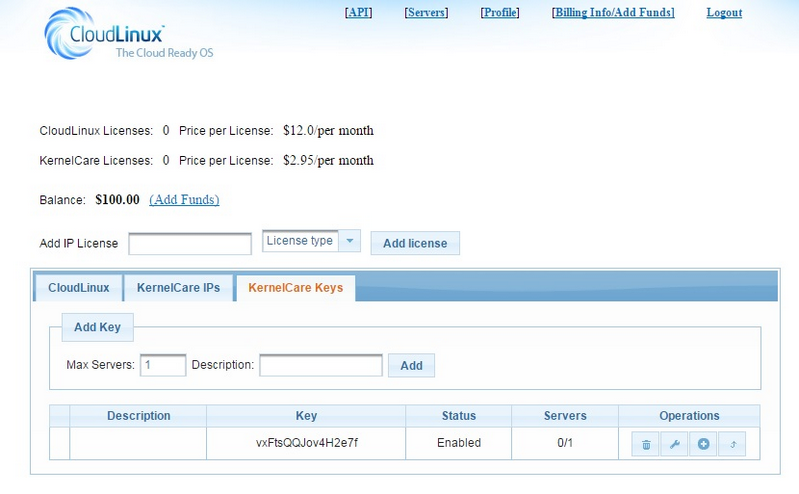
To add a KernelCare Key license go to the KernelCare Keys tab, enter the number of servers allowed for the license in Max Servers, add a description if needed and click Add. The key will be generated and appear in the list below.
In the Operations List you are able to edit or delete the key.
Billing Info/Add Funds
To add funds:
Click Add Funds near your balance or go to Billing Info/Add Funds on the top of the starting page of your account.
Click Add to add credit card details, then enter funds amount and click TopUp or Process to Checkout to pay via PayPal.

While adding credit card details, you can also choose the Auto add funds option - the funds amount you choose in the pull down menu will be automatically added when your balance is below $100.
If you choose Auto repay, your card will be automatically charged when your balance becomes negative. The minimum charge is $20 (e.g. for a balance of -$15 you will be charged at $20, for a balance of -$134.2 you will be charged at $134.2).
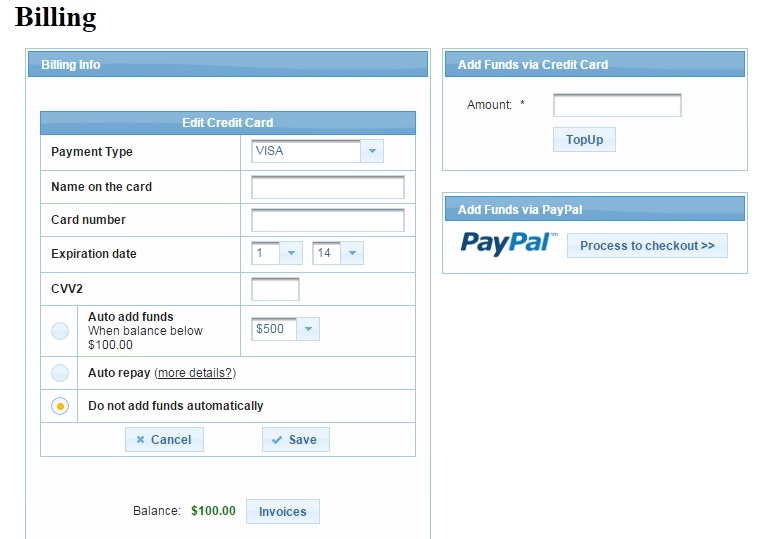
Note
If your balance is shown as negative, it means that you have to deposit more funds.
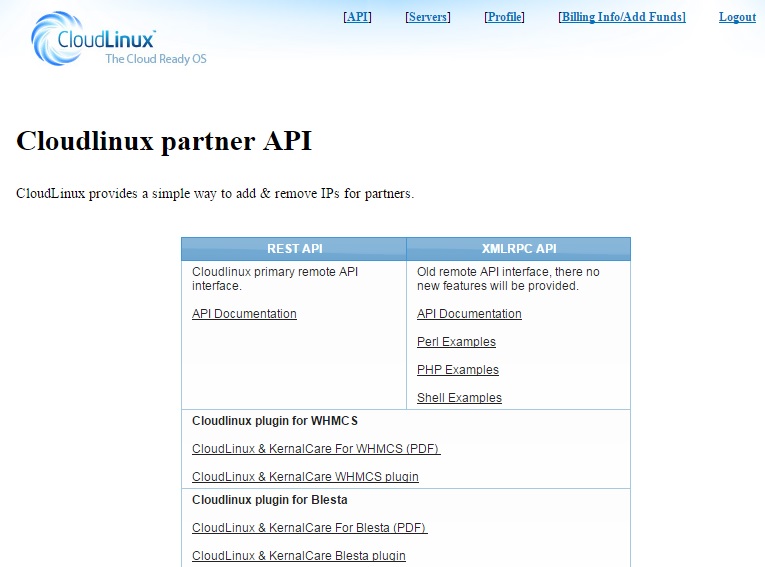
API Section
CloudLinux and KernelCare IP license adding and removing is compatible with different hosting and domain management and billing systems and platforms. You can find comprehensive information on all possible CloudLinux modules and plug-ins APIs in API Section.
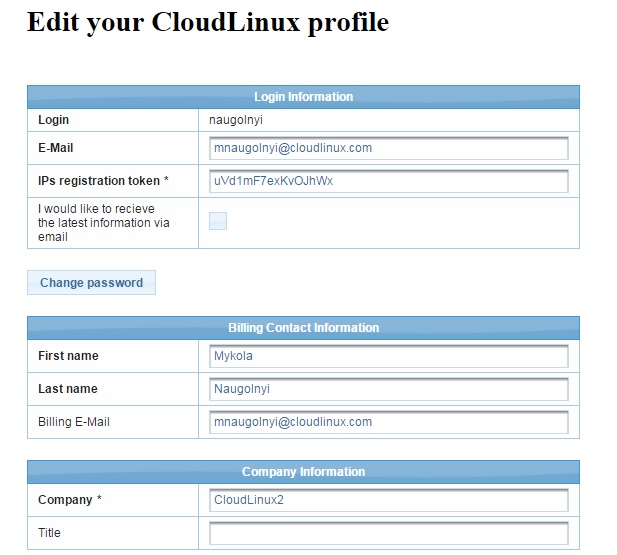
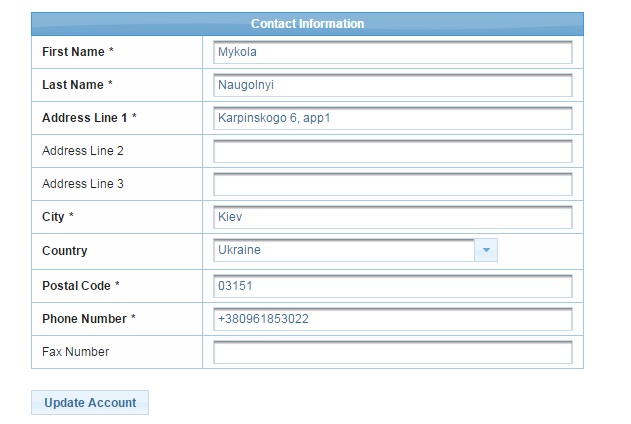
Profile
You can edit your profile information by clicking on Profile section. Edit the necessary info and click Update Account.
How To
How to disable HyperThreading (SMT) without reboot: KernelCare case
This article explains how to disable or enable SMT (Simultaneous multithreading) without rebooting using KernelCare, to help mitigate the recent MDS/Zombieload vulnerability.
Disabling CPU simultaneous multithreading (SMT) is one of the mitigations needed to counter the recent MDS vulnerability (also known as ‘Zombieload'). There is a performance impact that depends on the configuration of the hosting platform and its workload patterns. You should also consider the impact of other mitigation strategies, such as assigning dedicated cores to guests (e.g. VMs).
You can control and get the status of SMT with the kernel's sysfs interface. There are two files, both in the /sys/devices/system/cpu/smt directory:
controlactive
If you cannot find the /sys/devices/system/cpu/smt directory, this means your running kernel does not support SMT. In this case, you need to apply KernelCare patches so the SMT controls become available to your system. Use the kcarectrl command:
# kcarectl --update

Kernel is safe
# ls -l /sys/devices/system/cpu/smt

-r--r--r-- 1 root root 4096 May 17 13:06 active
-rw-r--r-- 1 root root 4096 May 17 13:06 control
As soon as you have these files in place, it is possible to proceed with disabling SMT.
SMT Control
/sys/devices/system/cpu/smt/control
This file lets you enable or disable SMT, and shows its state. There are three values:
on: The CPU supports SMT and it is enabled. All logical CPUs can be taken offline or online without restriction.off: The CPU supports SMT but it is disabled. Only so-called primary SMT threads can be taken offline/online without restriction. Attempts to put a non-primary sibling thread online will be rejected.notsupported: The CPU does not support SMT. You will not be able to write to the control file.
SMT Status
/sys/devices/system/cpu/smt/active
The contents of this file show the status of SMT (e.g. if two or more sibling threads are active on the same physical core the contents of this file is 1, if not: 0).
Here are some commands to control SMT support (root permissions are required):
Check the SMT state
$ cat /sys/devices/system/cpu/smt/active
Enable SMT
# echo on > /sys/devices/system/cpu/smt/control
Disable SMT
# echo off > /sys/devices/system/cpu/smt/control
Disabling SMT, updating microcode, and applying KernelCare patches will protect your systems against the ZombieLoad vulnerability. Note, only the latter action is applicable to virtual systems (e.g. VMs, VPS and other cloud instance types).
How to update Microcode without reboot with vendor-provided package
This article shows how to update the microcode of Intel CPUs running Linux.
Warning
To avoid possible issues with Microcode updating, enable SMT before the update.
Note
This article is subject to change and will be updated with instructions for other distributions.
Notes
- These steps must be done as root.
- The examples shown are for Debian.
- If you have doubts your systems are fully protected against CPU- and kernel-related vulnerabilities, please get in touch with us.
Updating microcode on Ubuntu and Debian
Find the microcode package download link for your platform
Download the package
Note
Example shown for Debian 9
$ cd <a temporary directory, e.g. /tmp>
$ mkdir firmware
$ cd firmware
$ wget http://security.debian.org/debian-security/pool/updates/non-free/i/intel-microcode/intel-microcode_3.20190514.1~deb9u1_amd64.deb
- Check the downloaded package
$ md5sum intel-microcode_3.20190514.1~deb9u1_amd64.deb

c7bc9728634137453e0f4821fb6bb436  intel-microcode_3.20190514.1~deb9u1_amd64.deb
A list of checksums is on the Debian packages download page.
- Unpack the package
$ dpkg -x intel-microcode_3.20190514.1~deb9u1_amd64.deb
- Check the unpacked files
$ ls -l

total 1896
drwxr-xr-x 5 root root   53 May 15 04:18 etc
-rw-r--r-- 1 root root 1940140 May 17 11:42 intel-microcode_3.20190514.1~deb9u1_amd64.deb
drwxr-xr-x 3 root root   22 May 15 04:18 lib
drwxr-xr-x 3 root root   19 May 15 04:18 usr
- Create a backup of existing microcode:
# test -d /lib/firmware/intel-ucode/ && mv /lib/firmware/intel-ucode/ /lib/firmware/intel-ucode.backup
- Copy the new microcode and check it
# cp -r lib/firmware/intel-ucode/ /lib/firmware/
# ls -l /lib/firmware/ | grep intel-ucode

drwxr-xr-x  2 root root 4096 May 17 11:47 intel-ucode
drwxr-xr-x  2 root root 4096 May 16 20:54 intel-ucode.backup
- Check the current microcode version
# dmesg | grep microcode

[ 2.254717] microcode: sig=0x306a9, pf=0x10, revision=0x12
[ 2.254820] microcode: Microcode Update Driver: v2.01 <tigran@aivazian.fsnet.co.uk>, Peter Oruba
- (Optional) Double check the current microcode versions (revisions per core)
$ grep microcode /proc/cpuinfo

microcode : 0x12
microcode : 0x12
microcode : 0x12
microcode : 0x12
- Check the microcode reload file exists
$ ls -l /sys/devices/system/cpu/microcode/reload

--w------- 1 root root 4096 May 17 11:54 /sys/devices/system/cpu/microcode/reload
- Force the kernel to load the new microcode
# echo 1 > /sys/devices/system/cpu/microcode/reload
- Check the new microcode
# dmesg | grep microcode

[ 2.254717] microcode: sig=0x306a9, pf=0x10, revision=0x12
[ 2.254820] microcode: Microcode Update Driver: v2.01 <tigran@aivazian.fsnet.co.uk>, Peter Oruba
[ 1483.494573] platform microcode: firmware: direct-loading firmware intel-ucode/06-3a-09
[ 1483.495985] microcode: updated to revision 0x21, date = 2019-02-13
[ 1483.496012] platform microcode: firmware: direct-loading firmware intel-ucode/06-3a-09
[ 1483.496698] platform microcode: firmware: direct-loading firmware intel-ucode/06-3a-09
[ 1483.497391] platform microcode: firmware: direct-loading firmware intel-ucode/06-3a-09
- (Optional) Double check the new microcode version (revisions per core)
$ grep microcode /proc/cpuinfo

microcode : 0x21
microcode : 0x21
microcode : 0x21
microcode : 0x21
Updating Microcode on Red Hat and CentOS
For RHEL-based distributions, you can use the microcode_ctl utility to update microcode.
- Get the latest microcode by updating the
microcode_ctlpackage
# yum update microcode_ctl
- Create a force file
Create a force-late-intel-06-4f-01 inside the firmware directory.
# touch /lib/firmware/`uname -r`/force-late-intel-06-4f-01
- Run the microcode update
# /usr/libexec/microcode_ctl/update_ucode
- Force the kernel to load the new microcode
# echo 1 > /sys/devices/system/cpu/microcode/reload
- Check the new microcode
# dmesg | grep microcode

[ 2.254717] microcode: sig=0x306a9, pf=0x10, revision=0x12
[ 2.254820] microcode: Microcode Update Driver: v2.01 <tigran@aivazian.fsnet.co.uk>, Peter Oruba
[ 1483.494573] platform microcode: firmware: direct-loading firmware intel-ucode/06-3a-09
[ 1483.495985] microcode: updated to revision 0x21, date = 2019-02-13
[ 1483.496012] platform microcode: firmware: direct-loading firmware intel-ucode/06-3a-09
[ 1483.496698] platform microcode: firmware: direct-loading firmware intel-ucode/06-3a-09
[ 1483.497391] platform microcode: firmware: direct-loading firmware intel-ucode/06-3a-09
- (Optional) Double check the new microcode version (revisions per core)
$ grep microcode /proc/cpuinfo

microcode : 0x21
microcode : 0x21
microcode : 0x21
microcode : 0x21
Updating Microcode on CentOS 6
- Get the latest microcode by updating the
microcode_ctlpackage
# yum update microcode_ctl
- If
yum update microcode_ctloutputs the following:
Package(s) microcode_ctl available, but not installed.
No Packages marked for Update
you need to install the package manually.
- To install
microcode_ctlpackage, run the command:
# yum install microcode_ctl
The command should output:
Installed:
  microcode_ctl.x86_64 2:1.17-33.11.el6_10

Complete!
- Check CPU microcode version:
$ grep microcode /proc/cpuinfo

microcode       : 9
microcode       : 9
microcode       : 9
microcode       : 9
- Try to update microcode
# microcode_ctl -u
If you see the output:
microcode_ctl: writing microcode (length: 2370560)
microcode_ctl: cannot open /dev/cpu/microcode for writing errno=2 (No such file or directory)
You need to load driver microcode.
- Load driver microcode
# modprobe microcode
- Try to update microcode again:
# microcode_ctl -u
If you see the output:
microcode_ctl: writing microcode (length: 2370560)
microcode_ctl: microcode successfully written to /dev/cpu/microcode
then the update is successful.
- Check version:
$ grep microcode /proc/cpuinfo

microcode       : 17
microcode       : 17
microcode       : 17
microcode       : 17
Plesk related
How to get a KernelCare activation key from the extended Plesk license
Often our clients purchase KernelCare licenses through Plesk/Odin and in such cases, they get a universal key which includes the KernelCare license and other additional keys for Plesk plugins. Such a key has the following syntax - A00B00-0CDE00-F0G000-HIGK00-LM0N00, and initially, it is installed through Plesk automatically and the license gets activated successfully.
However, if it is required to re-register the agent for some reason or simply get the KernelCare activation key separately, it would be impossible to apply the above-mentioned one - we would need to deal with the KernelCare service separately.
To get the KernelCare activation key from the extended Plesk license key, you will need to proceed with the following.
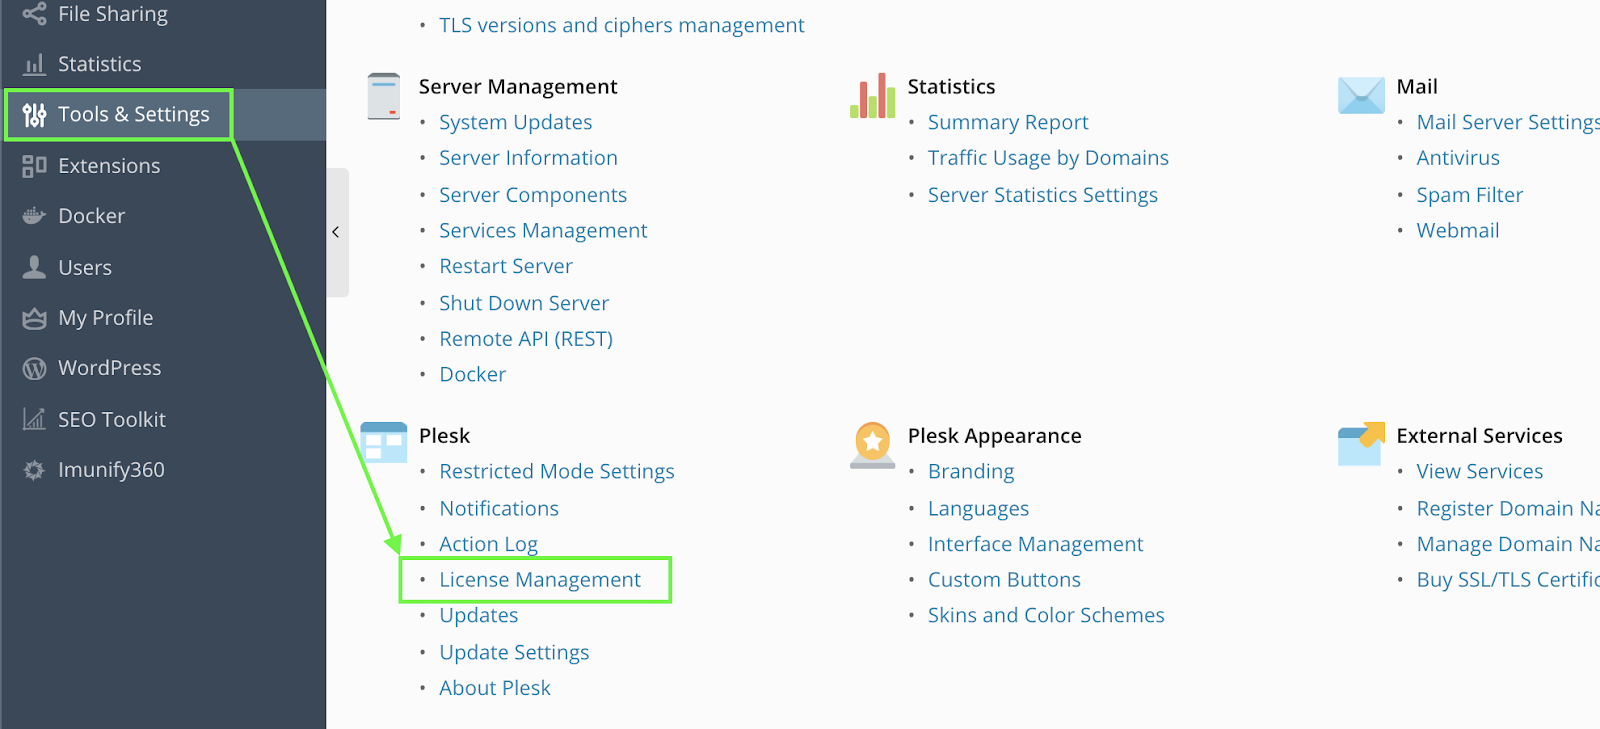
- Navigate to Tools & Settings -> Plesk -> License Management -> Additional License Keys
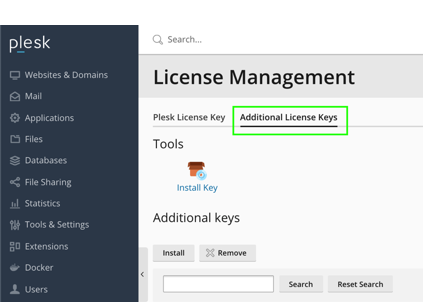
Click Download key next to the KernelCare license listed on the page and open the file downloaded in some text editor
Find the following abstract:
<!--Key body-->
<aps-3:key-body core:encoding="base64" core:type="binary">YOUR_BASE64_ENCODED_LICENSE_KEY==</aps-3:key-body>
<!--Information about additional key-->
This is your base64-encoded key, and it should be decoded using a CLI utility or an online base64 decoder into UTF-8, e.g. https://www.base64decode.org. The new license key should have the following format:
xxxxxxxxxxxxxxxx. It will contain lower and upper case letters and numbers.Use the new key decoded to activate the service:
# kcarectl --register DECODED_KEY_HERE
That's it!
LibCare
LibCare enables security patching of critical userspace shared libraries in-memory without restarting or disrupting the applications using them. It provides security updates for the OpenSSL and glibc libraries on many operating systems including CentOS, AlmaLinux, Oracle Linux, Debian, and Ubuntu.
Library Patching Lifetime
Each individual OpenSSL and glibc library covered by LibCare receives live patches for the same time period as the operating system (including the extended lifecycle support phase). LibCare tracks all releases of OpenSSL and glibc linked in memory at any given time and patches them forward.
Supported Architectures
LibCare is available only for x86-64 (Intel and AMD) architecture.
Installation and upgrade
Userspace processes patching feature is available in the KernelCare package.
Usage
To apply the available patches to all userspace processes, run the following command:
# kcarectl --lib-update
To gather information about what processes were patched, run the following command:
# kcarectl --lib-info
To gather information about applied patches, run the following command:
# kcarectl --lib-patch-info
To unpatch all processes, run the following command:
# kcarectl --lib-unload
Blacklisting
Applying a live patch may clash with software such as anti-viruses that detect or prevent memory updates. While the majority of software is compatible with live patching, for the software that may misbehave, LibCare comes with a default blacklist. The blacklist is located in the /var/lib/libcare/blacklist and contains the list of known applications that may misbehave when live patched. You can override those values by creating the file /var/cache/kcare/userspace/blacklist.
The format of the file is as follows. Patterns should be specified line by line prefixed with pattern type and a colon. Comments start with a hash (#). For example:
 # Symantec Antivirus
 path: /opt/Symantec/*
 filename:symcfgd
 filename:rtvscand
 filename:smcd
Specifying path means that the whole path to binary will be taken into account, while using filename allows you to blacklist a process irrespective of the full path to the binary.
Wildcards are also supported:
 filename:docker*
 path:/usr/libexec/docker/docker-*
Also POSIX regular expressions could be used as follows:
regex:/usr/bin/[[:alnum:]]+
Auto update
Userspace patching cron job is disabled by default. To enable it, run the following command:
# libcare-cron init
Usage in containers
LibCare supports containers natively, including docker, LXC and other containerization technologies. When run on the host it operates on all processes that are running, including processes present in containers. At the same time there are two ways to use LibCare with containers and each has its own advantages and disadvantages. Let's go through them.
Disposable container servers
Disposable container servers are services that are run within a container for a limited time and are refreshed periodically, e.g. daily to get the latest security updates. The recommended way to run LibCare with disposable containers is by installing kernelcare on the host, and it will automatically patch all processes libraries in the containers.
Persistent container servers
Persistent container servers are services that are run in containers the same way as a traditional physical server, i.e. the LXC approach. Although LibCare can run the same way as with disposable containers, it is also possible to install kernelcare within each container and that will enable live patching of the processes of each container individually. That approach enables accurate patching information within each containerized server that can be used by the available vulnerability scanner. When using this approach userspace patching must be disabled on the host using kcarectl --disable-libcare.
Troubleshooting
Auditd logs
The LibCare tools heavily use the ptrace syscall, and if auditd is configured to trace it's calls there will be a lot of records in the logs. There is a rule that is provided by the kernelcare package and is located at /etc/audit/rules.d/kernelcare.rules that will exclude the kernelcare processes from auditd.
Note: no such rule is provided for EL6 due to old autditd restrictions. There is a command that will add such a rule at runtime:
# auditctl -l | grep kcare | cut -d' ' -f2- | xargs -t -L1 -r auditctl -d && pgrep libcare-server | \
    xargs -t -n1 -i auditctl -A exit,never -F arch=b64 -S ptrace -F pid="{}" -k kcarever | \
    xargs -t -n1 -i auditctl -A exit,never -F arch=b64 -S ptrace -F pid="{}" -k kcare
It removes all currently enabled KernelCare rules and adds a new one by LibCare's process ID.
Unpatched Library Detector (UChecker)
Description
UChecker is a scanner that checks network Linux servers and detects out-of-date libraries both on disk and in memory. KernelCare's open-source scanner will find false negatives by correctly reporting vulnerable libraries running in memory that could be reported as updated by other scanners.
The UChecker (originated from "userspace checker") works with all modern Linux Distributions, it is free and open-source, distributed under the GNU General Public License.
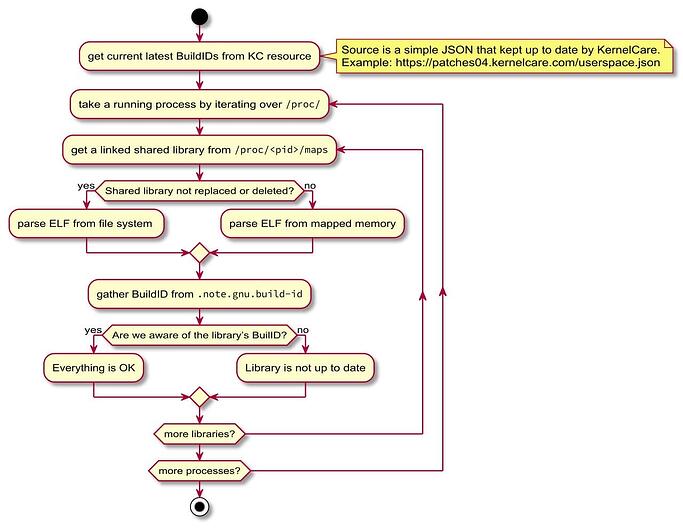
How UChecker works
This activity diagram shows how UChecker works:
UChecker Usage
To scan your systems, run the following command:
$ curl -s -L https://kernelcare.com/uchecker | sudo python
You will receive the following output:
[*] Process httpd[15516] linked to the `libc-2.17.so` that is not up to date.

You may want to update libraries above and restart corresponding processes.

KernelCare+ allows to resolve such issues with no process downtime. To find
out more, please, visit https://lp.kernelcare.com/kernelcare-early-access?
The following information is available in the output:
- Process ID
- Process Name
UChecker Troubleshooting
To see verbose output, you can choose a logging level: ERROR, WARNING, INFO, and DEBUG.
For example:
$ curl -s -L https://kernelcare.com/uchecker | sudo LOGLEVEL=debug python
To learn more, visit the UChecker Github page.
Vulnerability Scanner Integration with KernelCare
This document is made for developers of vulnerability scanners to correctly report live patched vulnerabilities as delivered by KernelCare. There are several approaches that vendors might take to identify vulnerabilities patched by KernelCare correctly.
Easiest: Identifying correctly the effective kernel
KernelCare provides "effective kernel" information in
/proc/kcare/effective_version
Security scanners can check if the file is present, and if it is, use it instead of /proc/version to identify the kernel. This will provide an effective kernel version from a security standpoint.
Alternatively, the command /usr/bin/kcarectl --uname can be run instead of the uname command to detect effective kernel version
Comprehensive: Using OVAL data
KernelCare comes with OVAL data that provides instructions to the scanner to identify the vulnerabilities addressed by the installed live patches. OVAL data are available for the operating systems supported by KernelCare, including AlmaLinux, Red Hat Enterprise Linux, Oracle Linux, CentOS, Debian, and Ubuntu.
The OVAL data cover all KernelCare products and LibCare.
The OVAL data for KernelCare live patching are available at patches.kernelcare.com/oval.
Comprehensive & local: Using the local CVELIST file on each scanned node
KernelCare provides two files listing the vulnerabilities the currently installed live patches address. These files contain a list of CVEs separated by a new line.
The list of vulnerabilities addressed by Kernel live patches is available at:
/proc/kcare/cvelist
The list of vulnerabilities addressed by system live patching (LibCare) is available at:
/var/cache/kcare/libcare_cvelist
