ePortal
TuxCare ePortal is the web management console dedicated to KernelCare Enterprise live patch management.
ePortal software can help protect servers located behind the firewall (i.e. with no internet access) and can be installed both on-premises and in the cloud.
ePortal Hardware Requirements
Disk:
- 100 GB minimum, 200 GB recommended (20GB in case of cache mode)
- SSD with at least 100 IOPS
Note
SSD based storage is a crucial requirement for ePortal server.
CPU:
As far as other requirements concerned, we have tested the following configuration and the following number of connected servers:
10k of connected machines is the maximum for the following requirements:
- VM
- 1 VCPU
- 1 GB RAM
75k of connected machines is the maximum for the following requirements:
- Core i5
- 1 CPU
- 4 GB RAM
Installation
Note
If you are installing for the first time, please confirm with our sales engineering team at sales@tuxcare.com BEFORE trying the installation via the documentation below. Please note that support tickets resulting from not following this recommendation will not be accepted.
ePortal is compatible with 64-bit versions of EL7/8/9 based distros like CentOS 7/8, AlmaLinux 8/9/10, Ubuntu 20.04/22.04/24.04 and Debian 11/12/13
Automated Installation Script
TuxCare provides an automated installation script that simplifies the ePortal installation and configuration process. The script handles repository setup, package installation, and initial configuration.
Supported Distributions
The installer script supports the following distributions:
RHEL-based:
- AlmaLinux 8, 9, 10
- Red Hat Enterprise Linux (RHEL) 8, 9, 10
- Oracle Linux (OEL) 8, 9, 10
Debian-based:
- Debian 11, 12, 13
- Ubuntu 20.04, 22.04, 24.04
Main Features
The installer script automates the following:
- Repository Configuration: Automatically configures the required repositories (Nginx and TuxCare ePortal)
- Package Installation: Installs ePortal and all required dependencies
- Service Validation: Verifies that ePortal service is properly installed and running
- Admin Password Setup: Interactive configuration of the admin user password
- Cache Mode Configuration: Optional configuration to enable patch caching mode (reduces disk space requirements)
- Business Units Configuration: Optional setup for multi-tenant business unit isolation
- Proxy Configuration: Optional proxy server configuration for environments requiring it
- SSL Certificate Setup: Optional Let's Encrypt SSL certificate installation and configuration
- Firewall Configuration: Automatically configures firewall rules for HTTP/HTTPS access
Using the Installation Script
Download and run the installer script:
# curl -O https://repo.cloudlinux.com/kcare-eportal/eportal_installer.sh
# chmod +x eportal_installer.sh
# ./eportal_installer.sh
The script will:
- Detect your Linux distribution and version
- Configure the necessary repositories
- Install ePortal and dependencies
- Guide you through interactive configuration steps
- Optionally configure SSL certificates
After installation, you can access ePortal at http://YOUR_SERVER_IP/admin using the admin credentials you configured during installation.
Note
The installer script requires root privileges and will prompt you to agree to the terms before proceeding.
Manual Installation
If you prefer to install ePortal manually or need more control over the installation process, follow the instructions below.
RHEL-based distros
For installation and workability of ePortal the Nginx web server is required. We recommend to use stable version from the official Nginx repository:
# cat > /etc/yum.repos.d/nginx.repo <<EOL
[nginx]
name=nginx stable repo
baseurl=http://nginx.org/packages/centos/\$releasever/\$basearch/
gpgcheck=1
enabled=1
gpgkey=https://nginx.org/keys/nginx_signing.key
module_hotfixes=true
EOL
You can find more information at https://nginx.org/en/linux_packages.html#stable
Setup ePortal repo:
# cat > /etc/yum.repos.d/kcare-eportal.repo <<EOL
[kcare-eportal]
name=KernelCare ePortal
baseurl=https://www.repo.cloudlinux.com/kcare-eportal/\$releasever/\$basearch/
enabled=1
gpgkey=https://repo.cloudlinux.com/kernelcare/RPM-GPG-KEY-KernelCare-rsa4096
gpgcheck=1
EOL
Note
If you are using CentOS7, starting from ePortal version 2.4-2, it's necessary to install the centos-release-scl package. You can do so with the following command:
# yum install centos-release-scl
For RHEL7 users, you'll need to enable the necessary repositories to ensure access to the required packages. Use the subscription-manager utility with the following commands:
# subscription-manager repos --enable rhel-7-server-optional-rpms
# subscription-manager repos --enable rhel-server-rhscl-7-rpms
For Oracle Linux 7 users, similar to CentOS7, you need to install the oracle-softwarecollection-release-el7 package. This can be done using the following command:
# yum install oracle-softwarecollection-release-el7
Install ePortal:
# yum install -y kcare-eportal
Ubuntu 20.04
Setup ePortal repo:
# apt update && apt install -y --no-install-recommends curl ca-certificates

# curl https://repo.cloudlinux.com/kernelcare/kernelcare.gpg -o /usr/share/keyrings/kcare-eportal.gpg

# cat > /etc/apt/sources.list.d/kcare-eportal.list <<EOL
deb [signed-by=/usr/share/keyrings/kcare-eportal.gpg] https://repo.cloudlinux.com/kcare-eportal/20.04 focal main
EOL
Install ePortal:
# apt update && apt install -y --no-install-recommends kcare-eportal
Ubuntu 22.04
Setup ePortal repo:
# apt update && apt install -y --no-install-recommends curl ca-certificates

# curl https://repo.cloudlinux.com/kernelcare/kernelcare.gpg -o /usr/share/keyrings/kcare-eportal.gpg

# cat > /etc/apt/sources.list.d/kcare-eportal.list <<EOL
deb [signed-by=/usr/share/keyrings/kcare-eportal.gpg] https://repo.cloudlinux.com/kcare-eportal/22.04 jammy main
EOL
Install ePortal:
# apt update && apt install -y --no-install-recommends kcare-eportal
Ubuntu 24.04
Setup ePortal repo:
# apt update && apt install -y --no-install-recommends curl ca-certificates

# curl https://repo.cloudlinux.com/kernelcare/kernelcare.gpg -o /usr/share/keyrings/kcare-eportal.gpg

# cat > /etc/apt/sources.list.d/kcare-eportal.list <<EOL
deb [signed-by=/usr/share/keyrings/kcare-eportal.gpg] https://repo.cloudlinux.com/kcare-eportal/24.04 noble main
EOL
Install ePortal:
# apt update && apt install -y --no-install-recommends kcare-eportal
Debian 11
# apt update && apt install -y --no-install-recommends curl ca-certificates

# curl https://repo.cloudlinux.com/kernelcare/kernelcare.gpg -o /usr/share/keyrings/kcare-eportal.gpg

# cat > /etc/apt/sources.list.d/kcare-eportal.list <<EOL
deb [signed-by=/usr/share/keyrings/kcare-eportal.gpg] https://repo.cloudlinux.com/kcare-eportal/debian/11 kcare main
EOL
Install ePortal:
# apt update && apt install -y --no-install-recommends kcare-eportal
Debian 12
# apt update && apt install -y --no-install-recommends curl ca-certificates

# curl https://repo.cloudlinux.com/kernelcare/kernelcare.gpg -o /usr/share/keyrings/kcare-eportal.gpg

# cat > /etc/apt/sources.list.d/kcare-eportal.list <<EOL
deb [signed-by=/usr/share/keyrings/kcare-eportal.gpg] https://repo.cloudlinux.com/kcare-eportal/debian/12 kcare main
EOL
Install ePortal:
# apt update && apt install -y --no-install-recommends kcare-eportal
Debian 13
# apt update && apt install -y --no-install-recommends curl ca-certificates

# curl https://repo.cloudlinux.com/kernelcare/kernelcare.gpg -o /usr/share/keyrings/kcare-eportal.gpg

# cat > /etc/apt/sources.list.d/kcare-eportal.list <<EOL
deb [signed-by=/usr/share/keyrings/kcare-eportal.gpg] https://repo.cloudlinux.com/kcare-eportal/debian/13 kcare main
EOL
Install ePortal:
# apt update && apt install -y --no-install-recommends kcare-eportal
Docker image
Note
For production deployments, use the -d flag (detached mode) to run the container in the background. For interactive testing or debugging, you can use -it flags instead.
Simple run:
docker run -d --rm --network=host kernelcare/eportal:latest
Run with persistent volume:
docker run -d --rm --network=host \
    -v eportal-volume:/var/lib/eportal/data/ \
    kernelcare/eportal:latest
or mount:
docker run -d --rm --network=host \
    -v /var/lib/eportal/data:/var/lib/eportal/data/ \
    kernelcare/eportal:latest
run with unprevileged user:
WARNING: Volume or mount should be provided, and the owner of the host folder should be equal to the UID that is used with --user option. --network=host option can't be used in this mode.
docker run -d --rm \
    -v /var/lib/eportal/data:/var/lib/eportal/data/ \
    --user <uid of user> kernelcare/eportal:latest
The ePortal image uses several environment variables which are useful for the advanced configuration
| Environment variable | Description | Default value |
|---|---|---|
| EPORTAL_SERVER_STATS_PERIOD | timeout in seconds when eportal send usage statistics | 1 day |
| EPORTAL_AUTO_UPDATE_PERIOD | timeout in seconds when eportal tries to pull updates | 10 min |
| EPORTAL_LIMIT_PATCHSETS | process at most N latest patchsets from patchserver | None (all) |
| EPORTAL_PROXY | proxy connection string | unset |
| EPORTAL_REDUCED_REPORT | do not send detailed stats to patchserver | False |
| EPORTAL_NODE_URL | this node URL (replication setup) | unset |
| EPORTAL_LEADER_URL | leader node URL (replication setup) | unset |
| EPORTAL_REPLICATION_SHARED_KEY | shared secret for replicas (replication setup) | unset |
| EPORTAL_REPLICATION_CHECK_CERT | whether to check node certificate | True |
| EPORTAL_REPLICATION_CLEAN_AGE | replication log retention period in seconds | 7 days |
| EPORTAL_REPLICATION_CLEAN_AGGRESSIVE_AGE | retention period for aggressive policy | 1 hour |
| EPORTAL_REPLICATION_STANDBY | passive mode for node (only receiving changes) | False |
| EPORTAL_CACHE_MODE | pass patch request directly to patchserver without preliminary downloading patchsets | False |
| EPORTAL_PATCH_SOURCE_URL | patch source | https://downloads.kernelcare.com/patch-download/ |
| EPORTAL_PATCH_SOURCE_USER | patch source user, if set, will overwrite patch source configuration in UI | unset |
| EPORTAL_PATCH_SOURCE_PASSWORD | patch source password | unset |
| EPORTAL_BUNITS | enable business units feature (multi tenancy) | False |
| EPORTAL_BUNITS_LOGIN_SELECTOR | allows to select business unit when logging in | False |
| EPORTAL_RADAR_PROXY_ENABLE | enable TuxCare RADAR proxying | False |
| EPORTAL_RADAR_PROXY_BASEURL | TuxCare RADAR URL | https://radar.tuxcare.com |
| EPORTAL_SEND_CHECKIN_PERIOD | servers check-ins report period in seconds | 1 day |
| EPORTAL_ENABLE_ERROR_REPORTING | send application errors to the patchserver | False |
For example, if you need to send reduced stats:
docker run -d --rm --network=host \
    -e EPORTAL_REDUCED_REPORT=1 \
    -v eportal-volume:/var/lib/eportal/data/ \
    kernelcare/eportal:latest
Users management command should be executed in the running container. For example, to create an admin user:
docker exec <container-id> kc.eportal -a admin -p AdminPassword
Image upgrade and downgrade
Typically, upgrading or downgrading ePortal image does not require any additional actions.
Special cases of downgrading:
- Downgrade from versions <= 2.11-1 is not supported
- Downgrade to versions <= 2.11-1 requires additional steps. For example, having data dir created with kernelcare/eportal:2.12-1, you want to downgrade to kernelcare/eportal:2.8-1. First, make a backup of eportal-volume, then proceed with
    docker run --rm -v eportal-volume:/var/lib/eportal/data --entrypoint=python3.8 \
        -it kernelcare/eportal:2.8-1 /var/lib/eportal/data/migration/migratedb.py
Then you can use kernelcare/eportal:2.8-1 image to run container as usual.
Allowed hosts
We must declare the list of allowed hosts in the configuration for security reasons. It help to avoid HTTP Host header attacks. According to your installation, you need to add this parameter into ePortal config file:
ALLOWED_HOSTS = ['node1-yourdomain.example.com', 'node2-yourdomain.example.com']
Instead of an example, use the DNS name(s) of your ePortal server installation. Default value is [].
Cache mode
Cache mode allows to greatly reduce disk usage requirements and speed up initial downloading step.
In cache mode ePortal downloads only lightweight meta information about patchsets and proxies patch requests from KernelCare agent to the patch server (Patch Source). Downloaded patch binaries are cached for 2 weeks and accessible for following requests directly from ePortal and doesn't consume public internet bandwidth.
Enable cache mode
- add the following setting into the ePortal config file:
CACHE_MODE = True
- restart ePortal:
# systemctl restart eportal
For existing installations you have to refetch meta info for existing patchsets:
# kcare/kc.eportal cache-mode --fetch-meta
Disable cache mode
- remove or comment the line below in the ePortal config file:
CACHE_MODE = True
- download missing patchests:
# kcare/kc.eportal kcare download-missing
- restart ePortal:
# systemctl restart eportal
Proxy configuration
ePortal can fetch packages and patches via a customer's proxy server.
On the ePortal machine, you should define the same proxy settings as you use on the command line.
To do so, add PROXY = 'http://example.com:3128' into the ePortal config file:
# echo "PROXY = 'http://example.com:3128'" >> /etc/eportal/config
ePortal also supports a SOCKS5 proxy via socks5:// proxy scheme:
# echo "PROXY = 'socks5://example.com:1080'" >> /etc/eportal/config
Restart ePortal (see the Stopping & Starting section, choose a corresponding OS).
Auth configuration
| Setting | Description |
|---|---|
AUTH_RESTRICTED_INDEX | Allow access to the index page only for registered users |
AUTH_PASSWORD_MIN_LENGTH | Minimal password length, default 5 |
AUTH_SESSION_LIFETIME | Session lifetime in seconds, by default session will last till browser closing |
AUTH_REFRESH_SESSION | If False (default), expires session after lifetime seconds after login. If True, expires session after lifetime seconds of inactivity. |
You can set configuration in ePortal config file.
Managing Users
You can manage portal using kc.eportal user utility:
usage: kc.eportal user [-h] [-a] [-c] [-d] [-p PASSWORD] [-r {admin,readonly}] [--note NOTE] [user]

list available users by default

positional arguments:
  user                  user name

optional arguments:
  -h, --help            show this help message and exit
  -a                    action: add new user
  -c                    action: change user
  -d                    action: delete user
  -p PASSWORD, --password PASSWORD
  -r {admin,readonly}, --role {admin,readonly}
  --note NOTE           description
To add a user:
# kc.eportal user -a -p AdminPassword admin
To change user's password:
# kc.eportal user -c -p NewPassword admin
Set user as read-only:
# kc.eportal user -c -r readonly admin
Authentication using LDAP
ePortal supports LDAP authentication via bind operation. Every user should have a DN with an ability to perform bind request. ePortal doesn't sync users so you don't need to set special DN/password to access LDAP server.
Configuration
LDAP configuration settings are available inside the Settings / LDAP navigation item.
URL
Specifies host, port, and protocol of the LDAP server to connect to.
Format: <scheme>://<host>[:port][?params]
- scheme:
ldap: a verified encrypted TLS connection, you can specifytls=0to use an insecure connection;ldaps: an SSL connection;
- host: hostname or ip of your LDAP server;
- port: custom port, by default 389 for
ldapand 636 forldapsscheme; - params:
strict_check=0: enable/disable strict SSL certificate verification (enabled by default);tls=0: enable/disable TLS handshake on connect (enabled by default);timeout=30: LDAP server connection timeout (in seconds, 5 by default).
For example:
ldap://ldap.forumsys.com?tls=0&timeout=30: use insecure connection with 30s connection timeout.
Connection String (DN template)
Connection string is a DN template used in LDAP bind operation. All %s template placeholders will be replaced with the username from the login form. For example: uid=%s,dc=example,dc=com
Some LDAP implementations support additional templates for bind requests:
- Active Directory accepts the
%s@example.comtemplate; cn=%s,dc=example,dc=comoremail=%s,dc=example,dc=comcan be also valid.
Filter
Filter is an optional setting which specifies parameters for an additional LDAP search request to limit users who have access to ePortal. Usually it is a check of a group a user belongs to. If the search returns a non-empty result the user will be considered authenticated.
Format: <base>??<scope>?<filter>, is a part of The LDAP URL Format RFC
- base: a search base, a root node to perform search from;
- scope: a search scope;
base: search only for base (default);one: search for direct ascendants only (one level deep from base);sub: search in whole tree;
- filter: search filter to apply.
For example: dc=example,dc=com??one?(&(ou=mathematicians)(uniqueMember=uid=%s,dc=example,dc=com))
Note
You can use a %s placeholder in the Filter setting as well. It will be replaced with the username from the login form.
Login process
When a user logs in to ePortal, ePortal checks the user credentials in the local database at first. If the credentials are found, the user will be authenticated, and only if the user credentials are not found, ePortal redirects to LDAP.
When you log in to ePortal with your LDAP credentials for the first time, a user with LDAP username, read-only permissions, and LDAP description is created in the database by default (https://<eportal>/admin/user/).
In the picture, you can see one user created with kc.eportal command line interface and two users logged in with LDAP credentials:

Note
All fresh LDAP users have read-only permissions. You can set admin rights on User edit page by turning off Readonly field.
Basic setup example
The following examples are based on the public test LDAP server ldap.forumsys.com
Here is a list of our users:
~$ ldapsearch -H ldap://ldap.forumsys.com -LLL -x -b 'dc=example,dc=com' '(objectClass=person)' dn
dn: uid=tesla,dc=example,dc=com
dn: uid=gauss,dc=example,dc=com
...
Basic setup only checks if the provided username/password can bind to your directory service. Note: all fresh users have read-only permission so you can safely allow them to login into eportal and set correct permissions individually.
For a basic setup you should fill Url and Connection string settings:
| Setting | Value |
|---|---|
| URL | ldap://ldap.forumsys.com?tls=0 |
| Connection string | uid=%s,dc=example,dc=com |
After that you can login using gauss:password or tesla:password credentials.
Filter setup example
Filter allows you to limit a set of users permitted to login into ePortal, for example users belonging to the mathematicians group.
Here are our example groups:
~$ ldapsearch -H ldap://ldap.forumsys.com -LLL -x -b 'dc=example,dc=com' '(objectClass=groupOfUniqueNames)' dn
dn: ou=mathematicians,dc=example,dc=com
dn: ou=scientists,dc=example,dc=com
...
And mathematicians group attributes:
~$ ldapsearch -H ldap://ldap.forumsys.com -LLL -x -b 'dc=example,dc=com' '(ou=mathematicians)'
dn: ou=mathematicians,dc=example,dc=com
uniqueMember: uid=euclid,dc=example,dc=com
uniqueMember: uid=riemann,dc=example,dc=com
uniqueMember: uid=euler,dc=example,dc=com
uniqueMember: uid=gauss,dc=example,dc=com
uniqueMember: uid=test,dc=example,dc=com
ou: mathematicians
cn: Mathematicians
objectClass: groupOfUniqueNames
objectClass: top
ePortal LDAP settings to limit allowed users:
| Setting | Value |
|---|---|
| URL | ldap://ldap.forumsys.com?tls=0 |
| Filter | dc=example,dc=com??one?(&(ou=mathematicians)(uniqueMember=uid=%s,dc=example,dc=com)) |
| Connection string | uid=%s,dc=example,dc=com |
The filter idea is to find the mathematicians group which has an attribute uniqueMember equal to DN of our user who tries to login. After that you can login using gauss:password but not tesla:password credentials.
Accessing ePortal
To access KernelCare.eportal management console, connect to http://YOUR_IP/admin and enter your login & password.
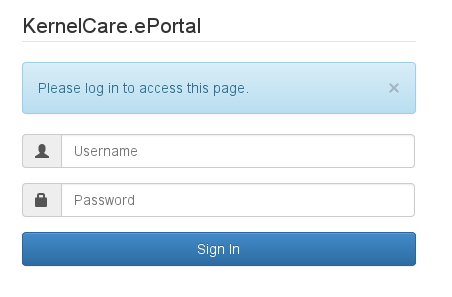
You can manage your login information using the kc.eportal tool
PatchSet deployment
ePortal has a built-in mechanism to download the latest patchsets. To start using it, click the Settings link in the ePortal navigational bar and then click Patch Source. To get access, please contact sales@tuxcare.com and request your ePortal access credentials.
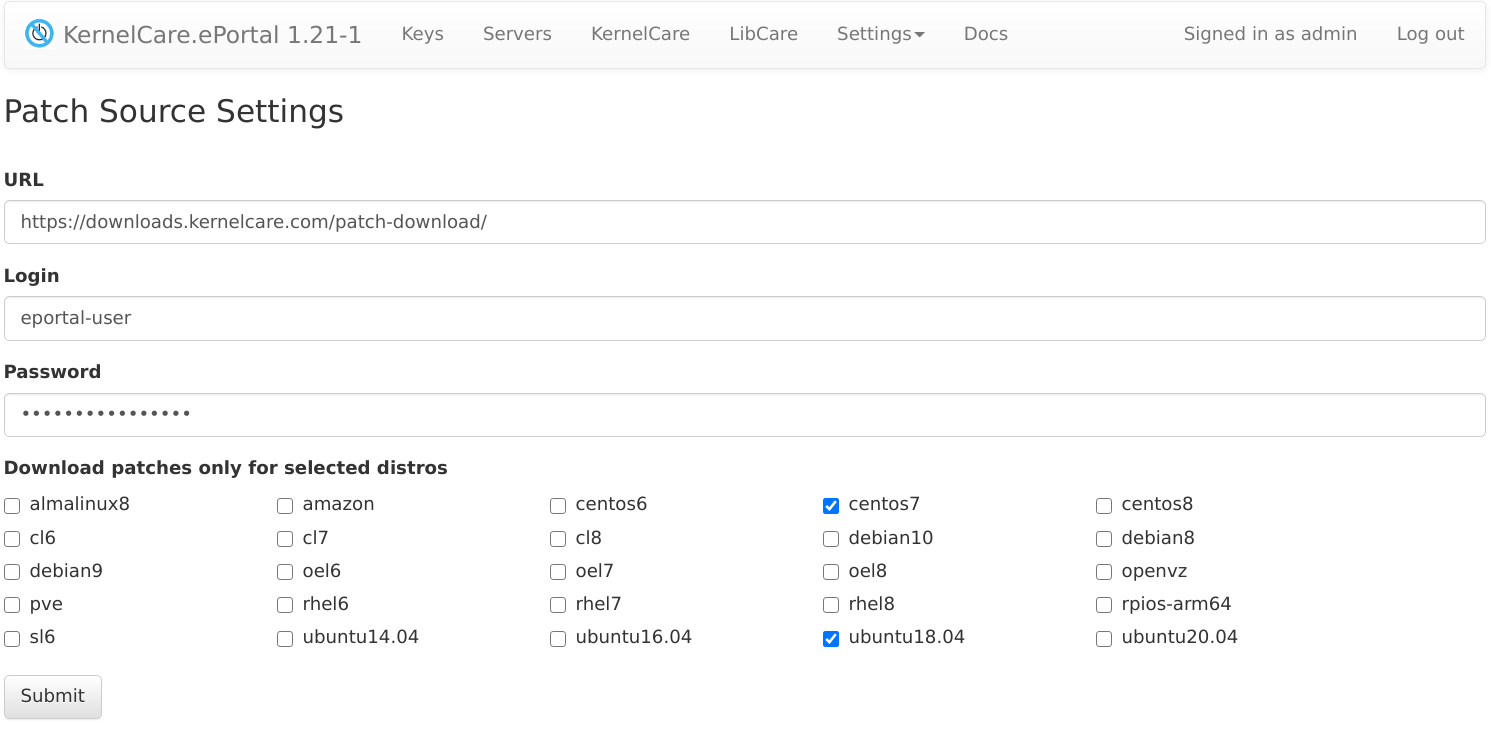
You can choose only a limited set of distros to fetch to reduce disk space and network bandwidth requirements. Once you set up patch source access info, you will get to a list of available patchsets.
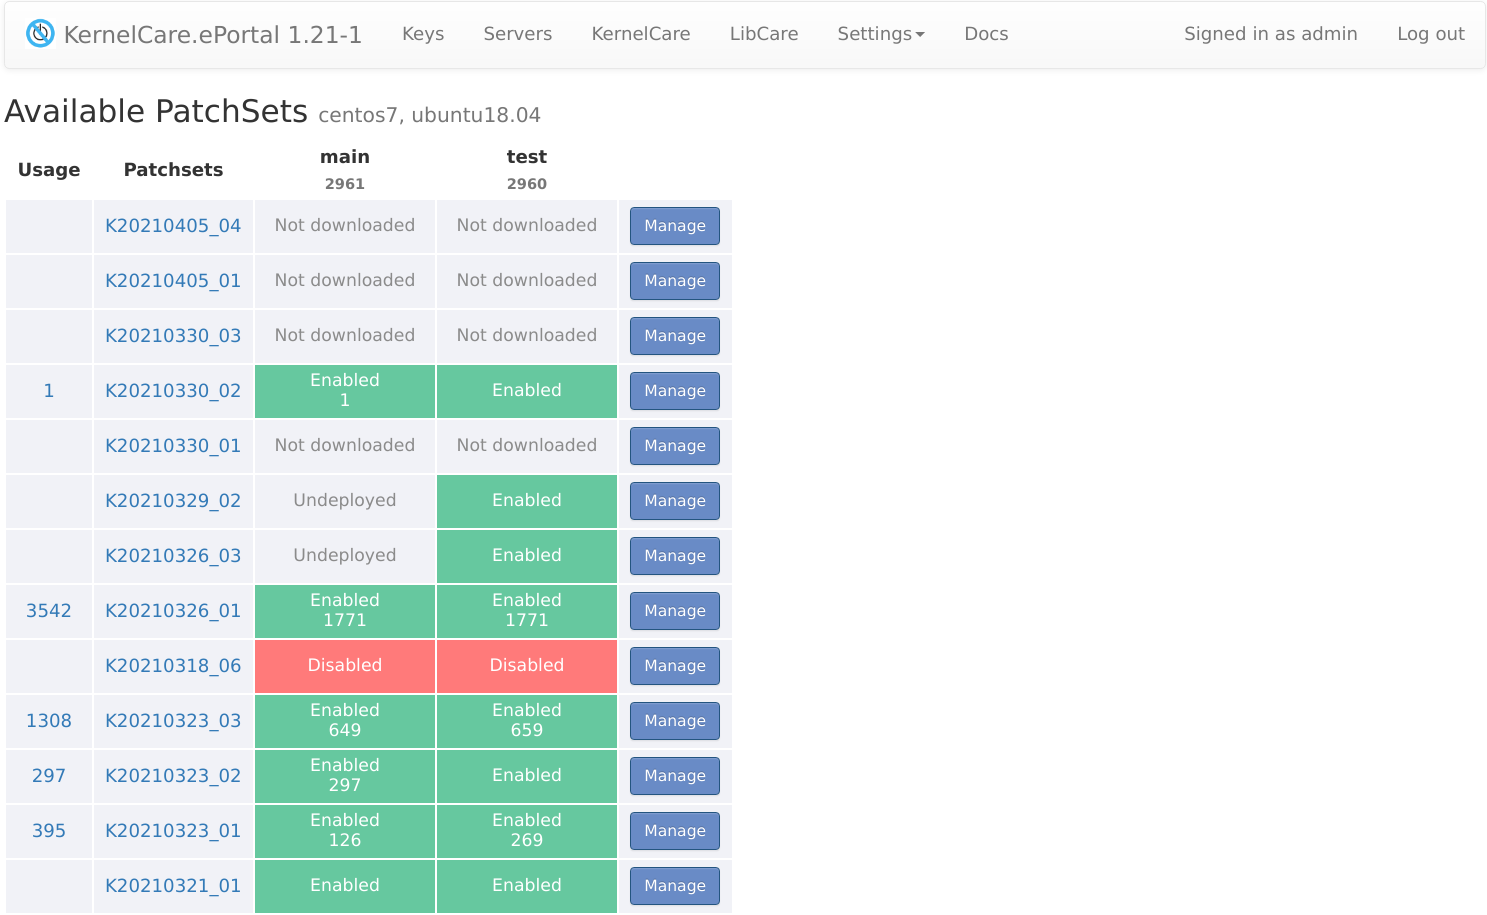
Usage: amount of servers using particular patchset on any feed. You can click on the number to see a list of servers using the patchset. You can filter the patchset list to show only patchsets that are in use by using the Usage column filter.
Patchsets: name of the patchset. Click on a name will show patchset changelog.
Distribution: shows the Linux distributions that this patchset supports. This column helps you identify which patchsets are relevant for your environment. You can use the distribution filter to view only patchsets for specific distributions.
Feed name: cells show patchset deployment and server usage status on particular feed. Numbers are also clickable to filter server list.
Manage: opens dialog to enable/disable the patchset.
Patchset deployment statuses
The dashboard displays different statuses for patchsets in each feed column:
Enabled: The patchset is enabled and available for servers to use.
Disabled: The patchset has been disabled by the administrator. It remains in the feed but is not available to servers.
Blocked: The patchset is blocked on the patchserver, indicating it should not be used (e.g., due to known issues). Blocked patchsets are automatically disabled in ePortal and cannot be managed through the UI.
Undeployed: The patchset has been downloaded but is not yet deployed to the feed.
Not downloaded: The patchset has not been downloaded to ePortal yet.
Not available: The patchset is unavailable for the feed (disabled on the patchserver but not blocked).
Enabled (!): Warning status - the patchset is enabled in ePortal but has been disabled or is no longer available on the patchserver. This indicates a conflict between the local ePortal configuration and the patchserver state. Possible causes include:
- The patchset was disabled on the patchserver after it was enabled in ePortal (e.g., due to discovered issues, deprecation, or replacement)
- The patchset may have been removed from the patchserver for a specific feed or channel
When you see this status, you should review the patchset and consider disabling it in ePortal or updating to a newer patchset if available. Servers using this patchset may encounter issues.
Filtering patchsets
You can filter patchsets on the dashboard page:
Usage filter: Filter to show only patchsets that are currently in use by servers (i.e., have at least one server actively using them). This helps you focus on active patchsets or identify which ones can be safely removed. See the Usage column description above for more details.
Distribution filter: Filter patchsets based on Linux distribution. This allows you to view only patchsets relevant to specific distributions (e.g., Ubuntu, Debian, RHEL-based), making it easier to manage patchsets for your environment. The filter works with the Distribution column to help you find relevant patchsets.
Show unavailable patchsets: By default, patchsets that became unavailable (disabled on the patchserver) are hidden from the dashboard. Enable this toggle to display all patchsets, including those that are unavailable. This can be useful for troubleshooting or viewing the complete list of patchsets.
Manage patchset page

In this dialog you can control which patchsets will be enabled/disabled on corresponding feeds.
Enable all up to this patchset: action will enable all patchsets (excluding disabled) up to this patchset and mark them as Enabled. This action skips any patchsets that are currently disabled, so they remain disabled even when using this bulk enable action.
Enable: action will enable only the current patchset and mark it as Enabled. If the patchset is not yet deployed, it will be downloaded and deployed first.
Disable: action will disable only the current patchset and mark it as Disabled. Disabled patchsets are immune to auto-update and mass-enabling via Enable all up to this patchset action. The patchset remains in the feed but is marked as disabled.
Undeploy down to this patchset: action will undeploy the selected patchset and all newer patchsets in the feed and mark them as Undeployed. Older patchsets remain available in the feed.
(see the Patchset deployment statuses section for details about possible patchset statuses)
To disable a patchset from the CLI, run:
# kc.eportal --unroll 16012017_1
Or use the stream-specific commands:
# kc.eportal kcare unroll 16012017_1
# kc.eportal libcare unroll U20210129_02
If you want to remove a patchset instead of just disabling it, you can use the --delete option:
# kc.eportal kcare unroll 16012017_1 --delete
# kc.eportal libcare unroll U20210129_02 --delete
Automatic updates
You can configure automatic updates by enabling Autoupdate on the desired feeds via LivePatching -> Feeds.
Note
The default feed cannot be configured via the Settings page to receive automatic updates. See the next section on configuring automatic updates for the default feed.
Automatic updates on default feed
It is possible to configure automatic updates on the default feed by creating a cron job. The following commands can be used to receive these updates.
The command below determines if the latest patchsets are available and installs them to the default feed:
# kc.eportal --get-latest
Script to deploy release from a file
If you have no opportunity to connect your ePortal server to the KernelCare patch server to download patchsets directly from it, you can do it manually.
If you have a location with already downloaded patchsets, and would like to identify the latest patchset file to be moved, you can compare the lists of archives you have with the content of the /usr/share/kcare-eportal/arch/ folder.
After that, upload the selected patchsets to your ePortal server and run the kc.eportal --deploy command for each of them.
Example
Lets find out the difference between a test and a production ePortal instances:
$ comm -23 \
    <(ssh eportal-test "ls /usr/share/kcare-eportal/arch/K*.tar.bz2" | sort -h) \
    <(ssh eportal-prod "ls /usr/share/kcare-eportal/arch/K*.tar.bz2" | sort -h) | tee patchsets.diff
Upload patchsets to the production:
$ cat patchsets.diff | xargs -Phav {} rsync -iv eportal-test:{} /tmp/
$ rsync -Phav /tmp/K*.tar.bz2 eportal-prod:/tmp/
Run the deployment tool with patchset file name as a parameter:
$ ssh eportal-prod 'ls /tmp/K*.tar.bz2 | sort -h | xargs -n1 kc.eportal kcare deploy'
2021-12-02 01:25:06,555 - eportal.patches - INFO - K04082020_1 was enabled in main
...
Note
Please note that procedure above should be done for all other types of patchsets (like libcare) separately. Use corresponding file prefixes and commands like kc.eportal libcare deploy.
Clean obsolete releases
The list of provided patchsets is reduced once in a month (old patchsets that have newer versions are removed), but resources are not deleted from ePortal machine. The control of resource deletion is in charge of the ePortal administrator. To free disk space on ePortal old release resources could be removed.
To check what releases will be removed:
# DRY_RUN=1 kc.eportal --clean-releases
To remove obsolete releases:
# kc.eportal --clean-releases
LibCare PatchSet Deployment
Starting from version 1.18, ePortal supports the LibCare patchset management. It is accessible from the Patches / LibCare navigation item. LibCare patches use the same Patch Source credentials, and you don't need to perform additional configuration.
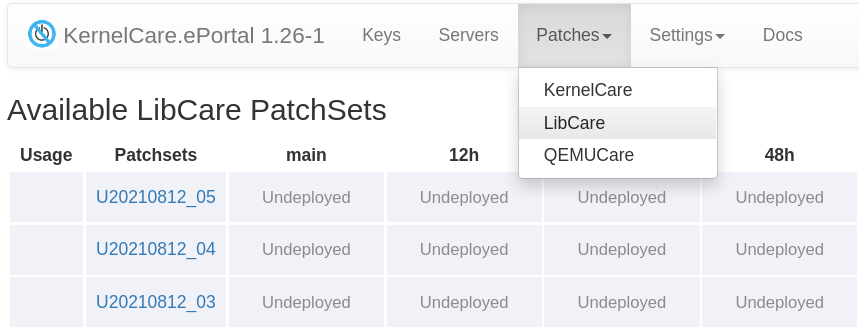
Disable arbitrary patchset
To disable a patchset, run the following command:
kc.eportal kcare unroll K20210129_02
If you want to remove patchsets instead of disabling them, you can use the --delete option:
kc.eportal kcare unroll K20210129_02 --delete
CLI to install the latest patchsets
To update the default feed, run the following command:
# kc.eportal libcare update
To update the test feed, run the following command:
# kc.eportal libcare update --feed test
To update all auto-feeds, run the following command:
# kc.eportal libcare auto-update
CLI to deploy patchset from archive
~$ kc.eportal libcare deploy --help
usage: kc.eportal libcare deploy [-h] [--feed FEED] [--disabled] archive

positional arguments:
  archive      path to archive

optional arguments:
  -h, --help   show this help message and exit
  --feed FEED  feed to deploy archive to
  --disabled   do not enable patchset after deploy
For example:
# kc.eportal libcare deploy --feed test /tmp/U20210129_02.tar.bz2
This command will deploy and enable the U20210129_02 patchset in to the test feed.
QEMU PatchSet Deployment
Note
QemuCare is being deprecated. No new patchsets have been released since January 2025.
Support for QemuCare will be removed in ePortal 2.23 and KernelCare 3.4 (February 2026). To continue using existing Qemu patchsets, use older versions of ePortal and KernelCare that include QemuCare support.
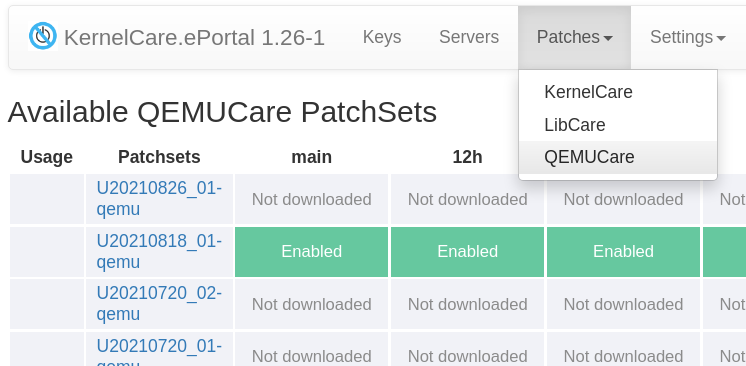
Qemu patchsets are accessible from the Patches / QEMUcare navigation item. QEMU patchsets use the same Patch Source credentials, and you don't need to perform additional configuration.
Command to install the latest patchsets
To update the default feed, run the following command:
# kc.eportal qemu update
To update the test feed, run the following command:
# kc.eportal qemu update --feed test
To update all auto-feeds, run the following command:
# kc.eportal qemu auto-update
Command to deploy patchset from archive
~$ kc.eportal qemu deploy --help
usage: kc.eportal qemu deploy [-h] [--feed FEED] [--disabled] archive

positional arguments:
  archive      path to archive

optional arguments:
  -h, --help   show this help message and exit
  --feed FEED  feed to deploy archive to
  --disabled   do not enable patchset after deploy
For example:
# kc.eportal qemu deploy --feed test /tmp/U20210818_01-qemu.tar.bz2
This command will deploy and enable the U20210818_01-qemu patchset in to the test feed.
Managing Keys
To register new servers you need to create a KernelCare key that will be used for server registration. To go to the list of keys, click the Keys navigation item.

- To edit a key, click
 . The Edit tab opens.
 - To remove a key, click
 . Please note, that removing the key would remove all servers under that key.
 - Click a key to go to Servers tab with the list of servers registered under that key. You can also remove servers on that tab.
To create a new registration click Create tab.
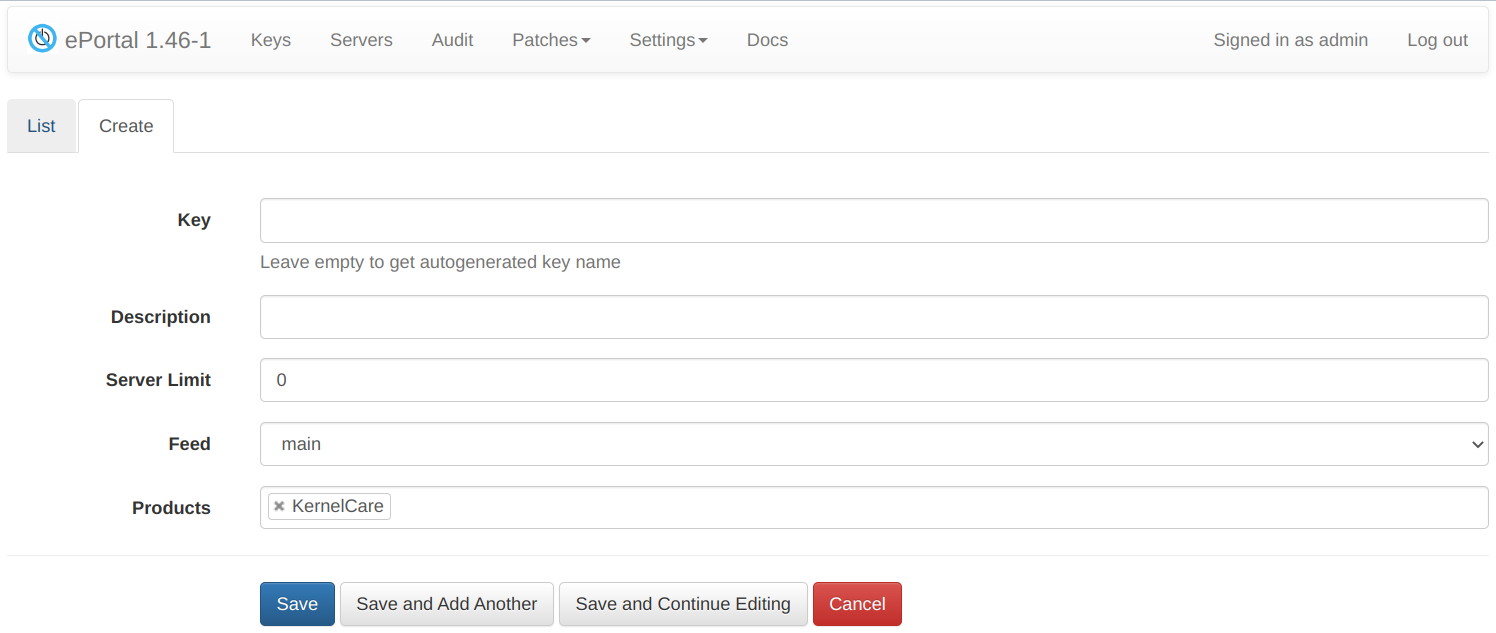
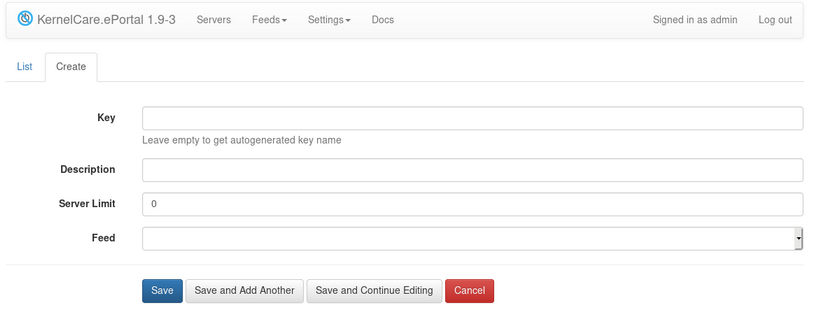
Fill in the following fields:
- Key - you can provide a key value or leave the field empty, so an automatically generated key will be used
- Description - you can provide a description for the key
- Server Limit - the amount of servers that can be registered under that key
- Feed - select a specific feed or leave empty.
- Products - limit allowed products can be used with the key.
Available products:
- KernelCare/LibCare/QemuCare/DBCare: allow only patches of selected type (QemuCare product is being depricated).
- Enterprise Support for AlmaLinux - ESU: allow access to the Extended Security Updates and FIPS repositories.
Products can be mixed to limit access to a particular set of patch types. For example:
- KernelCare + LibCare: allow access only to kernel and lib patches.
For Enterprise Support for AlmaLinux deployment instructions please see the dedicated section
Click Save to add the key. The new registration key will be created and added to the list. The key itself will be used as a part of the registration command on an individual server.
Click Save and Add Another to save this key and add one more key.
Click Save and Continue Editing to add the key and open the key edit tab.
Click Cancel to return to the key list tab without adding a new key.
CLI to manage keys
~$ kc.eportal key --help
usage: kc.eportal key [-h] [-a] [-c] [--note NOTE] [--server-limit SERVER_LIMIT] [--feed FEED]
                      [--product {kernel,libcare,qemu,tuxcare-esu}] [--default-products]
                      [key]

list available keys by default

positional arguments:
  key                   key name

optional arguments:
  -h, --help            show this help message and exit
  -a                    action: add new key
  -c                    action: change key
  --note NOTE           key description
  --server-limit SERVER_LIMIT
                        maximum number of servers allowed
  --feed FEED           feed to associate key to
  --product {kernel,libcare,qemu,tuxcare-esu}
                        products available for the key, can be specified multiple times
  --default-products    set default product list (KernelCare, LibCare, QEMUCare) for the key
List keys:
# kc.eportal key
Autogenerate key:
# kc.eportal key -a
Create key with specified value:
# kc.eportal key -a test
Set feed to key:
# kc.eportal key -c test --feed test
Managing Servers
You can see servers belonging to the key by clicking on the key itself in the Managing Keys interface.
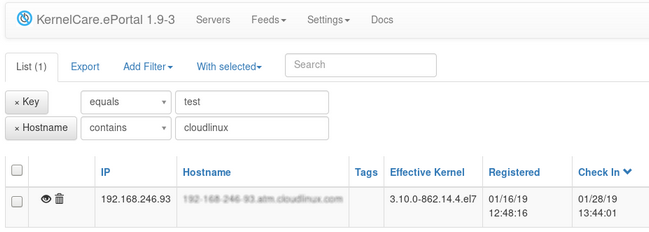
The screen shows servers registered under the key, their IP, hostname, effective kernel as well as the time of registration and last check in.
To view the list of all servers IDs that are connected to the particular key, do the following:
- In the UI go to the page with the list of keys. Then click the particular key. The list of servers connected to this key will be displayed.
To view the list of all servers, use the Servers menu on the navigation bar and select Servers from the dropdown menu. The dropdown menu also provides access to Server tags and Overview pages.

Clickable counters
The counters displayed on the Servers page are clickable. Clicking on any counter will filter the server list to show only servers matching that criteria. For example, clicking on a counter showing "KCare active" will filter to show only servers with KernelCare actively reporting. This provides quick navigation and filtering capabilities. See also the Overview page for similar interactive features.
Also you can use CLI to see pairs of key/number of servers run:
$ kc.eportal --list-servers
Count | Key
----- + --------------------------------
    0 | 2shcolu7Y1x6885Q
    2 | 6J89aS44j6OmTr05
Clean inactive servers
Servers inactive for more than 30 days can be removed using the followed command:
# kc.eportal server clean --inactive
2 servers were deleted
Clean-up of inactive servers can be performed automatically every day or rarer. To enable daily auto clean-up, you can add an option CLEAN_INACTIVE_SERVERS_PERIOD = 3600 * 24 (value in seconds) in the ePortal config file
Show extended check-in statistics in admin UI
A new table is added to the starting page. This table displays the following:
- Total number of servers.
- Number of servers that checked in for the past 48 hours.
The number of servers for each key is listed on the Keys page.
Managing server tags
You can use 'Server tags' page to deal with tags.

Tagging is a convenient way to group servers by any criteria. For example OS, deployment environment, location, etc. You need to create a tag and then it can be assigned to a server from the Managing Servers interface.
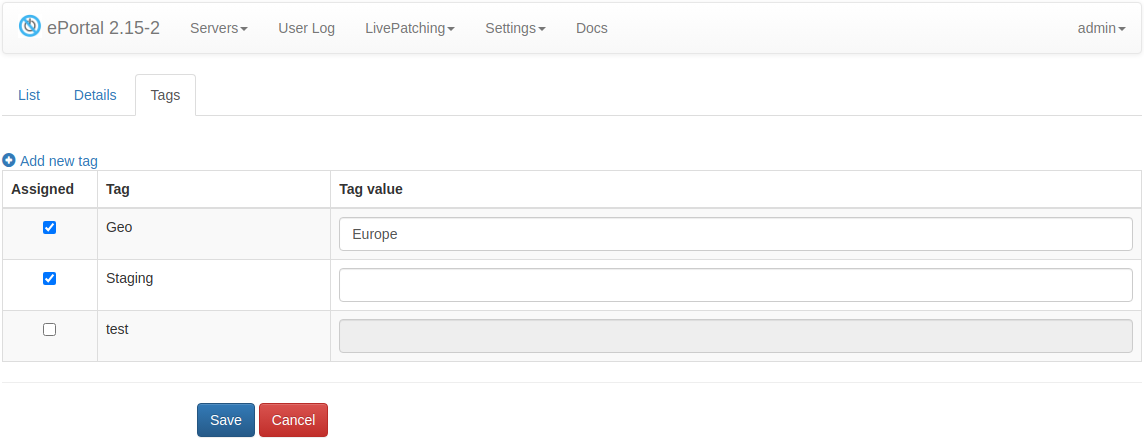
The tag may have an optional value. For example, this allows you to introduce a new geo location without creating a new tag for it.
Using agent CLI to manage tags
To add an extra Tag field for the server, run:
# kcarectl --tag command
where command is a parameter defined by a user. This parameter will be displayed in UI for the server. User could add multiple tags for each server. Each tag should be separated with ; symbol.
Example:
# kcarectl --tag "env:prod;ubuntu"
This server has two tags : env:prod and ubuntu.
env:prod is a parameter that has tag name env and the value prod.

To remove all tags from a particular server, run:
# kcarectl --tag ""
Where "" is a parameter to delete the previously defined tag.
Feed Management
Feeds are intended to manage patchsets on the server, and they provide a possibility to bind a set of patchsets to a specific key. Possible use cases: for preliminary testing of patchsets, for applying updates to groups of servers with the similar hardware, etc.
To get into Feeds Management interface go to LivePatching -> Feeds:

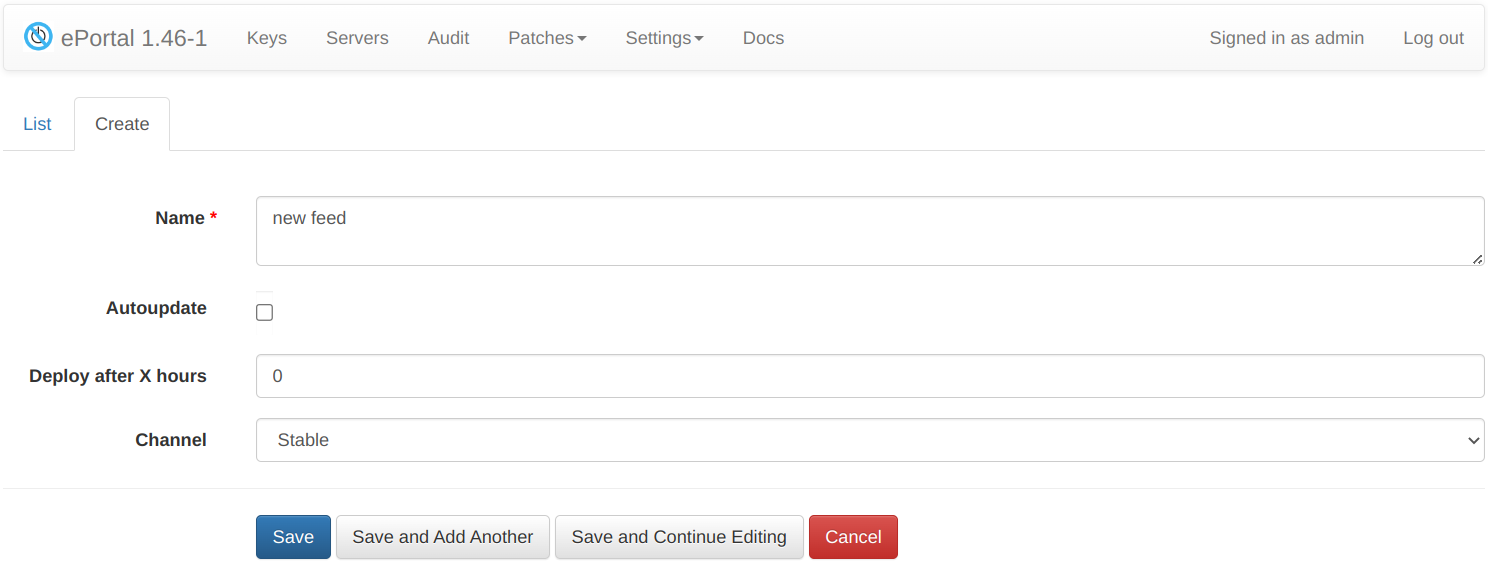
On this page a user can manage the existing feeds: create, delete, edit.

Available options:
Name - a name of a feed.
Auto update - enable and disable automatic downloading of patchsets to this feed.
Deploy after X hours - a delay in hours between the moment the patchset is available for deployment and the moment it is installed to the feed.
Channel - a patch channel to use.
- Stable: (default) stable patchsets marked with
eportallabel on the patch server. - Testing: all patchsets available on the patch server.
- Unstable: patchsets from early-access feed (not recommended).
- Stable: (default) stable patchsets marked with
Every 10 minutes ePortal checks for new patchsets on the main patch server. If a new patch is available, it is uploaded to the ePortal server. Note: it is uploaded but is not deployed.
Note
For information about configuring a client to periodically check and automatically download new patch sets, see client configuration
The patch availability time is considered starting from the moment a new patch appears on the ePortal, and that time is taken into account in Deploy after X hours option. So, if a user sets Deploy after X hours = 10, the patch will be deployed to the feed 10 hours after it has been downloaded to the ePortal server.
To make the feed auto-update immediately, so new patchsets are loaded to the feed immediately after they are available on ePortal, set Deploy after X hours = 0.
A special case is a clean installation when ePortal is installed on a new server (there aren't any downloaded archives with patches and feeds with deployed patchsets, including default feed). In this case, if a user creates a new feed and sets Deployed after X hours option right away, then all patchsets (from the oldest to the latest available) will be deployed to the feed after the specified X hours. This is because the archives are downloaded from scratch and will be considered as "just appeared on ePortal" - that is, all patchsets will have the same appearance time on ePortal from which the option Deploy after X hours will repel.
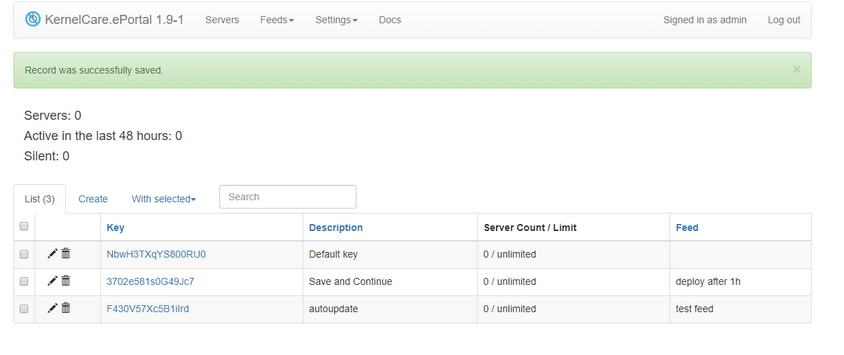
On the main ePortal page, a user can set the corresponding key <> feed pair. This is done in the key creation interface or when editing a key.
By default, a new key is bound to the default feed, alternatively, a user can choose a desired feed from the drop-down menu.
Note
When removing a feed all keys attached to this feed will be moved to the default feed.
CLI to manage feeds
~$ kc.eportal feed --help
usage: kc.eportal feed [-h] [-a] [-c] [--auto] [--no-auto] [--deploy-after hours]
                       [--channel {default,test,unstable}] [feed]

list available feeds by default

positional arguments:
  feed                  feed name

optional arguments:
  -h, --help            show this help message and exit
  -a                    action: add new feed
  -c                    action: change feed
  --auto                update feed automatically
  --no-auto             don't update feed automatically
  --deploy-after hours  deploy after specified hours
  --channel {default,test,unstable}
                        patchset channel to use for this feed
List feeds:
$ kc.eportal feed
Add auto updated feed:
# kc.eportal feed -a test --auto
Change feed into delayed feed:
# kc.eportal feed -c test --deploy-after 12
API keys Management
An API key may be used as an alternative to password authentication when accessing public API endpoints. API tokens provide a more secure way to authenticate APIs because they can be easily revoked without affecting each other, and you don't need to share your credentials.
To get into API keys Management interface go to Settings -> API keys:

On this page a user can manage the existing API keys: create, revoke (delete).

Available options:
- Key name - a name of the API key.
- Expiration date - optional key expiration date.
After generating the key, you will see a bar with a token, as in the picture below.

This token is not stored on the server, so you need to keep it in a safe place. Use this token in an API client as described in ePortal API documentation.
The API key is personal, meaning it is tied to a specific user and inherits their permissions. A user with read-only permissions can only manage their own keys, while an administrator has access to any user's API keys.
Overview page
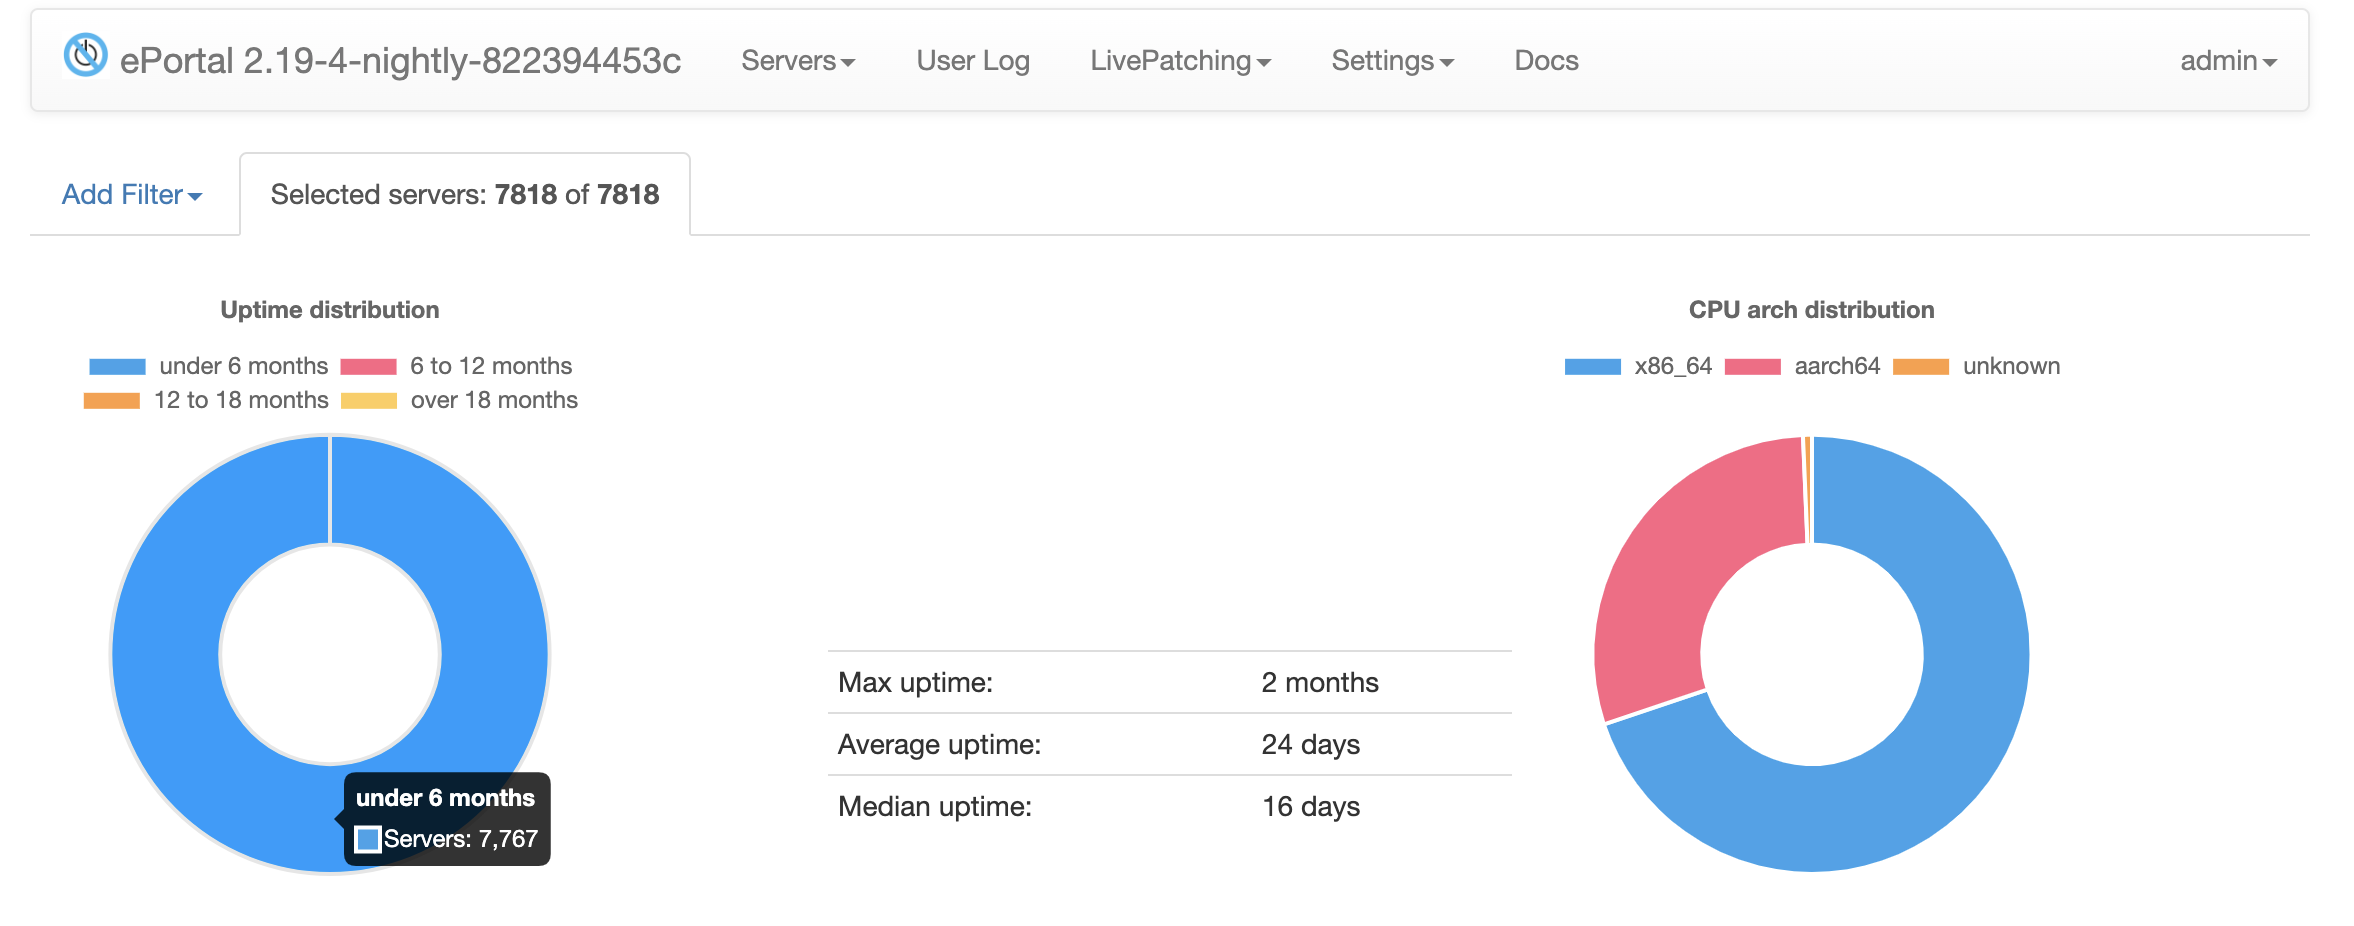
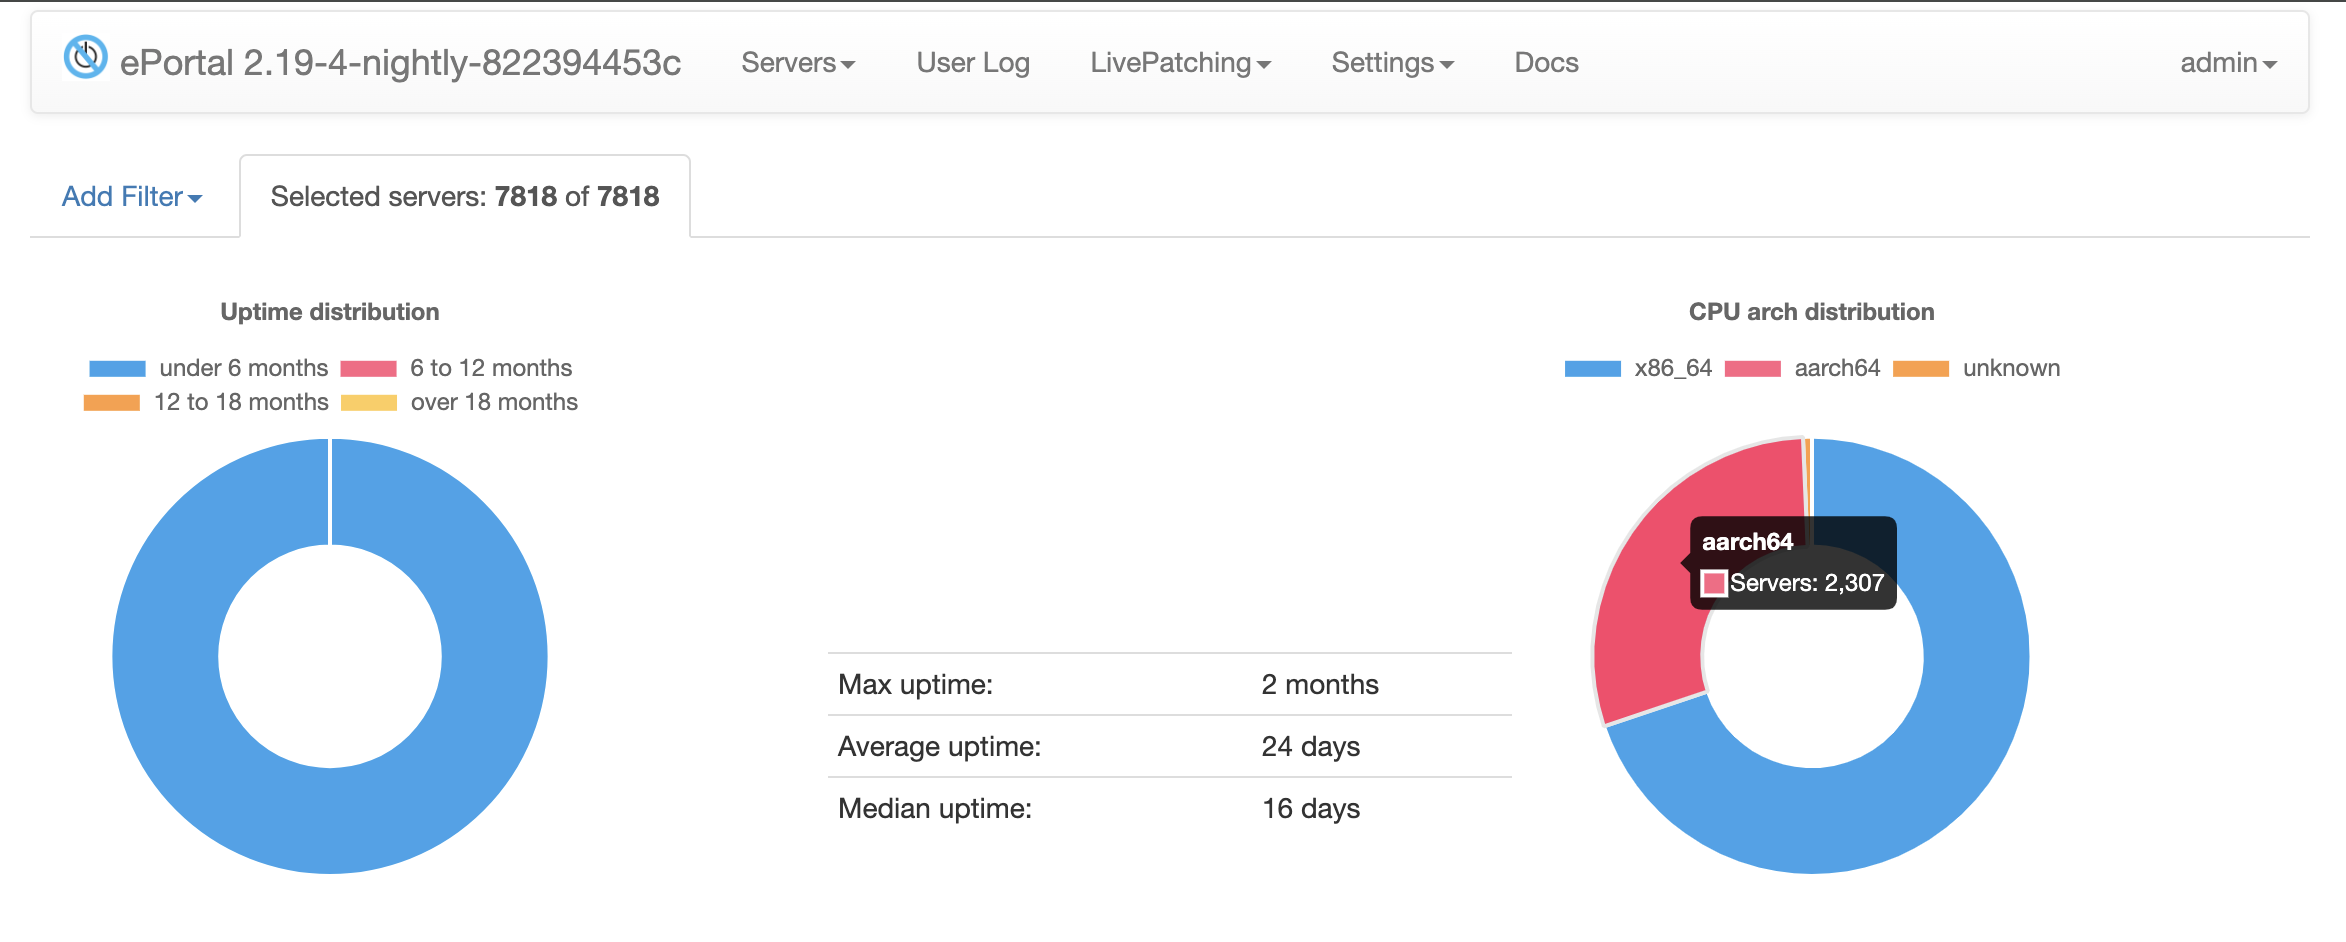
The Overview page provides a high-level summary of all selected servers. It includes data on server uptime, CPU architecture, OS and kernel distribution, and how many servers have KernelCare (KCare) or LibCare enabled.
Uptime distribution
This section shows the uptime of servers where our agent is installed. Uptime refers to how long the server has been running without a reboot.
The donut chart categorizes server uptime into:
- under 6 months
- 6 to 12 months
- 12 to 18 months
- over 18 months
Additional metrics:
- Max uptime — the longest uptime among servers with a reporting agent
- Average uptime — average uptime across these servers
- Median uptime — median uptime across these servers
Interactive charts
You can click on any segment of the donut chart to drill down and filter the server list. This allows you to explore which servers fall into each uptime category and view detailed information about them.
CPU arch distribution
Shows the breakdown of CPU architectures detected on servers. If the architecture is not reported, it appears as unknown.
Interactive charts
Click on any segment of the donut chart to filter the server list and view servers with that specific architecture. See also the Uptime distribution section for similar functionality.
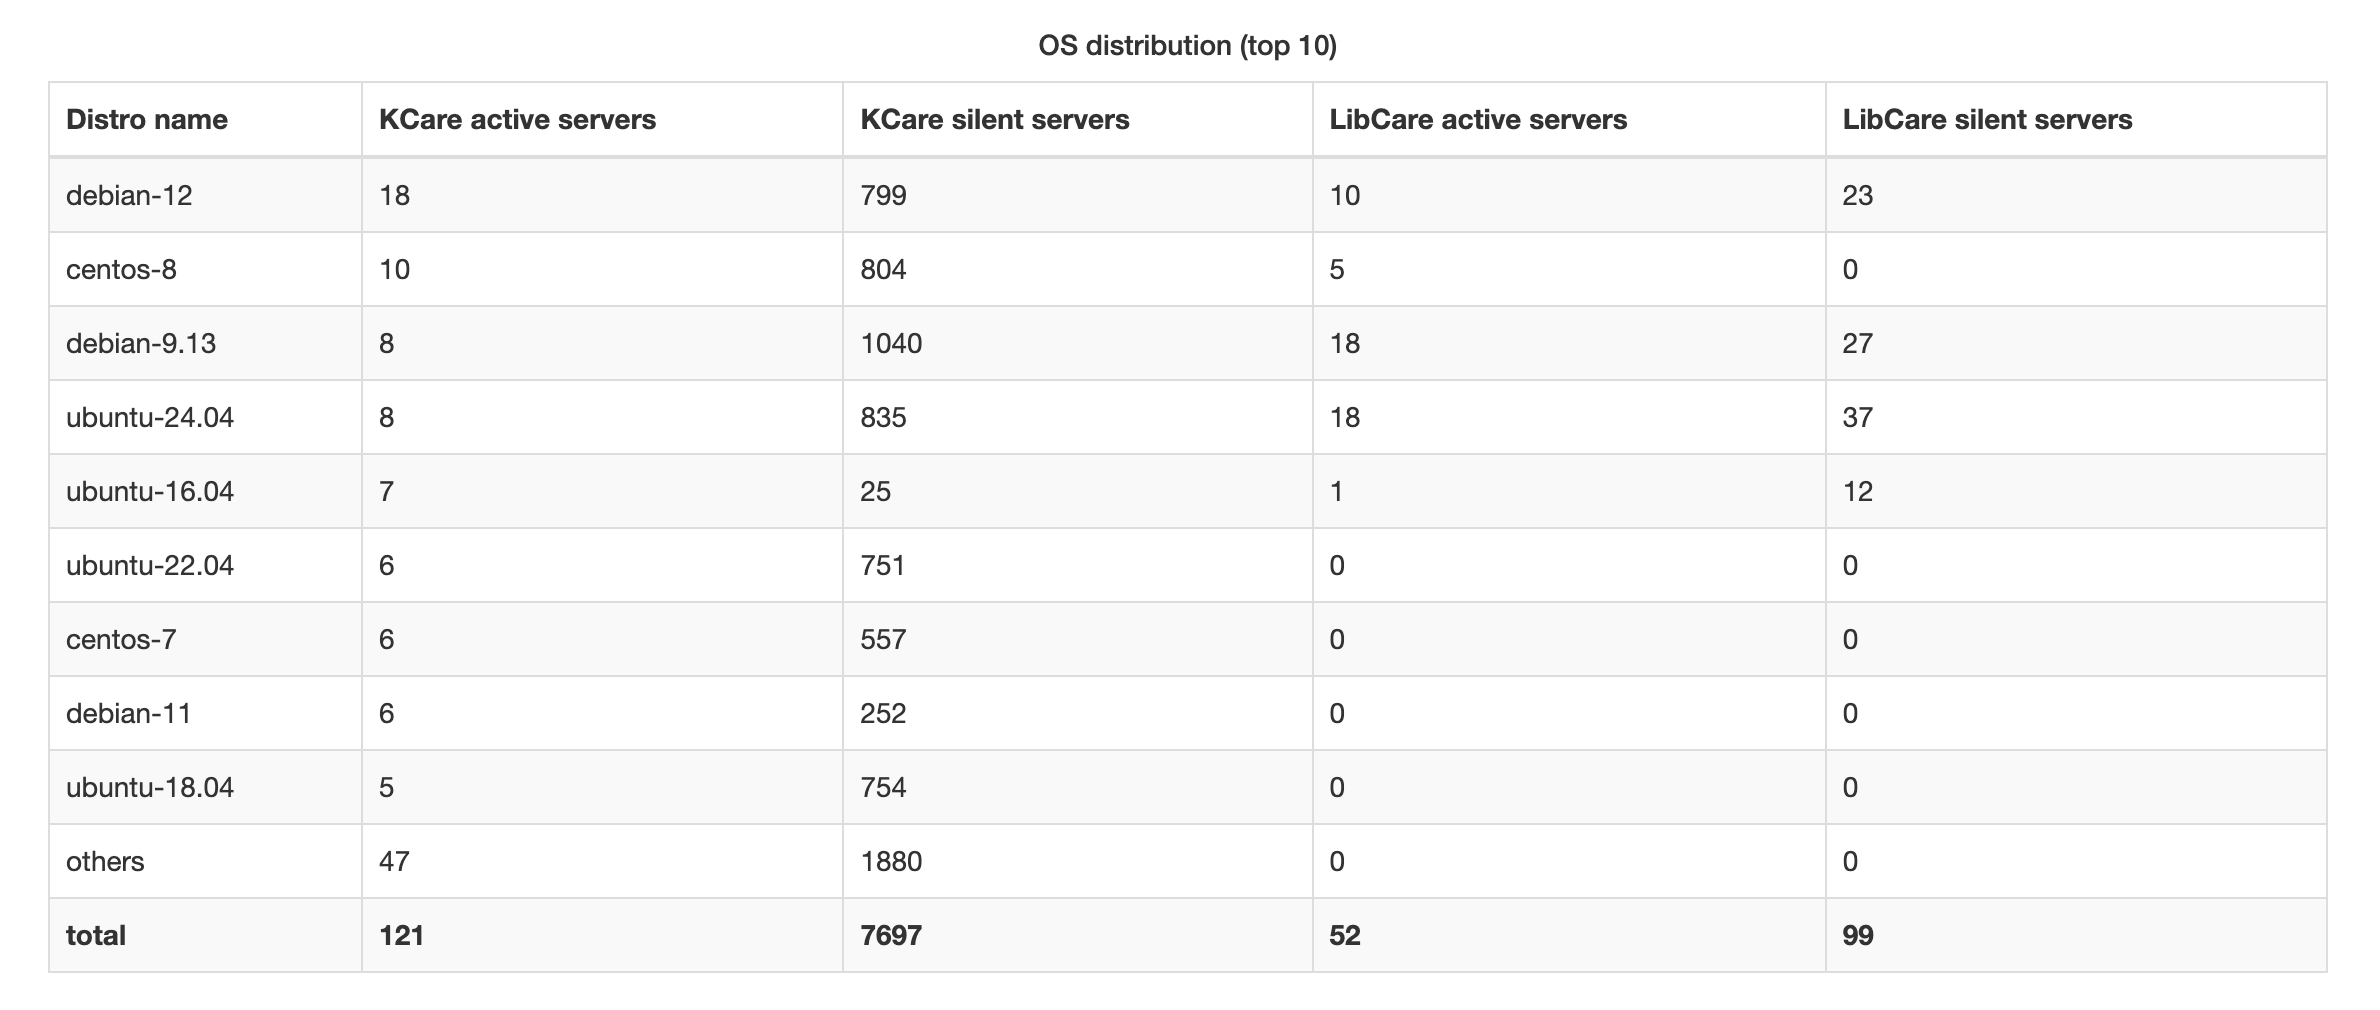
OS distribution
This table displays the top 10 most common operating system distributions among the selected servers, along with how many of those servers have KernelCare (KCare) or LibCare enabled:
- KCare active — server has KCare enabled and is actively reporting
- KCare silent — server has KCare enabled, but is not currently reporting
- LibCare active — server has LibCare enabled and is actively reporting
- LibCare silent — server has LibCare enabled, but is not currently reporting
The LibCare usage statistics show how many servers have LibCare enabled and are actively using it versus those that have it enabled but are not currently reporting. This helps you understand LibCare adoption and usage across your infrastructure.
If more than 10 OS types are detected, the rest are grouped under an "Other" row. A Total row summarizes all servers.
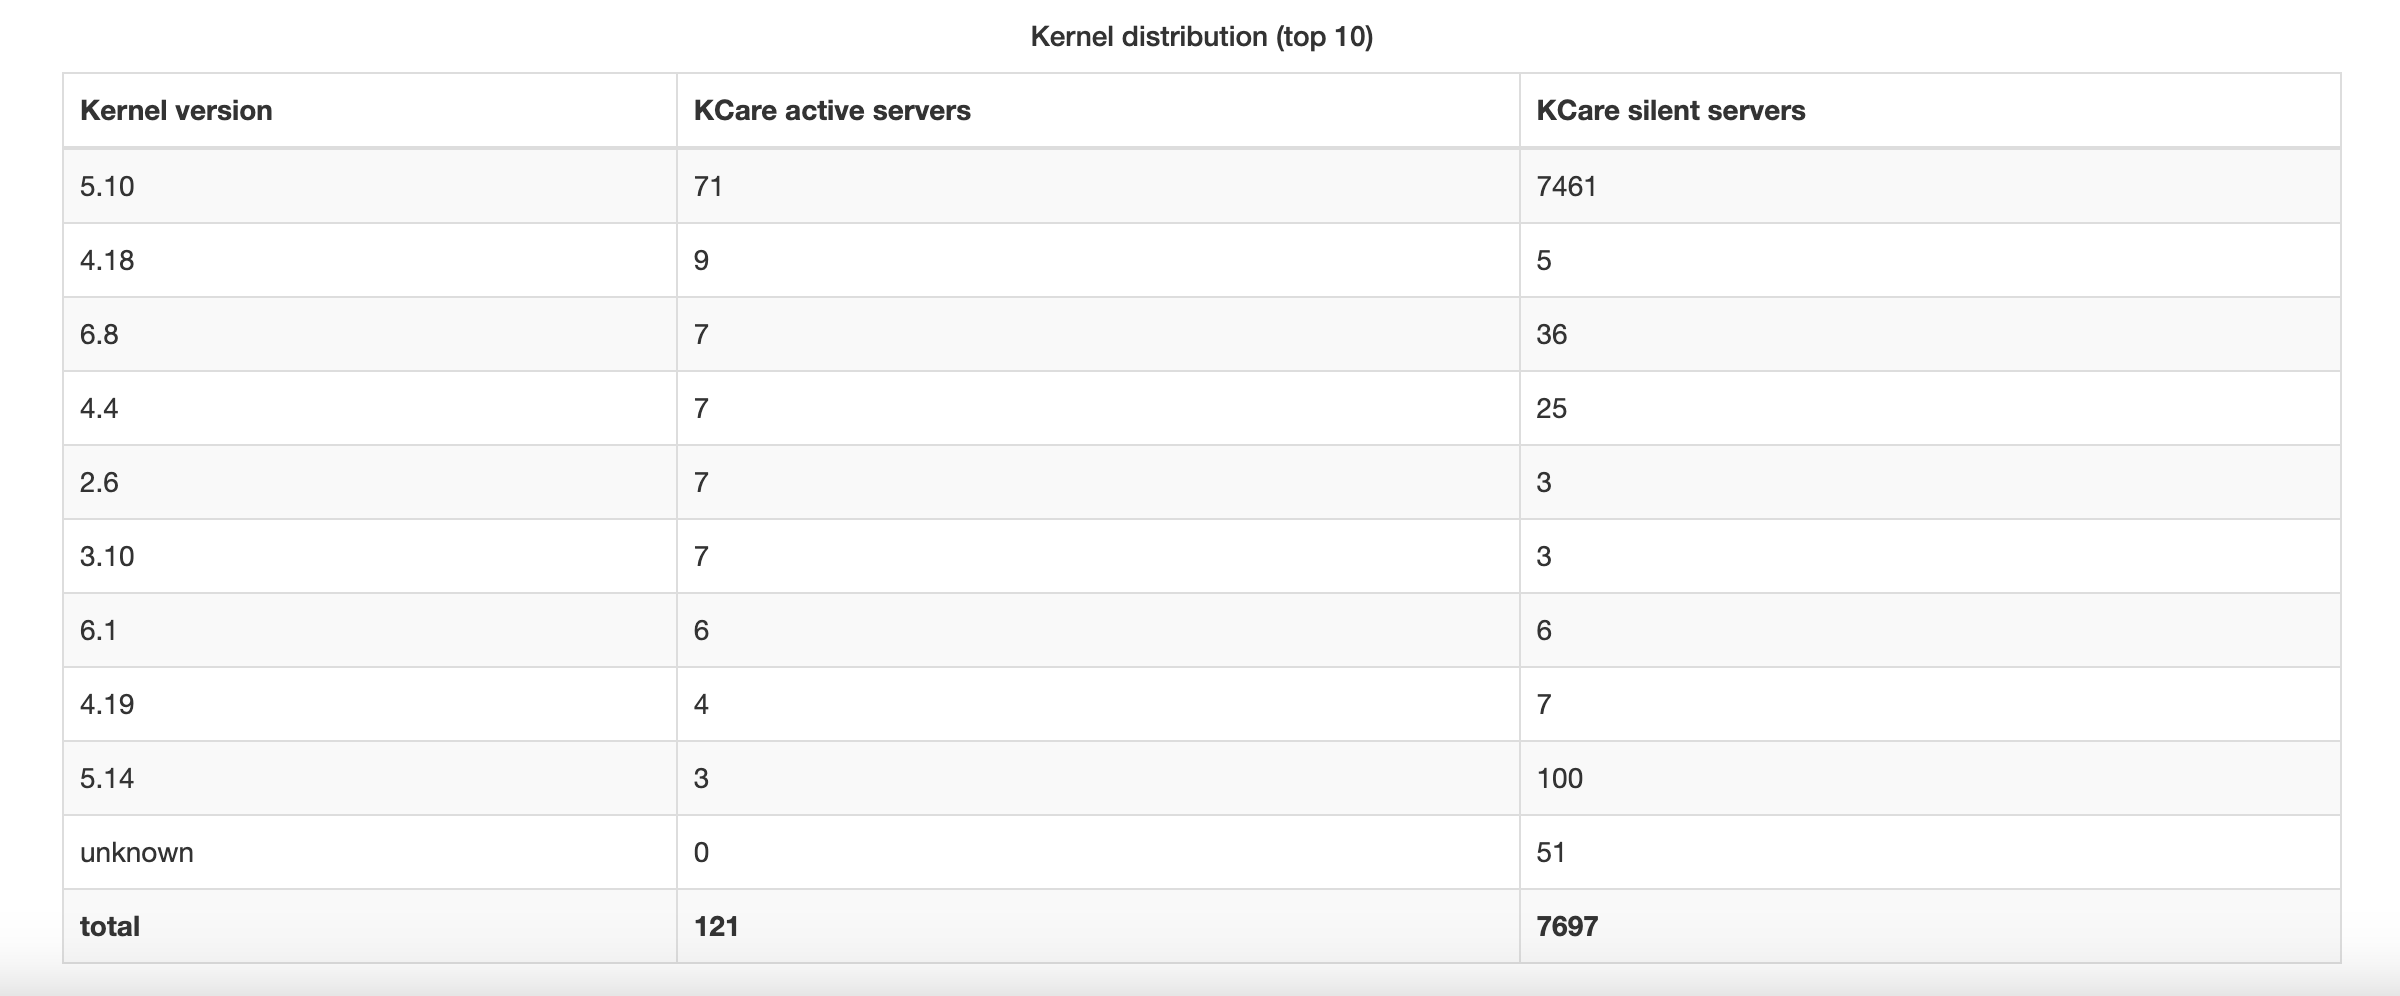
Kernel distribution
This section lists the top 10 kernel versions detected across the selected servers, along with how many servers are running each version with KCare enabled:
- KCare active — server has KCare enabled and is actively reporting
- KCare silent — server has KCare enabled, but is not currently reporting
If more than 10 kernel versions are detected, the rest are grouped under an "Other" row. A Total row summarizes all servers.
Effective kernels
The Overview page also displays a list of effective kernels — the kernels that are actually in use across your servers. This differs from the kernel distribution chart above in that it shows the complete list of active kernels rather than just the top 10, helping you identify all kernel versions that need patch coverage.
How to setup ePortal to use HTTPS
Some assumptions for a server where e-portal is deployed:
Terminate TLS on ePortal public nginx web server
- A firewall allows connections to 443 port.
- Private and public keys are downloaded on the server.
- Edit SSL configuration template according to your certificates:
# mv /etc/nginx/eportal.ssl.conf.example /etc/nginx/eportal.ssl.conf
# vi /etc/nginx/eportal.ssl.conf
- Include this configuration into the main one:
# sed -e '3iinclude eportal.ssl.conf;' -i /etc/nginx/conf.d/eportal.conf
- Restart nginx:
# service nginx restart
Terminate TLS on external balancer
You can use any reverse proxy server of choice to terminate TLS traffic and forward requests to ePortal instance. The only requirement is to provide correct Host and X-Forwarded-Proto headers.
For example balancer nginx config:
server {
   listen       443 ssl;
   server_name  your-eportal-domain;

   # ssl stuff ...
   # ssl_certificate  ...
   # ssl_certificate_key ...

   location / {
      proxy_pass http://eportal-instance-address;
      proxy_set_header Host $http_host;
      proxy_set_header X-Forwarded-Proto https;
   }
}
Update agent configuration
In order to communicate with e-portal, updated to https, you need to modify KernelCare configuration file on all the servers if they have IPs hard coded servers settings.
To do that, update PATCH_SERVER and REGISTRATION_URL options:
# vi /etc/sysconfig/kcare/kcare.conf
So, after editing your /etc/sysconfig/kcare/kcare.conf should contain updated PATCH_SERVER and REGISTRATION_URL environment variables like in the example below:
PATCH_SERVER=https://eportal_domain_name/
REGISTRATION_URL=https://eportal_domain_name/admin/api/kcare
As an alternative you can use ePortal's special endpoint to update patch server address:
# curl -s https://eportal_domain_name/set-patch-server | bash
High availability
Starting from version 1.28, ePortal supports application level replication. It allows to propagate changes in both ways – from a leader to followers and from followers to the leader.
Configuration settings related to replication and can be changed in ePortal config file:
NODE_URL: URL to the self instance, needed for auto-discovery purposesLEADER_URL: URL to the instance from where to fetch changesREPLICATION_SHARED_KEY: authorization key to access the replication dataREPLICATION_CHECK_CERT: use strict TLS cert check for replication requests. It can be useful to deploy self signed certificates on replicas and get encrypted replication traffic without getting proper TLS certificate.REPLICATION_CLEAN_AGE: data age in seconds to leave during oplog cleanup. 7 days by default.REPLICATION_CLEAN_AGGRESSIVE_AGE: data age in seconds to leave during oplog cleanup for not-important operations. 1 hour by default.
A leader node discovers followers automatically and after that fetches the changes.
You can use any convenient way to balance agent requests to the ePortal cluster. For example, you can add multiple IP addresses to the DNS name or use an HTTP balancer.
Basic setup
Prepare two fresh ePortal instances and assign DNS name to IPs. For example:
- eportal1.corp -> 192.168.1.11
- eportal2.corp -> 192.168.1.12
- eportal.corp -> 192.168.1.11, 192.168.1.12
Let's choose
eportal1as a leader andeportal2as a follower.eportal.corpis a cluster hostname to use on servers with KernelCare agent.Warning!
Please do not use a cluster hostname to perform operations with the ePortal admin UI.
On the
eportal1defineNODE_URLandREPLICATION_SHARED_KEYin the configuration file:
NODE_URL = 'http://eportal1.corp'
REPLICATION_SHARED_KEY = 'secret'
- On the
eportal2defineNODE_URL,LEADER_URLandREPLICATION_SHARED_KEY:
NODE_URL = 'http://eportal2.corp'
LEADER_URL = 'http://eportal1.corp'
REPLICATION_SHARED_KEY = 'secret'
- That's it. After ePortal restart on both hosts, changes on the
eportal1will be replicated to theeportal2instance and vice versa.
Note
You can change the KernelCare agent settings to point to a cluster hostname via:
# curl -s http://eportal.corp/set-patch-server | bash
Adding node to an existing ePortal instance
If you already have a working ePortal instance, you can setup a second node, define NODE_URL and LEADER_URL on both instances and trigger full sync on the follower instance:
[root@eportal2.corp]$ kc.eportal replication --full-sync
Monitoring
You can use kc.eportal replication --short-status CLI command to check replication status. It exits with code 1 if there are some issues with replication and outputs JSON:
{
  "ok": true,       // overall health status
  "lag": 1,         // overall replication lag in seconds
  "last_sync": 1,   // overall sync delta in seconds (how many seconds ago was successful communication with an upstream)
  "upstream": {     // per upstream metrics
    "node2": {
      "ok": true
      "lag": 1,
      "last_sync": 1,
    },
    "node3": {
      "ok": true
      "lag": 1,
      "last_sync": 1,
    }
  }
}
Other replication setups
For one leader and two follower setup:
     +-> leader <-+
     |            |
     |            |
follower1       follower2
there is a chance to lose a leader node and follower1/follower2 will not communicate with each other. To mitigate this issue, you can deploy a ring replication:
  +-> node1 --+
  |           |
  |           v
node2 <---- node3
where each instance follows another node.
Caveats
Replication uses HTTP transport. If you deploy ePortal without SSL termination, the replication data will be transferred as-is unencrypted.
For a round-robin balancer setups (DNS or HTTP balancer round-robin) KernelCare agent can run onto replication lag in case of sequential registration and following update. You can introduce 10s timeout or repeat in your configuration management logic to mitigate the issue.
Replication log is kept for 7 days. If a node loses connectivity for more than 7 days it skips some changes.
Deploying KernelCare Enterprise
You can find instructions to install KernelCare agent on http://your-eportal-domain/admin/docs/.
To install agent through ePortal you can use special endpoint http://your-eportal-domain/install-kernelcare:
# export KCARE_MAILTO=admin@mycompany.com
# curl -s http://eportal.mycompany.com/install-kernelcare | bash
# kcarectl --register my-key
Exporting KCARE_MAILTO is an optional step, it helps to configure corresponding entry in /etc/cron.d/kcare-cron to receive all notifications related to failed KernelCare updates.
KernelCare Enterprise client config file
KernelCare Enterprise client configuration file is located in /etc/sysconfig/kcare/kcare.conf
Example:
AUTO_UPDATE=True
PATCH_SERVER=http://10.1.10.115/
REGISTRATION_URL=http://10.1.10.115/admin/api/kcare
If AUTO_UPDATE set to True, KernelCare client will check in every 4 hours, and try to download and apply latest patchsets
PATCH_SERVER - server from which patchsets will be downloaded
REGISTRATION_URL - URL used to register/unregister server
Deployment Automation
It is possible to use automation tools like Ansible/Puppet/Chef/Salt to install and operate KernelCare on a big number of systems.
The deployment process includes:
- Running
http://your-eportal-domain/install-kernelcarescript. You can pre-download it (verify checksum) or directly executecurl -s http://your-eportal-domain/install-kernelcare | bash. - Registering KernelCare agents using an activation key
Ansible
To start the automated deployment, you need to specify the following information:
ePortal server name (or IP) in the
eportal_srvAnsible variable. Other config file options can be found at Config Options and KernelCare client config file (ePortal).an activation key in the
activation_keyAnsible variable. Activation keys can be generated in ePortal as described in Managing Keys (ePortal).
Ansible playbook for deployment phase may look like:
- hosts: kernelcare
  vars:
    eportal_srv: http://192.168.250.19
    activation_key: my-key
  tasks:
    - name: Download the installation shell script
      get_url:
        url: "{{ eportal_srv }}/install-kernelcare"
        dest: /root/kc-install.sh
        mode: '0700'

    - name: Run the installation shell script
      command: /root/kc-install.sh

    - name: register KernelCare agents
      command: /usr/bin/kcarectl --register {{ activation_key }}
Ansible playbook file example for KernelCare agent removal:
- hosts: kernelcare
  tasks:
    - name: unregister KernelCare agents
      command: /usr/bin/kcarectl --unregister
      ignore_errors: yes
      args:
        removes: /usr/bin/kcarectl

    - name: remove kernelcare package
      package:
        name: kernelcare
        state: absent
Changing ePortal IP/domain
You can change ePortal address at any moment by calling two special endpoints on hosts with KernelCare agent:
# curl -s http://your-eportal-domain/set-kernelcare-repo | bash
# curl -s http://your-eportal-domain/set-patch-server | bash
set-kernelcare-repoconfigures new package repo to download agent updates through ePortal.set-patch-serverconfigures new address of patch server.
Deploying Enterprise Support for AlmaLinux
You can find instructions on how to set up Enterprise Support for AlmaLinux on http://your-eportal-domain/admin/docs/
tuxctl is the setup tool for TuxCare's Extended Security Updates product for AlmaLinux. To set up tuxctl through ePortal you can use a special endpoint http://your-eportal-domain/install-tuxcare:
# curl -s http://eportal.mycompany.com/install-tuxcare | bash
# tuxctl --license-key my-key
Where my-key should have the Enterprise Support for AlmaLinux - ESU product enabled.
Migrate ePortal
Here is a procedure to migrate feed/server/key configuration and patchsets data from one ePortal to another. ePortal version on a new host should be >=1.18 and equal or greater than on an old host.
If you migrate from Debian-based to Debian-based system you can simply:
- Stop ePortal on both hosts.
- Copy
/var/lib/eportalto a new host. Note: directory owner must stay aseportal:eportal. - Copy config
/etc/eportal/configif it exists. - Run migration
/usr/share/kcare-eportal/migratedb.pyon a new host. - Start ePortal on a new host.
Migration from RHEL-based distro is more elaborate. Later we refer to a $BASE_DIR variable in scripts. You can export it for RHEL-based distros:
# export BASE_DIR=/usr/share/kcare-eportal
or for Debian-based distros:
# export BASE_DIR=/var/lib/eportal
or for docker-based installation use corresponding data directory. For example if you run a container as docker run -v /var/lib/eportal/data:/var/lib/eportal/data kernelcare/eportal use /var/lib/eportal/data as $BASE_DIR:
# export BASE_DIR=/var/lib/eportal/data
- Stop ePortal on both hosts:
[old-host ~]# systemctl stop eportal
[new-host ~]# systemctl stop eportal
- Remove db files on a new host:
[new-host ~]# rm $BASE_DIR/*.sqlite*
Copy database files
$BASE_DIR/*.sqlite*from an old host to a new host.(Optional) copy runtime LDAP and Feed Source settings
$BASE_DIR/config/config.json.(Optional) copy ePortal web app settings
/usr/share/kcare-eportal/config/local.pyor for new ePortal/etc/eportal/configto/etc/eportal/configon a new host if it exists.Copy
$BASE_DIR/instance-idso our billing can know that the new ePortal was migrated and to avoid double billing.Copy patch data
$BASE_DIR/{arch,resources,user-resources}to a new host.Set file owner. For RHEL-based distros:
[new-host ~]# chown -R nginx:nginx $BASE_DIR
For Debian-based distros:
[new-host ~]# chown -R eportal:eportal $BASE_DIR
Run migration
/usr/share/kcare-eportal/migratedb.pyon a new host.Start ePortal on the new host:
[new-host ~]# systemctl start eportal
Migration to docker container
Let's suppose that we're going to use dockerized eportal on the same host.
The easiest way to migrate is to reuse the data directory. It can be mounted when the container starts.
docker run -d --rm --network=host -v /var/lib/eportal:/var/lib/eportal/data kernelcare/eportal:latest
If you prefer to use a named volume for data-dir then all data should be copied from /var/lib/eportal to the volume (see Docker docs)
If you have custom configuration at /etc/eportal/config you can pass it using environment variables or mount this configuration file directly into the container like this -v /etc/eportal/config:/etc/eportal/config:ro
Backup and restore
Create backup
kc.eportal utility have an option to create a data backup
kc.eportal backup <path_to_archive> - creates an archive with a backup.
# kc.eportal backup /var/lib/eportal/backups/eportal_$(date '+%Y-%m-%d').tar.gz
Backup databases only
To backup only the databases without patchset files:
# kc.eportal backup-db /var/lib/eportal/backups/db_backup
Use the -v or --verbose flag to see operation progress:
# kc.eportal backup-db -v /var/lib/eportal/backups/db_backup
This is useful when you only need to backup configuration and server data without the large patchset files. For full backups including patchsets, use the backup command instead.
Restore data from a backup
Warning!
IMPORTANT: ePortal should be stopped before restore process.
The restore command supports several options to control what gets restored:
--db- restore database data only--config- restore config.json only--instance-id- restore instance ID only--data- restore database and config.json (default)--full- restore all data (databases, config, instance ID, and patchset files)
See the backup section for information on creating backups.
For example, to restore everything:
# systemctl stop eportal
# kc.eportal restore --full /var/lib/eportal/backups/eportal_backup.tar.gz
# kc.eportal kcare download-missing
# kc.eportal libcare download-missing
# systemctl start eportal
To restore only the database and configuration:
# systemctl stop eportal
# kc.eportal restore --data /var/lib/eportal/backups/eportal_backup.tar.gz
# systemctl start eportal
download-missing commands ensure patchset state on disk corresponds with a state in db.
Backup and restore for ePortal docker container
Volume backup process can be performed according to the instructions given here. For example:
docker run --rm --volumes-from eportal -v $(pwd):/backup ubuntu tar cvf /backup/backup.tar /var/lib/eportal/data/
or if you want to make a backup without patchsets (only configs and the database)
docker run --rm --volumes-from eportal -v $(pwd):/backup ubuntu tar
    --exclude '/var/lib/eportal/data/patches'
    --exclude '/var/lib/eportal/data/arch'
    --exclude '/var/lib/eportal/data/resources'
    -cvf /backup/backup.tar /var/lib/eportal/data/
That backup could be restored like this
docker run --rm --volumes-from eportal2 -v $(pwd):/backup ubuntu bash -c "cd / && tar xvf /backup/backup.tar"
Config files
- ePortal config:
/etc/eportal/config. Config for old versions (<1.35):/usr/share/kcare-eportal/local.py. - Web Server (nginx) config:
/etc/nginx/conf.d/eportal.conf. - Data directory:
/var/lib/eportal. - Legacy data directory (RHEL based distros for old versions <2.6):
/usr/share/kcare-eportal.
Stopping & starting
To stop/start/reload/restart configuration of nginx server:
# systemctl stop|start|reload|restart nginx
To stop/start/restart ePortal (Python):
# systemctl stop|start|restart eportal
Log files
ePortal log: journalctl -u eportal
Nginx ePortal access log: /var/log/nginx/access.log
Nginx error log: /var/log/nginx/error.log
Log rotation
By default there is no predefined parameters for ePortal's logs rotation. If you want to enable it for the files listed above:
- Install
logrotatepackage - Create/edit
/etc/logrotate.d/eportalconfiguration file
Example logrotate config:
/var/log/nginx/kcare-eportal.log {
    daily
    rotate 5 # keep 5 last archives
    missingok # it's ok if there is no such file
    notifempty # do nothing if file is empty
    compress
}
Nagios & Zabbix support
KernelCare.ePortal since version 1.2 supports server monitoring similar to Nagios & Zabbix monitoring.
You can curl the API directly to receive the information:
https://yourserver/admin/api/kcare/nagios/KCAREKEY
or you can use https://patches.kernelcare.com/downloads/nagios/check_kcare script by modifying KEY_KCARE_NAGIOS_ENDPOINT in it to point to your server (change https://cln.cloudlinux.com/clweb (link to old UI) or https://cln.cloudlinux.com/console/auth/login (link to new UI) with https://yourserver/admin ).
Note
Access using PARTNER_LOGIN/TOKEN is not supported by KernelCare.ePortal
Usage reports
In common case, usage reports are sending automatically but when it's not possible, ePortal will try to send report as an email. That requires configured Sendmail (SSMTP) on the host. You can find a short instruction below.
If mail sending attempt fails, ePortal will save the reports in /usr/share/kcare-eportal/reports which should be sent manually.
How to configure Sendmail (SSMTP)
First of all you need to install ssmtp:
# yum install -y ssmtp
Edit /etc/ssmtp/ssmtp.conf file in accordance with your SMTP server configuration. Here is a simple config file describing a common way to connect to Gmail accounts:
root=username@gmail.com
mailhub=smtp.gmail.com:587
hostname=localhost
UseSTARTTLS=YES
AuthUser=username@gmail.com
AuthPass=xxxxxxxxxxxxxxxxxxx
FromLineOverride=YES
TLS_CA_File=/etc/ssl/certs/ca-certificates.crt
Actual location of a TLS_CA_Files depends on Linux distribution:
"/etc/ssl/certs/ca-certificates.crt",                // Debian/Ubuntu/Gentoo etc.
"/etc/pki/tls/certs/ca-bundle.crt",                  // Fedora/RHEL 6
"/etc/ssl/ca-bundle.pem",                            // OpenSUSE
"/etc/pki/tls/cacert.pem",                           // OpenELEC
"/etc/pki/ca-trust/extracted/pem/tls-ca-bundle.pem", // CentOS/RHEL 7
Also you could get if from:
# curl-config --ca
Now you can test a connection:
$ echo -n 'Subject: test\n\nTesting ssmtp' | sendmail -v some-recipient@gmail.com
Custom environment variables
You can define your own environment variables for ePortal process.
There is the /usr/share/kcare-eportal/environment folder, which is basically daemon tools compatible envdir.
For example, to disable the default https verification you can set the PYTHONHTTPSVERIFY environment variable to 0 as follows:
# echo 0 > /usr/share/kcare-eportal/environment/PYTHONHTTPSVERIFY`
Authentication using Single Sign On
ePortal supports Single Sign On authentication by "OAuth 2.0" standard, "Authorization Code" flow.
SSO Configuration
To enable SSO you need to configure OAuth2 authentication service provider and ePortal.
Okta Application setup example
You set up your OpenID Connect application inside the Okta Admin Console:
In the Admin Console, go to Applications > Applications.
Click Create App Integration.
On the Create a new app integration page, select OIDC - OpenID Connect for the Sign-in method and then select Web Application as the Application type.
Fill in the Application Settings.
| Setting | Value |
|---|---|
| Sign-in redirect URI | http://eportal_ip/admin/sso/login/callback |
| Sign-out redirect URI | http://eportal_ip/admin/login |
- Obtain Client ID, Client secret, the full URL to the
/authorize,/token,/userinfoendpoints.
ePortal setup
On the ePortal machine, configure SSO settings.
Edit ePortal config file:
OIDC_AUTH_URL="https://dev-61441893.okta.com/oauth2/v1/authorize"
OIDC_TOKEN_URL="https://dev-61441893.okta.com/oauth2/v1/token"
OIDC_USERINFO_URL="https://dev-61441893.okta.com/oauth2/v1/userinfo"
OIDC_LOGOUT_URL="https://dev-61441893.okta.com/oauth2/v1/logout"

OIDC_CLIENT_ID="0Aa134lzhUKj8jDMo5d7"
OIDC_CLIENT_SECRET="AoBNuWRLRu2dxIR3Q0btO53N1entmGxBjQqwmjVL"
Restart ePortal (see the Stopping & Starting section, choose a corresponding OS).
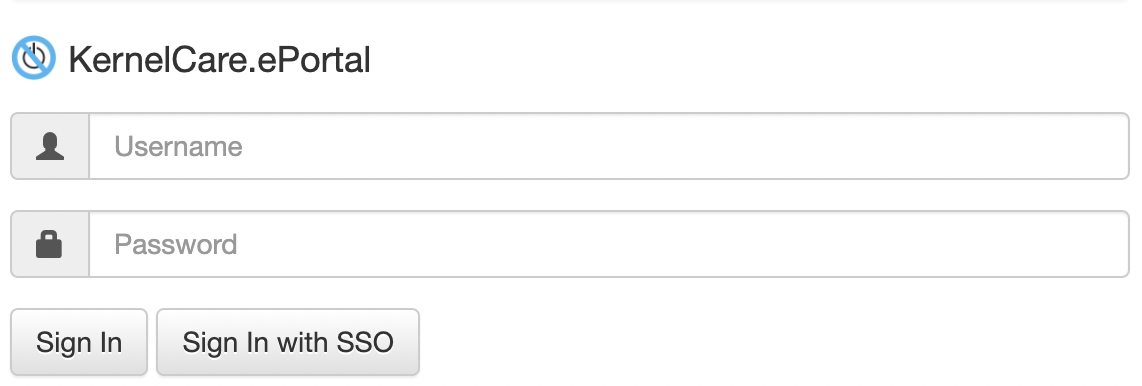
If all settings configured correctly the new Sign In with SSO button has to appear on login page http://eportal_ip/admin/login
Custom patchsets storage
By default patchsets and databases are stored in /var/lib/eportal. You can configure it to use split storage, for example to keep patchsets on external block device.
Note
For ePortal installations prior to version 2.6-1, patchsets and databases were stored in /usr/share/kcare-eportal by default on RHEL-based systems. When upgrading these installations to newer ePortal versions, the original storage location is preserved and continues to be used.
Edit ePortal config file:
PATCHES_DIR = '/path/to/patchsets/storage'
Run:
# kc.eportal sync-nginx-conf
It initializes storage and makes corresponding modifications to nginx config to serve patchsets from a new place.
And restart nginx and eportal services to apply changes:
# systemctl restart eportal nginx
Troubleshooting
If you have any questions regarding setting up and operating ePortal, please reach out to the support team. To simplify the analysis of a problem, it is often necessary to provide additional information about the system environment. It is recommended to use the ePortal CLI to collect this information and submit it to support.
Run:
# kc.eportal doctor
In order for the auto-submission to work, you need to configure patch source (see PatchSet deployment).
If you experience problems configuring the patch source or have problems accessing the Internet, you can generate a report and submit it manually.
# kc.eportal doctor --no-send
The above command will create an archive with the collected data and output the path to it. You can inspect the contents of the archive if necessary and then send it to the support team.


